| engnrsrule's Albums | |||
| Album Title | Pictures | Last Picture | |

|
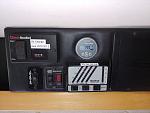
Installation of Victron Battery Monitor
My Roadtrek's original battery configuration was one 12V rated at 90 ampere hours. I found this inadequate when the propane function of my refrigerator went out and I had to run on 12V, while staying in in a state park with no shore tie and very limited hours when generators could be run.
I upgraded the battery to two 6V Golf cart batteries rated at 235 aH. This has proven much better for our typical 2 or 3 days of boondocking. I also felt battery monitoring would be advisable so I could determine how fast we were depleting and plan charging needs accordingly. The Victron utilizes a shunt between the 12V system and Battery negative terminal. It allows you to determine current draw of equipment and estimate the amount of time before batteries need external charging. I mounted the shunt in the Roadtrek's "electrical compartment" close to where the negative lead to the battery was located. I put the control interface on the Roadtrek's "Control Center." The pictures show the basic Victron Monitor, but I subsequently upgraded to the bluetooth model which gives me a full readout on my phone. |
5 | 01-17-2020 02:52 PM |

|
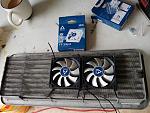
Gas Absorption performance mods
These are the mods I did to provide forced airflow to improve performance of my Dometic absorption refrigerator. The results have been good, but don't expect miracles. Absorption fridges have their limits and this kind of mod is a help. It consists of two low current draw (0.3a) fans which exhaust the void are behind the refrigerator, a sheetmetal baffle (made from a piece of dryer duct) to force the airflow through the fins, and a thermostatic switch that turns the fans on and off based on the air temp at the fins. The switch can be illuminated but I did not connect the lights, since I don't like extraneous lights at night and did not want the current draw.
The thermostatic switch allows setting the “on” temp from 90-130°, and turns off after a 20° drop. 12V power to this system was tapped off of the cabin furnace blower. To better monitor the refrigerator performance I added a wireless thermometer that displays freezer and refrigerator compartment temperature. All parts obtained on Amazon AcuRite 00986M Refrigerator/Freezer Wireless Digital Thermometer (~$20) Two ARCTIC F9 Silent, 92 mm Fans with Standard Case (~$8 each) NTE Electronics 54-240W Waterproof Miniature Illuminated Rocker Switch, SPDT Circuit, ON-OFF-ON Action (~$8) Emerson 3F05-1 Adjustable Snap Disc Fan Control (~$12) Important factors: The fans are not needed when you are rolling. In extreme heat the system works better if you can park with the refrigerator vents on the shady side. It is helpful to remove the mounting frames of the grills while working in the space as it allows better access. Make sure you know which wires are 12v and which are 120V. If you are not comfortable working with vehicle wiring hire a professional. Be mindful of anything making contact against wires or tubing. Road vibration can cause wear at any contact point. Minimize use of flammable materials. The ventilated space behind RV refrigerators are sealed from the cabin. Make sure you do not compromise that seal as you run new wiring from other locations to this space. Consider current draw for the fan system, which is more important when you are boondocking. Having an off option is helpful, no sense running the system if you don’t need it. Try not to compromise the ability to remove the refrigerator for servicing as necessary. This may mean using connection plugs for the fans or the thermostatic switch instead of hard wiring. Also make sure the baffle does not block access to the gas fittings or 120v plug. In this installation I relocated the 120v plug to above the baffle. Fortunately it was a surface receptacle with sufficient extra cable to allow relocation. Make sure the baffle does not impede the exhaust vent of the refrigerator's propane burner. |
5 | 01-17-2020 02:10 PM |