 |
|
 10-29-2006, 12:01 AM
|
#1
|
|
Platinum Member
Join Date: Oct 2006
Location: New Brunswick, Canada
Posts: 8,828
|
 Macerator waste pump in the 4" pipe - Roadtrek
Newer Roadtreks come with a macerator waste pump. Here's how you can put one in the 4" pipe on your Roadtrek.
I got the idea from RV Sani-Con. More info here:
http://www.emptythetanks.com/road-trek-rvs-install.html
re: the Empty_the_Tanks installation method, I suggest drilling a few drain holes in the bottom of the 4" black pipe to make sure you don't flood the pump if your installation leaks. The outer end of my black pipe has a raised inner lip; 1/2" or more of water could accumulate in the pipe without drain holes.
Basically, I used their idea with a few differences. I only need a flat head screwdriver to remove the pump if necessary.
Here's what my first try looked like:

The hose attachment was in too far. It was hard to reach.
So, I made an elbow adapter to make attaching the hose easier.
Pipe up:

Pipe down:

Elbow:

Elbow in travel position:

Under Van Clearance:

|

|

|
 01-06-2007, 04:30 AM
|
#2
|
|
Platinum Member
Join Date: Oct 2006
Location: New Brunswick, Canada
Posts: 8,828
|
I learned something on rv net a while back about how much the output of your macerator pump is reduced by using a smaller hose.
I thought my 12 gpm pump (rated through 1") effectively became a 9 gpm pump when I use 3/4" hose but I was wrong. I was calculating diameter not area.
The fact is I only get approxiately 6.75 GPM because I am using a 3/4" instead of a 1" discharge hose.
12 GPM down to 6.75 GPM!
|

|

|
 01-16-2007, 05:27 AM
|
#3
|
|
Platinum Member
Join Date: Oct 2006
Location: New Brunswick, Canada
Posts: 8,828
|

I originally made a portable macerator:


On the pump inlet you have two choices; a 1-1/2" hose barb or 1-1/2" N.P.T Male threaded. The pump outlet is 1" hose barb.
I went to a hardware store and the rep glued together two black plastic fittings for me. One was a 1-1/2" N.P.T female pipe fitting and the other was a coupling or collar of some sort. The end result was that the 1-1/2" N.P.T Male threaded inlet was converted to a 2+" smooth surface, perfect to fit into the rubber fitting shown in the above photos.
(I did this two years ago so I can't remember the exact sizes of what I used.)
That 2+" smooth surface came in handy when I installed the pump permanently. I bought a rubber pipe connector from Home Depot and used it as a bushing to take the 2+" up to 3" so the blue hose would fit nice and snug.
These are not the exact rubber fittings but they give a general idea what they look like.
Used originally when portable:

Used later as a bushing to take the 2+" up to 3" so the blue hose would fit tight and not leak. I took those hose clamps off because it went inside the blue hose. I did use two hose clamps to secure the blue hose to the bushing/pump.

|

|

|
 01-28-2007, 02:08 AM
|
#4
|
|
Platinum Member
Join Date: Oct 2006
Location: New Brunswick, Canada
Posts: 8,828
|
Here are some photos of connected discharge hose.
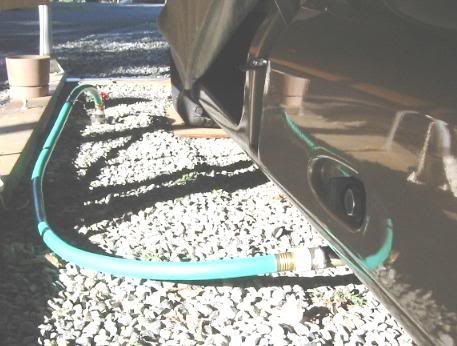
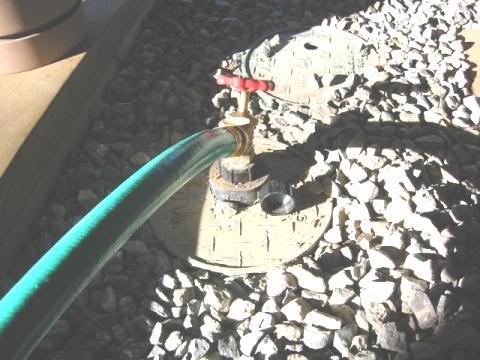
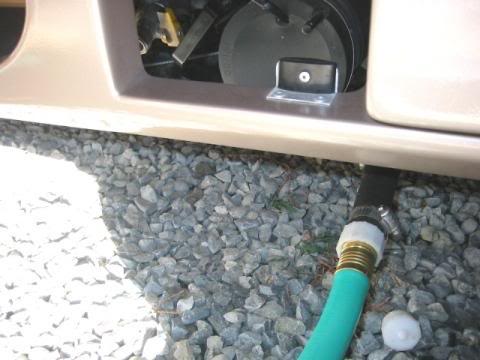
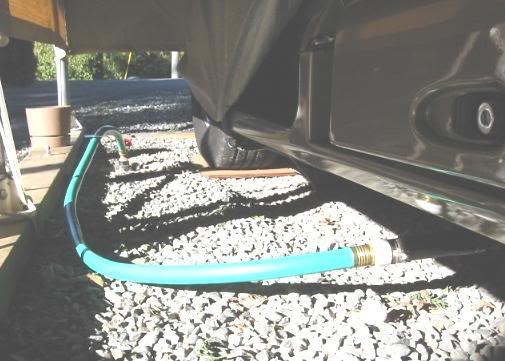
When we dug out the sod in preparation for road base and gravel we found two 4" sewer cleanouts about 1 foot down. I would never have known they were there. These covers make it easy to access them.

I've since cut a hole in one cover to fit this:

I've used the faucet from the beginning - no problems - two years now. It looks small but has 3/4 stamped on it. I use 3/4 garden hose. Having something to connect the output hose to was more important at my previous house because the cleanout was on the side of the house.
|

|

|
 02-24-2007, 05:15 PM
|
#5
|
|
Platinum Member
Join Date: Oct 2006
Location: New Brunswick, Canada
Posts: 8,828
|
|

|

|
 02-24-2007, 08:35 PM
|
#6
|
|
Platinum Member
Join Date: Dec 2006
Location: Kansas City, Ks. Suburb
Posts: 896
|
Neat setup!!
__________________
Bob & Sharon
2019 Winnebago Travato K (2018 Chassis)
Past RV's: 2013 WGO ERA 70A, Chevy PW Lexor
Itasca Navion, 29' Jayco 5th Wheel
|

|

|
 04-11-2008, 03:04 AM
|
#7
|
|
Platinum Member
Join Date: Oct 2006
Location: New Brunswick, Canada
Posts: 8,828
|
I just thought I should update this thread:
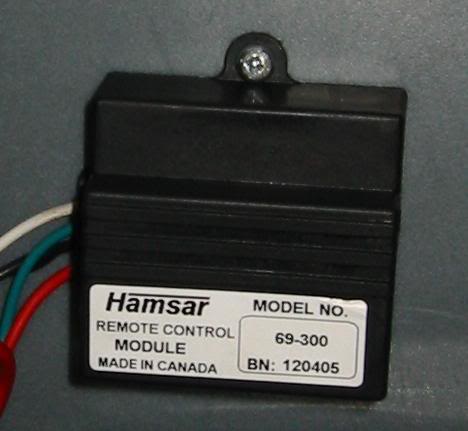
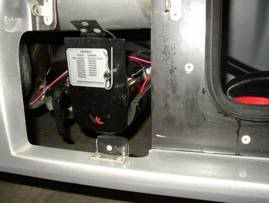
When I installed the macerator I put a wireless remote switch on it. I got the switch from Wal-Mart for around $20 and it was rated 20 amps - perfect for the pump. It worked from inside my RT 
Here's a photo of the remote module installed the side compartment for anyone who's interested in this idea. I kept the clicker in the glove box.
|

|

|
 01-01-2009, 06:52 AM
|
#8
|
|
Platinum Member
Join Date: Oct 2006
Location: New Brunswick, Canada
Posts: 8,828
|
 Re: Macerator waste pump in the 4" pipe - Roadtrek
I used this idea from RV Sani-Con as the basis for my installation:
http://www.emptythetanks.com/
Quote:
The RV Sani-Con System provides an alternative method to empty the tanks on Road Trek RVs.
The Road Trek is a very popular RV. According to the manufacturer, all of the comforts of a big rig are presented in a much smaller package. At the request of several Road Trek owners, we will offer an alternate method to the tank emptying system furnished as standard. Based on the patented RV Sani-Con System, you can easily reach into the adjacent storage compartment and remove a 1 diameter x 21 foot long discharge hose and nozzle. Remove the 1 drip cap on the discharge nozzle and place the nozzle into the sewer. Open the valve of the tank you would like to empty and flip a switch, empty the tanks, and simply store the hose away. If your vehicle has a compartment next to the sewer pipe compartment, you should be able to install the system as below. We make no warranty that you system is as shown, however. This is offered as a suggestion only. You may want to consult your technician to determine the suitability of this installation.
The installation of the RV Sani-Con Model RT6003 is very simple and you do not abort or alter the function of the factory installed hose carrier system. You will need a saber saw with a blade to cut plastic pipe, a Phillips screwdriver, a straight blade screwdriver, a marking pencil that will show on black pipe, a 1 ¼ hole saw, ½ bit, and electric drill. You will also need a drop light, or a large flashlight.
General Installation Information
Generally, to install the RV Sani-Con Model RT6003, you will prepare the 4 carrier pipe to receive a pump and motor that is connected to the existing 3 flexible sewer hose. Then the discharge of the pump is connected to the 1 x 21foot hose furnished with the RV Sani-Con System. A hole is made in the compartment wall to allow the discharge hose to be stored in the adjacent compartment. The power circuit is hooked up to the vehicle battery and the basic installation is complete.
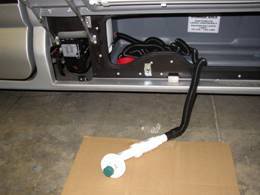
Specific Installation Information
First, remove the pin on the hinged door and lower the 4 black carrier pipe. Remove the heavy web loop that holds the pipe off the ground when you remove the blue hose. Remove the black plastic adapter on the end of the blue hose, and stick the hose back down into the pipe. Next we will prepare the slot in the 4 pipe to receive the pump and pump discharge barb. With a felt tip pin marker that will shine or mark on the 4 black pipe, make a mark at the 1 oclock position on the pipe wall, below the steel pin that is fastened to the pipe. (this is the pin that holds the pipe in place on the hinged door). Measure down 1 ¼ to the 3 oclock position on the end of the pipe. Draw a line on the pipe that is 7 long from the end of the pipe on each mark. This line should be straight and parallel to the pipe center. At the end of the lines, connect the ends so you will know when to stop sawing. You will not need to saw the short 1 ¼ line marked, you can just lift it up and break it off. Before starting to saw the opening, push the blue hose down into the 4 pipe to prevent the saw from cutting into the hose. You can block the hose with a screwdriver at the view port cut into the 4 pipe. The cutting maneuver requires a little caution to get the saw set to make the parallel cuts. Stop the saw at the end of the 7 line. Then simply lift the 11/4 piece that is 7 long up and break it off. The pipe is soft and the piece will easily be removed. Now the slot will allow the pump to slide into the 4 pipe.
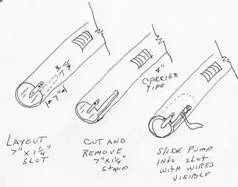
Before you install the pump and motor, pull the blue sewer hose from the pipe, place the 3 clamp that is included with the pump and motor over the end of the blue hose. Slip the blue hose over the gasket on the inlet of the pump. The gasket is an exclusive of RV Sani-Con and makes for a proper non-leaking connection. Tighten the clamp snugly but do not over tighten and bite a hole into the blue hose. Slide the motor into the pipe and align the discharge of the pump into the slot until it bottoms out at the end of the slot. Store the two wires from the pump motor in the slot for the time being.
At this time, lift the pipe up and return the web pipe hanger back to the vehicle frame. Place the pin into the hinged door and install the locking pin. The discharge of the pump should be pointing toward the wall of the compartment next to the pump and motor. With the marker pen, make a mark on the wall of the outside of the compartment where the discharge barb points to the wall. If the wall of the compartment is fiberglass or plastic, you will be able to light the wall outside and see the mark on the inside of the compartment. Make a mark on the inside wall to drill the connection hole with the hole saw. If you are unable to see the mark, accurately determine the center of the hole barb and make a mark on the inside. Drill a small test hole to check the accuracy of the connection hole. The hole saw should be slightly larger than the diameter of the rubber cuff on the end of the discharge hose. If the position of the hole is correct, using the hole saw, drill the connecting hole. Avoid drilling into the pump discharge opening when going through the wall. Make sure the hole is smooth and free of jagged edges that might cut into the wall of the discharge hose. You may want to wrap a layer of duct tape around the hose where the penetration is determined. Place a clamp around the hose discharge before pushing the hose onto the barb. This will be a good time to pull the red switch wire into the compartment, make a loop and back out to the pump. The loop will be cut and connected to the switch later.
The other end of the red wire will be pulled to the power source up into the engine compartment. The black wire can be pulled at the same time as the red wire. Red is positive and black is negative.
Your installation will be finished when the wiring is pulled and the switch installed. The switch bore is ½ diameter. You may find a spot that is more suitable than is shown in the picture, however the owner of the vehicle preferred this placement.
Wire tie the wires to prevent being pulled or cut. Put sealant around the connection hole to prevent water from entering the compartment.
|
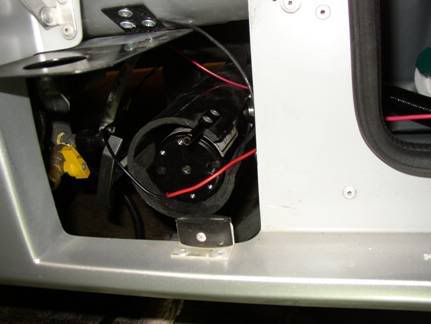
I did not route the hose into the side compartment.
I could still drop the tube down for "gravity assist" 
I drilled a few drain holes in the bottom of the 4" black pipe so the pump couldn't get flooded.
I could easily remove the pump with a regular flat head screw if it ever failed and dump the traditional way.
|

|

|
 09-08-2009, 06:29 PM
|
#9
|
|
Platinum Member
Join Date: Aug 2009
Location: Houston, TX
Posts: 116
|
 Re:
Re:
Quote:
|
Originally Posted by markopolo
I just thought I should update this thread:
When I installed the macerator I put a wireless remote switch on it.
|
After pumping out yesterday at a really badly designed dump site in 97 degree weather, I am ready for this mod. The contact points for the builtin macerator's red button on/off switch are deeply buried under the driver's seat. Any suggestion as to how to get in there to hook up the remote?
Thanks,
Dan F.
|

|

|
 09-09-2009, 04:31 AM
|
#10
|
|
Platinum Member
Join Date: Oct 2006
Location: New Brunswick, Canada
Posts: 8,828
|
 Re: Macerator waste pump in the 4" pipe - Roadtrek
I'm not familiar with your switch. Is it the type you have to keep pressing for it to stay on?
I had a normal on / off toggle switch on mine. The remote receiving unit was placed after that. I had to turn the toggle switch on first then use the remote. I did it that way to prevent "accidents"   
You know how sometimes something presses a remote switch when it is in your pocket? Like your keys press up against it or something. I did not want to "accidentally" activate the macerator!
If your switch is a normal toggle switch (stays on or off) I'd keep it and instead tap into the wiring closer to the pump for the remote.
Alternatively, take a look at what Leon did to hold the switch on.
http://outdoors.webshots.com/album/573811481cvVXey
The wireless remote would really help at those dump stations that require someone to hold the hose in place and a second person to activate the switch.
|

|

|
 09-10-2009, 02:54 AM
|
#11
|
|
Platinum Member
Join Date: Aug 2009
Location: Houston, TX
Posts: 116
|
 Re: Macerator waste pump in the 4" pipe - Roadtrek
Quote:
|
Originally Posted by markopolo
I'm not familiar with your switch. Is it the type you have to keep pressing for it to stay on?
|
Yes. The RSA has a big red button mounted on the support for the driver's seat. At good dumps, I can position the vehicle so I can hold the hose down with one hand (or foot, if necessary) and hold the button with the other. Better dumps have way to hold the hose down without hands -- like the heavy metal sewer cap or a conveniently placed rock.
Quote:
|
If your switch is a normal toggle switch (stays on or off) I'd keep it and instead tap into the wiring closer to the pump for the remote.
|
Yeah, I may have to go underneath to find the pump leads. There isn't even any visible way to remove the button from the outside of the seat. Of course, the inverter/charge controller is also under the seat, in the way of getting at the back side of the button.
Hadn't thought of the mechanical option -- good one! Maybe a remote control that activates a small stepper motor that holds the button in? Or is that a bit too much? 
Thanks,
Dan F.
|

|

|
 05-15-2018, 03:33 AM
|
#12
|
|
New Member
Join Date: Apr 2011
Posts: 7
|
 macerator frustration
is it true that i need to be plugged in to empty my sewer tank with the macerator? i went to a dump station with the engine on and it would not engage. when i'm hooked up at a campground it works, unfortunately, i am stuck in a non-sewer sight for a few days. any suggestions? personally, i love the gravity system that all my other rv's had. this 2010 roadtrek 190 popular, is not popular with me......help!
|

|

|
 05-15-2018, 03:36 AM
|
#13
|
|
Platinum Member
Join Date: Aug 2010
Location: Minnesota
Posts: 12,457
|
Quote:
Originally Posted by joannehafner

is it true that i need to be plugged in to empty my sewer tank with the macerator? i went to a dump station with the engine on and it would not engage. when i'm hooked up at a campground it works, unfortunately, i am stuck in a non-sewer sight for a few days. any suggestions? personally, i love the gravity system that all my other rv's had. this 2010 roadtrek 190 popular, is not popular with me......help!
|
As long as you have the 12 volt power on in the van at the battery switch, the macerator should work, unless your batteries are totally failed. Shore power not needed, as if it were nobody could dump at a dump station.
|

|

|
 05-15-2018, 04:00 AM
|
#14
|
|
New Member
Join Date: Apr 2011
Posts: 7
|
thanks, that makes sense. since i am totally ignorant when it comes to this rig, where is the switch that i would use to turn that battery on to enable the macerator at a dump station?
|

|

|
 05-15-2018, 04:09 AM
|
#15
|
|
Platinum Member
Join Date: Aug 2010
Location: Minnesota
Posts: 12,457
|
This should link you to the owner's manual for the 2010 190 Roadtrek and show you where all the switches and buttons are located.
You are being redirected...
I think on your model the battery power switch is on the same panel as the tank levels, water pump, stuff.
|

|

|
 05-15-2018, 04:10 AM
|
#16
|
|
Platinum Member
Join Date: Nov 2015
Location: CA
Posts: 1,668
|
Quote:
Originally Posted by joannehafner

thanks, that makes sense. since i am totally ignorant when it comes to this rig, where is the switch that i would use to turn that battery on to enable the macerator at a dump station?
|
There is a battery disconnect switch on the control panel. Is it in the connect position?
|

|

|
 05-15-2018, 04:30 AM
|
#17
|
|
New Member
Join Date: Apr 2011
Posts: 7
|
i have an invertor switch and a similar switch above it, both are in the off position.
|

|

|
 05-15-2018, 05:04 AM
|
#18
|
|
Platinum Member
Join Date: Aug 2010
Location: Minnesota
Posts: 12,457
|
Quote:
Originally Posted by joannehafner

i have an invertor switch and a similar switch above it, both are in the off position.
|
Those are likely on the very end of the panel where generator and other controls are? One marked inverter and the other blank? If so the the blank one is probably the outside porch light.
We are talking about neither of those switches.
The switch that needs to be on is marked "battery" and the little red light next to it should be on. It is a momentary switch so it will bounce back to center after you push it, but going one way the light should come and the other way the light will go off. You should also hear a clunk from the rear of the van when you push the switch. Here is a pic, the switch on the right is the battery one you want on.

|

|

|
 05-15-2018, 05:18 AM
|
#19
|
|
New Member
Join Date: Apr 2011
Posts: 7
|
yes, that's exactly what i have. thanks so much, i appreciate the time that you spent helping me.
|

|

|
 05-15-2018, 05:19 AM
|
#20
|
|
Platinum Member
Join Date: Nov 2015
Location: CA
Posts: 1,668
|
Quote:
Originally Posted by joannehafner

i have an invertor switch and a similar switch above it, both are in the off position.
|
Booster's photo in #18 illustrates the battery switch which must be on for any 12 volt appliances to operate, the macerator included. FYI, the macerator is fuse protected with a 20 amp fuse in the DC fuse panel.
Dry testing for macerator functon should be brief. They don't like being run dry for a long period.
Do you have the owner's manual for this coach?
|

|

|
 |
|
 Posting Rules
|
You may not post new threads
You may not post replies
You may not post attachments
You may not edit your posts
HTML code is Off
|
|
|
|
 » Recent Threads
 |
|
|
|
|
|
|
|
|
|
|
|
|
|
|
|
|
|
|
|
|
|
|
|
|
|
|
|
|
|
|
|
|
|