 |
 03-12-2008, 07:59 PM
|
#1
|
|
Silver Member
Join Date: Mar 2008
Location: Eastern Arizona
Posts: 59
|
 Installing a ceiling vent where there is none..
Hi all,
My B has only a dinky "Fume Releaser" vent above the loo in the back. Living in Ten-Zillion degree Arizona, where temps inside a car hit 170F. in the Summer, I'm thinking that installing a 14" square (industry standard) vent like a Shurflo or Fantastic would be a good idea.
I have the tools needed, and am not "skeered" of cutting the hole.  Right now, I'm thinking of mounting the vent right in line with the aft end of the cab-over, and in front of the air conditioner..
Being ah..er, "po",, I am aiming to spend as little as necessary to get the vent parts.. eBay is my friend.
Right now, I'm thinking of using a vent and adding a solar-powered fan unit in the vent top that can be on when the RV is not in use. The regular, larger 12V fan (reverseable) can be used when camping. I may mount the solar fan in a MaxxAir cover.
This project won't take place until the Fall, so if you see this post late, please don't think it's 205 to chime in. I appreciate any tips on vent units to use, installation, or links to suitable products. I'm especially interested in anyone's experience with the solar vent fans on the market.
Thanks.
Chip
__________________
Boondock traveler, Frugal, but never "cheap".
|

|

|
 03-13-2008, 03:22 AM
|
#2
|
|
Platinum Member
Join Date: Oct 2006
Location: New Brunswick, Canada
Posts: 8,828
|
 Re: Installing a ceiling vent where there is none..
Take a look at MaxxAir
http://www.maxxair.com/products/MaxxFan.aspx
I had a Fan-Tastic Vent http://www.fantasticvent.com in my Roadtrek. I'm sure they're a great fan. They really stand behind the product and mine worked perfectly, but...................
I really like the MaxxAir I installed in my B+ 


I don't think I closed the vent all summer! Rain doesn't get in. They can be thermostatically controlled to help conserve power. I have a second vent on my roof so the windows can all be closed and I can still run the fan.
Quote:
|
Provides over 900 CFM of airflow on High using 4.2 amps, medium one 617 CFM at 1.84 amps, medium two 730 CFM at 2.53 amps, and 500 CFM on Low at 1.45 amps
|
1.45 amps (on low setting) is less current than what a single 1156 incandescent RV light bulb draws.
I've seen them on sale at Camping World at about half what I paid for mine. I couldn't wait so I bought locally.
I don't have any comments to make re: solar vents - I've never had one.
My install was easy because I was replacing a (cheap) vent. The hole was there and the wiring was already in place. You'll have to run wire to your new install. That may influence where you end up putting it.
|

|

|
 03-13-2008, 04:02 AM
|
#3
|
|
Platinum Member
Join Date: Oct 2006
Location: New Brunswick, Canada
Posts: 8,828
|
Re: installation - the local dealer explained how to install the fan and gave me a roll of butyl rubber tape 

I laid out the butyl around the 14" sq opening in the roof to form a gasket. The fan fastens to the roof with screws (lots of screws - maybe 20). As you tighten the screws some butyl will get squeezed out. I trimmed off the excess butyl and then used Dicor lap sealant around the perimeter edge of the fan housing and covered the screws. Dicor lap sealant is self-leveling so it makes for a nice finish.
http://www.dicor.com/
 http://www.dicor.com/installcomp.html
|

|

|
 03-14-2008, 09:39 PM
|
#4
|
|
Silver Member
Join Date: Mar 2008
Location: Eastern Arizona
Posts: 59
|
Mark, you rock. 
I think this is the solution, and especially for the low current draw.
Thank you.
Chip
__________________
Boondock traveler, Frugal, but never "cheap".
|

|

|
 04-09-2008, 03:57 AM
|
#5
|
|
Bronze Member
Join Date: Mar 2008
Location: plano, tx
Posts: 21
|
 yeah
yeah
say cornbread......
i have a falcon b, cousin to horizon b. i'm gettin' old, but, i think i read somewhere that they used some sort of braces to support the fiberglass roof. i may be mistaken. i'm sure you dont want to cut through a support.
the people that build the present phoenix campers included some people that worked for intervec, the horizon builder. they have a website and club for class b users. someone there could give you the information you need to safely position your vent.
happy trails
|

|

|
 05-30-2008, 02:21 PM
|
#6
|
|
Bronze Member
Join Date: May 2008
Location: Bend, O
Posts: 31
|
Would you recommend the butyl over the foam gasket that Fantastic supplies with their fans?
Also for sealing fridge side vents (service door / vent and upper side vent) would you use butyl / dicor combo as well?
|

|

|
 05-30-2008, 04:30 PM
|
#7
|
|
Platinum Member
Join Date: Oct 2006
Location: New Brunswick, Canada
Posts: 8,828
|
I'd go with whatever was supplied by or recommended by Fantastic when installing one of their fans.
I've never installed a fridge so I won't be much help to you. I would think the butyl rubber would work but try to find out if it is affected by by the heat from the fridge.
As much as I like Dicor I doubt that I'd use it around the sides of service door vent and upper side vent. It wouldn't look clean enough.
It looked to me that my Roadtrek had a clear silicone type caulk around the sides of service door vent and upper side vent. Same thing on my Trail-lite. The caulk around the sides of service door vent frame is clear and "rubber like".
|

|

|
 06-05-2008, 09:56 PM
|
#8
|
|
Bronze Member
Join Date: May 2008
Location: Bend, O
Posts: 31
|
I ended up using RTV silicone sealant around the fan and it leaked. Of course we had a monster of a storm with high winds and driving rain, but it RTV silicone didn't hold up. I don't seem to have good luck with silicone sealants.
I dug out all the silicone around the edge of the vent and replaced it with this epoxy stuff that you mix and it hardens like steel. Maybe no the best solution if I ever want to remove the vent, but I'd rather cross that bridge when it comes than deal with a leaky roof. Of course I didn't use the stuff on the screws so I don't know if my leaks will stop or not. I think I'll just dump more silicone on the screw heads and hope that works. No rain after using the epoxy so I'm in wait mode.
|

|

|
 07-10-2023, 11:54 AM
|
#9
|
|
Platinum Member
Join Date: Oct 2014
Location: League City, TX
Posts: 1,172
|

This is a very old thread but I wanted an on-topic place to drop this DIY post and itís not worth starting a new thread:
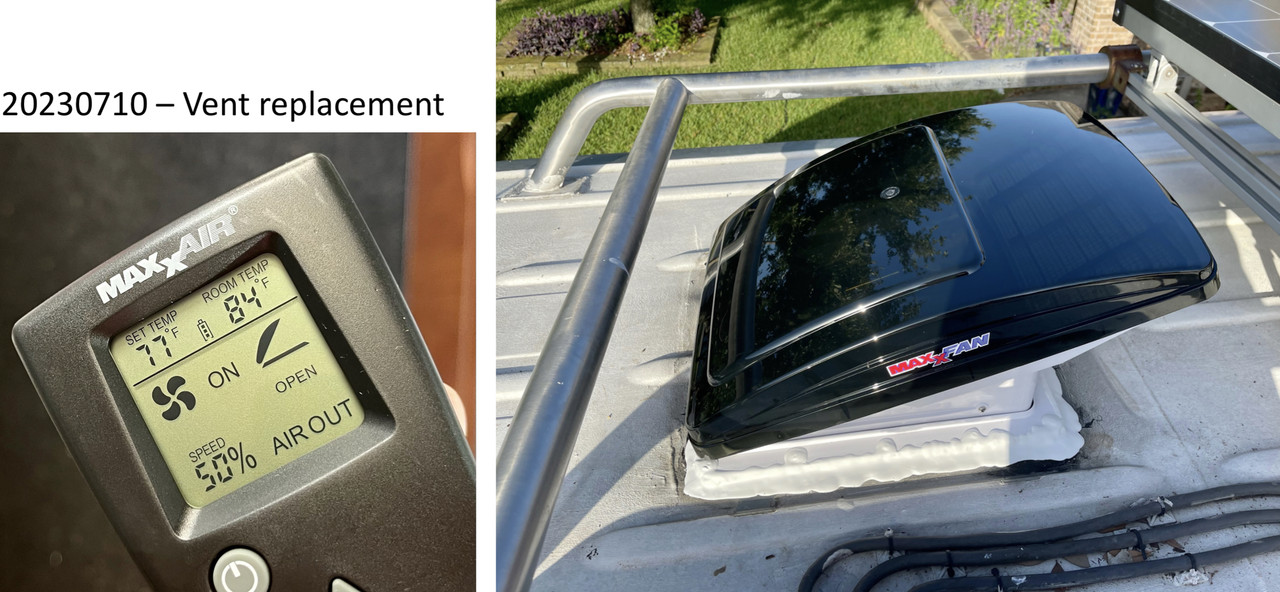
This past weekend, we replaced our 16-year-old Fantastic with a new Maxxair. We went from a 3-speed clunker with effectively no thermostat to a 10-speed multi-function unit with thermostat and a remote control. And no more goofy separate rain hood, which was equally as clunky.
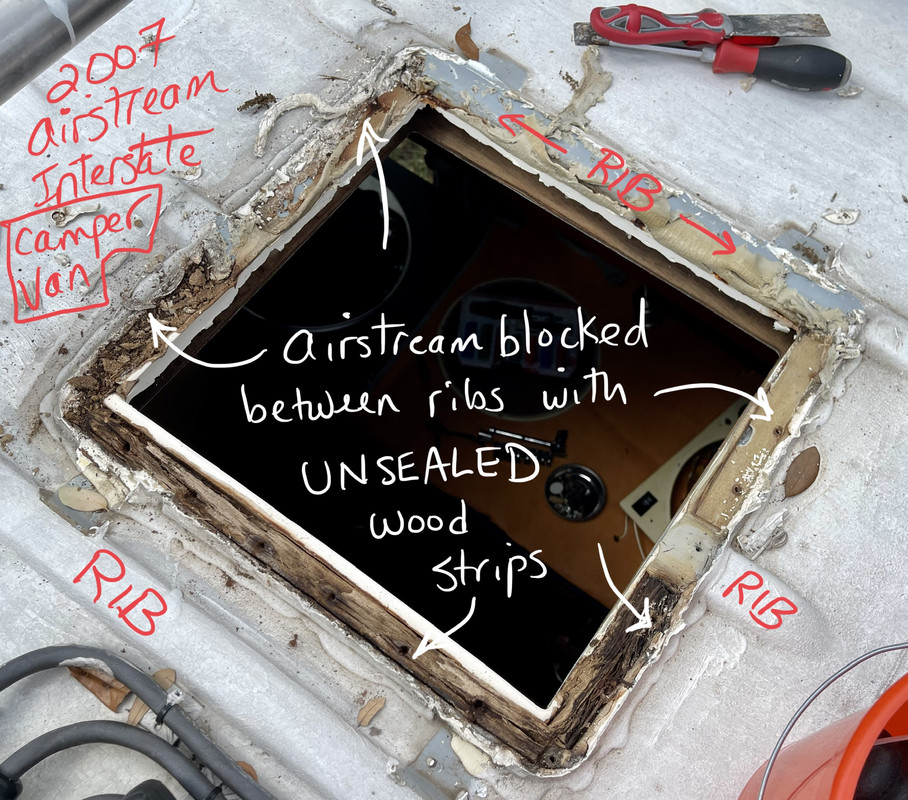
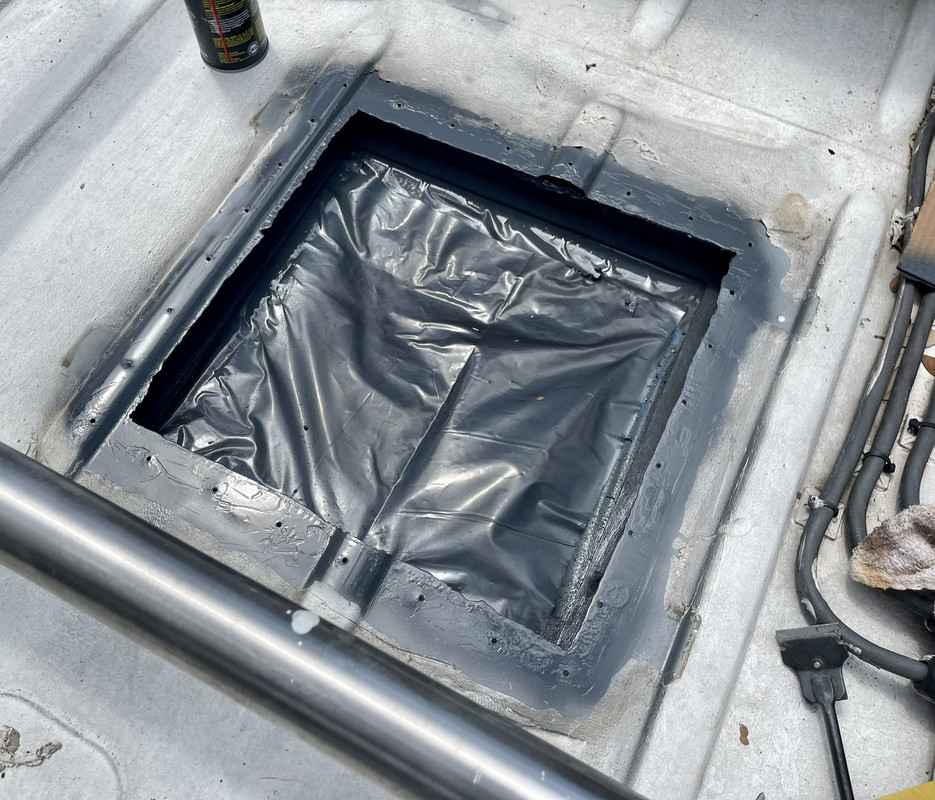
Our install was a standard-issue hours-long P.I.T.A. because, of course, the Sprinter roof is not flat. The installation requires that the space between the ribs be blocked with something. Our original upfitter (Airstream) had ripped down some wooden strips for that purpose, but then didnít seal them. They rotted out sometime in the early years prior to someone Dicor-ing the heck out of the entire mess, at which point the leaking stopped for at least a decade until we came along and re-did the entire job (we bought our van second hand). I also ripped down wooden strips as blocking, but I sealed them.
Having a remote control may seem like it falls into the category of a first-world problem, but we boondock almost exclusively in a Class B that has no open-able windows except for the rain flaps. Survival depends on being able to ventilate by sucking air through those flaps, especially in the deep south with its heat and humidity, and I cannot tell you how many times Iíve had to get up in the middle of the night to manually turn the Fantastic up or down depending on conditions. Now I can press a button without having to wake fully up.
On the first four of the ten speeds, the Maxxair is almost inaudible, which also helps. It means that I can have it running in all conditions. The Fantastic made a racket even at the lowest speed, and I hated having to shout over it.
I highly recommend this upgrade if you have a very old vent fan in your B.
BEFORE:
 DURING
:
 AFTER
AFTER:

|

|

|
 07-10-2023, 03:57 PM
|
#10
|
|
Bronze Member
Join Date: Dec 2017
Location: Arizona
Posts: 36
|
As someone rebuilding an old Fiesta (which I understand is nearly a carbon copy of the Falcons)...the sheer amount of HORRIBLY LOUSY craftsmanship in building this thing is astounding. I get that they weren't intended for the top of the line market, and I'm not even complaining about the so called stapled together balsa wood construction.
I too have found things like the wood strip fillers, and my favorite so far - window cutouts that look like they turned a 10 year hopped up on crack loose with a body saw..not a straight cut to be found anywhere with some corners having about 1/32" of fiberglass actually covering the window flange.
Fixing all this is quickly turning in to a nightmare..
|

|

|
 07-10-2023, 04:30 PM
|
#11
|
|
Site Team
Join Date: Jul 2013
Posts: 5,426
|
Quote:
Originally Posted by Detroit80

I get that they weren't intended for the top of the line market
|
Not that that makes any difference. As @Interblog's story illustrates, a top-of-the-line Airstream Interstate is often just as bad. Both of my previous vans (an Interstate and a GWV Leged) were among the best available when I purchased them. I had to replace rotted wood in both of them.
For our current (custom) van, the first thing I specified was that there was to be absolutely nothing that can rot or rust outside the envelope of the OEM van.
__________________
Now: 2022 Fully-custom buildout (Ford Transit EcoBoost AWD)
Formerly: 2005 Airstream Interstate (Sprinter 2500 T1N)
2014 Great West Vans Legend SE (Sprinter 3500 NCV3 I4)
|

|

|
 07-11-2023, 11:56 AM
|
#12
|
|
Platinum Member
Join Date: Oct 2014
Location: League City, TX
Posts: 1,172
|

Quote:
Originally Posted by Detroit80

As someone rebuilding an old Fiesta ....
|
I envy you, in a way. My husband and I will probably either go fully custom or rebuild once we have the time in retirement. Meanwhile, we have to maintain or upgrade the crap that we already own on a piecemeal basis, which often feels like one step forward and two steps back.
Itís an exciting time to do either (buy or rebuild) because the consumer market has come so far, especially in the area of electrical component choices. Years ago, we did a DIY lithium system which took hundreds of hours and many thousands of dollars and was the best available option at the time, but which canít hold a candle to some of the newer products. Six months ago, I bought an EcoFlow Delta Pro at Costco for less money than our original hardware cost us, and for zero labor cost. We typically do a major off-grid trip once per year, and I got the Delta Pro to power our CargoMate utility trailer (we mounted 600 watts of solar on its roof and we do a lot of land development work, so we need the power). The DeltaPro will run my Engel MT 45 fridge-freezer combo for A WEEK without needing a recharge - itís astonishing. Not too many years ago, we DIYers were all struggling to find ways to make our 12-volt Danfoss compressor refrigerators run for more than a few days. Now anybody could do it.
|

|

|
 |
 Posting Rules
|
You may not post new threads
You may not post replies
You may not post attachments
You may not edit your posts
HTML code is Off
|
|
|
|
 » Recent Threads
 |
|
|
|
|
|
|
|
|
|
|
|
|
|
|
|
|
|
|
|
|
|
|
|
|
|
|
|
|
|
|
|
|
|