 |
 12-13-2006, 04:00 PM
|
#1
|
|
Platinum Member
Join Date: Nov 2006
Location: SE Minnesota
Posts: 242
|
 Dennis' Site
Here's a website owned by a friend of ours in Galveston TX. He's done alot of modifications to his Pleasureway and has some very good pictures and descriptions on his site. Look for the link titled "Projects" He has some great photos too.
He would probably love to have an email from you, if you enjoy his site. However, don't expect a reply. Dennis is currently battling a life threatening brain tumor and can no longer type. He would love to know that people are still reading and learning from his website.
http://www.plateauway.org
__________________
A good traveler has no fixed plans, and is not intent on arriving. ~ Lao Tzu
|

|

|
 12-13-2006, 04:19 PM
|
#2
|
|
Platinum Member
Join Date: Oct 2006
Location: New Brunswick, Canada
Posts: 8,828
|
I am so sorry to hear that. I will let him know that he is in my thoughts and wish him a full recovery.
His website is an important one. Here's a list of his project titles:
Air Command Kit: Installing a Firestone Dual Air Command Kit.
Awning Tools: Where to relocate your awning crank and support so it's not in the way.
Broom: Just hanging a broom.
iPod: Where are you going to put your iPod? Check this out.
Macerator Pump: No more slinky, connecting or disconnecting.
Mirror: Replace the original passenger side flat mirror with a curved one.
Soap Pump: I hate to have to search for the soap.
Speakers: Add a set of 6.5" Polk Audio 2-way "rear" speakers and get incredible sound.
Paper Towel Holder: Gotta have it. The question is, where to put it?
Trailer Hitch: A Curt 5000 lb. hitch. Good enough for a bicycle rack.
Water Purifier: Install a General Ecology water purifier and drink the water from your tank safely.
|

|

|
 01-25-2007, 05:25 AM
|
#3
|
|
Bronze Member
Join Date: Nov 2006
Posts: 42
|
 Re: Dennis' Site
Quote:
|
Originally Posted by julievojo
Here's a website owned by a friend of ours in Galveston TX. He's done alot of modifications to his Pleasureway and has some very good pictures and descriptions on his site. Look for the link titled "Projects" He has some great photos too.
He would probably love to have an email from you, if you enjoy his site. However, don't expect a reply. Dennis is currently battling a life threatening brain tumor and can no longer type. He would love to know that people are still reading and learning from his website.
http://www.plateauway.org |
Would you knpw where he got his paper towel holder from?
|

|

|
 01-26-2007, 02:27 AM
|
#4
|
|
Platinum Member
Join Date: Oct 2006
Location: New Brunswick, Canada
Posts: 8,828
|
Julie - Do you know any more about how Dennis is doing?
Jerry - Dennis noted that he got his paper towel holder from Organize Everything.
|

|

|
 01-26-2007, 05:18 AM
|
#5
|
|
Bronze Member
Join Date: Nov 2006
Location: Quebec City
Posts: 38
|
One thing I havn't noticed in the past on Dennis's site is his iPod setup. We have two iPods (nano and video 80g). I went for the Belkin kit to send the audio signal through the RT's stereo system but didn't try it yet.
Let's hope that the tumor is benign. Then again, it remains a difficult situation to live.
Send him our best wishes.
__________________
1998 Roadtrek 200 Versatile.
Skype user.
|

|

|
 10-23-2007, 02:09 PM
|
#6
|
|
Platinum Member
Join Date: Oct 2006
Location: New Brunswick, Canada
Posts: 8,828
|
Dennis passed away on March 28, 2007.
I didn't know him but I did visit his website frequently. I think he really enjoyed his Pleasure-Way Plateau and really enjoyed sharing his ideas, projects and modifications so that other could benefit from them.
Here are some of the modifications he made to his Pleasure-Way Plateau:
|

|

|
 10-23-2007, 02:10 PM
|
#7
|
|
Platinum Member
Join Date: Oct 2006
Location: New Brunswick, Canada
Posts: 8,828
|

Macerator Pump
Quote:
|
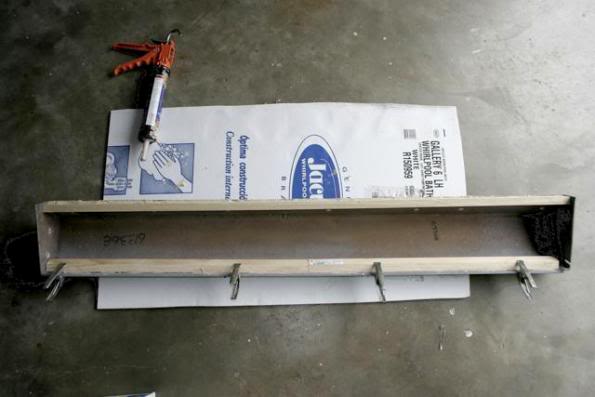
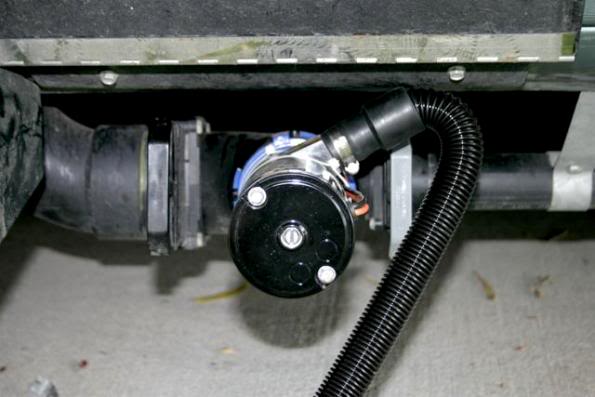
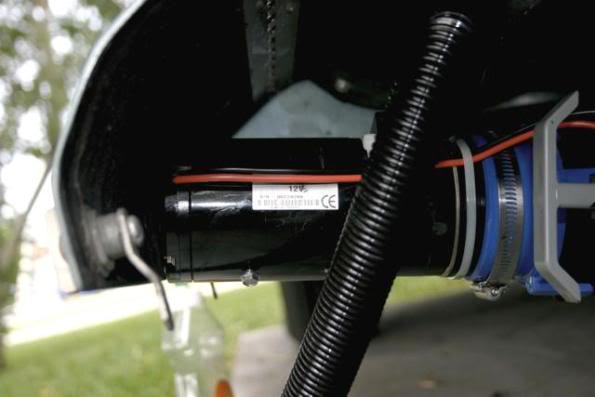
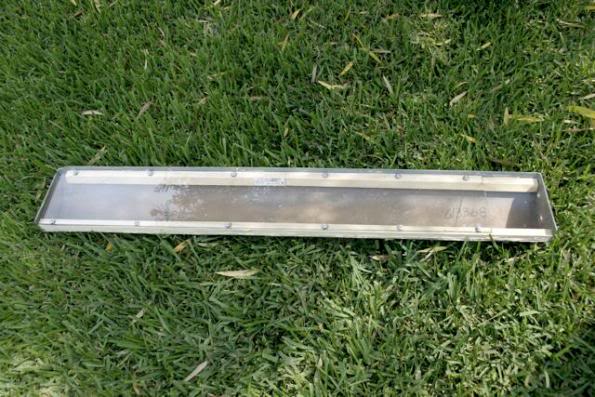
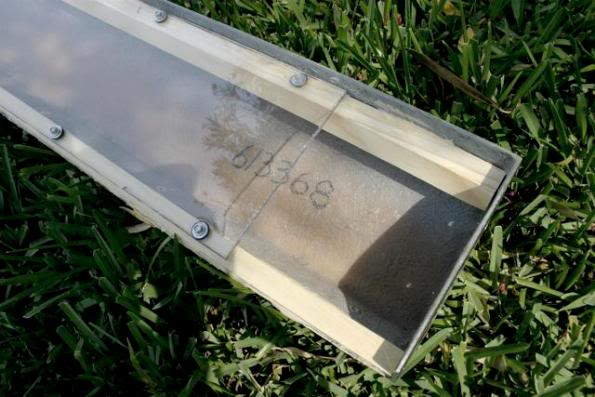
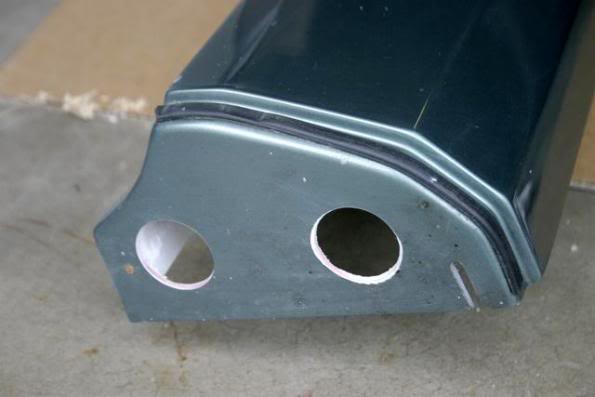
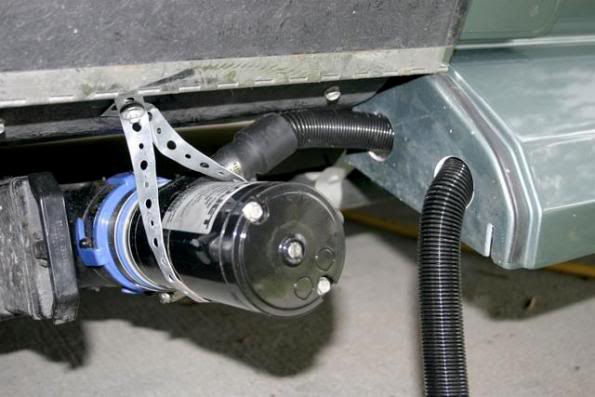
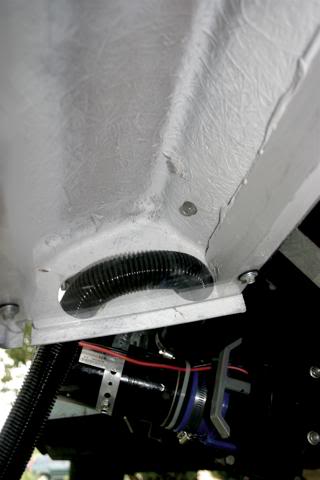
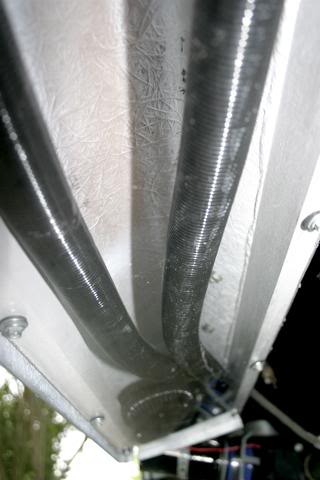
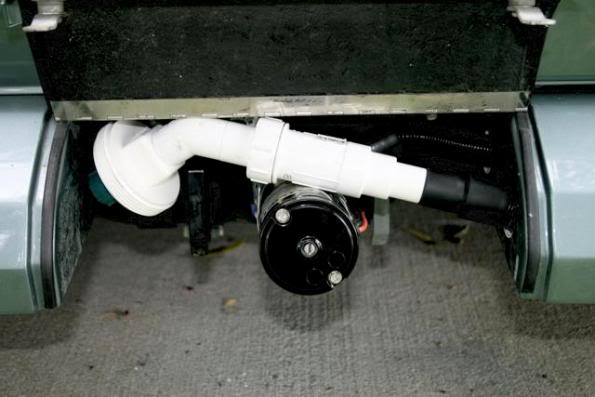
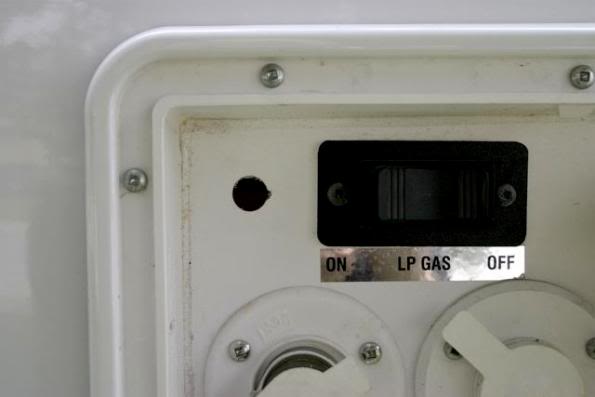
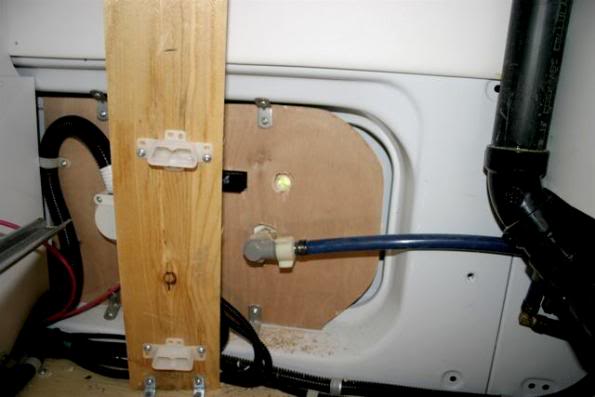
A macerator pump takes the liquid and sludge from the holding tanks and pulverizes it so that the output from the pump can fit through a garden hose. The pump stays in place along with it's hose so there's no need for attaching and removing the slinky hose. The macerator pump will also pump the output up to 20' above the pump so this gives you all kinds of possibilities for dumping the tanks. The process is simple: Pull the hose out and remove the end cap and place it in the dump receptacle. Open the black water valve and flip the switch. When empty close the black valve and open the gray water valve and repeat. Replace the end cap on the hose and put the hose away. That's all there is to it. On the Plateau the challenge was to find a place to store the hose. I came up with the idea of using the space below the running board. I removed it to work on it first. Then I cut wood strips to attach to the sides of the running board with construction adhesive for attaching the acrylic plexiglas that I had decided to use as a bottom to the storage area. The reason for the clear acrylic instead of wood or metal was so that I could see the hose in the storage if something happened that prevented it from coming out or putting it away. Easy to make a decision whether or not to remove the 12 screws that hold the acrylic in place if you can see what's going on. Cutting the acrylic to size was a trick but I managed to do it without breaking it. It's pretty much straightforward stuff to enclose the running board into a storage area and drill the holes for the hose. Probably the hardest part of the job was running the power wire for the pump from the electrical panel. I used the "utility center" for attaching the switch for running the pump. To get to this you just take out the two drawers that are below the wardrobe. I also had to remove the drawers support to get to the area behind the panel to drill out the plywood to be able to attach the switch. No rocket science here, just hard work and a couple of days to do it all. I got the pump at RV Sani-Con. It's model 419 and is 8" long without gray water bypass.
|
Quote:
|
Running board with wood strips glued on for attaching Plexiglas
|
Quote:
|
Side view of macerator pump showing how it just clears the access hatch
|
Quote:
|
Plexiglas attached to running board which has to be removed to reattach the running board to the van
|
Quote:
|
Shows how hose enters and exits the storage area
|
Quote:
|
Underside view of hose when drawn out
|
Quote:
|
Underside view of hose when stored
|
Quote:
|
Shows how the end of the hose fixture is stored and held in place by the pump and the hatch door when closed
|
Quote:
|
This is where I put the pump switch. Hole drilled but switch not installed yet.
|
Quote:
|
Inside view of the "utility center" panel
|
|

|

|
 10-24-2007, 02:32 PM
|
#8
|
|
Platinum Member
Join Date: Oct 2006
Location: New Brunswick, Canada
Posts: 8,828
|

Quote:
Air Command
Installing a Firestone Dual Air Command Kit
WARNING! If you follow the instructions below, you do so at your own risk! I am not an expert but this is what worked for me. However, it may not work for you.
I purchased the kit from JCWhitney online. Total cost with shipping was $379.97. Search with "ZX817668R" as a keyword on their site. (Firestone's part no. is WR1-760-2168.).
Note: There is not enough air tubing supplied with this kit to do this inatallation on the Plateau with the compressor and tanks mounted where I wanted them. I didn't measure the length of the tubes but they supply you with two and you'll need three. I had a long length of tubing leftover from my STW installation a few years ago. But even back then, that kit didn't contain enough tubing. Huh, you say? The answer is simple: Back then I called Firestone from the phone number on their Ride Rite website. I told them I needed more air tubing and they quickly and without cost, sent me two extra long tubes. I only needed one, which is why I had enough to do this installation.
Disconnect all power both 12V and 120V
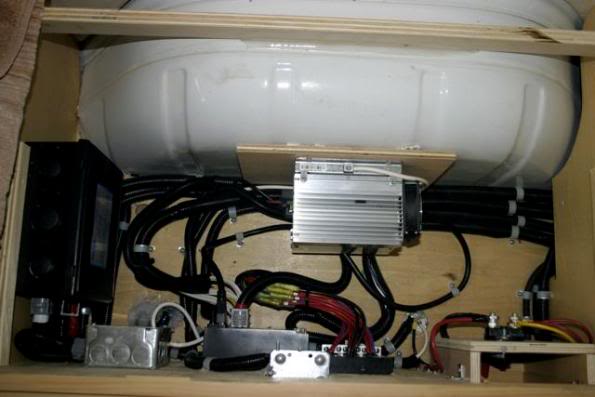
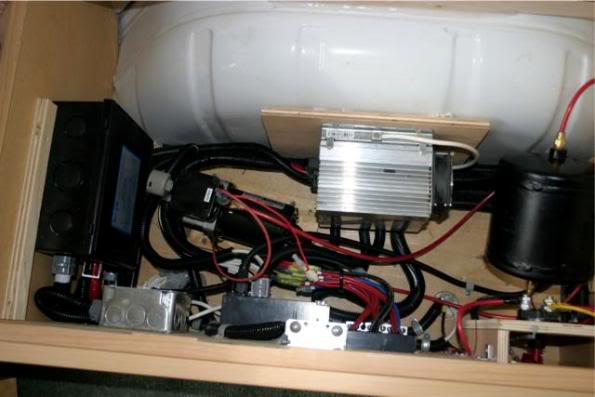
Scout out a location to install the air compressor and air tank. They don't necessarily have to be close to each other but it's more convenient if they are. I chose the electrical compartment under the left side bed. Try clearing a space for the compressor and the air tank. Make sure they both fit before committing to this location. Note that the compressor cylinder wall gets real hot when running so it shouldn't contact any wiring or anything else. The compressor needs to have ventilation. Of course, it compresses air! The electrical compartment is real "leaky" so I didn't think the compressor would be starved for air in this location.
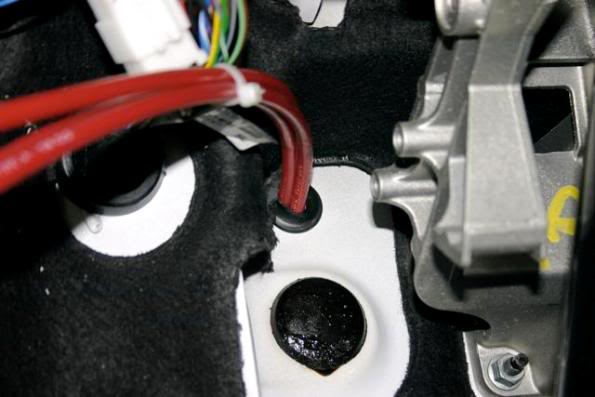
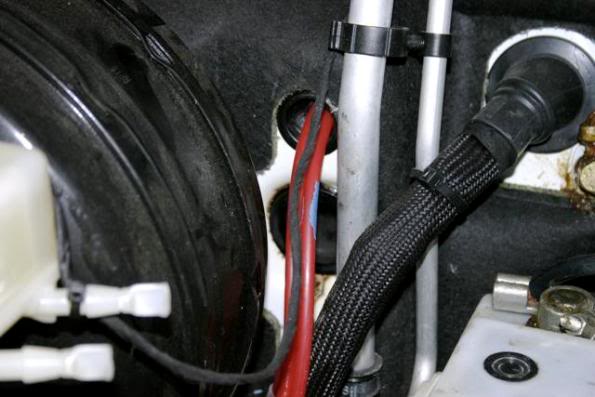
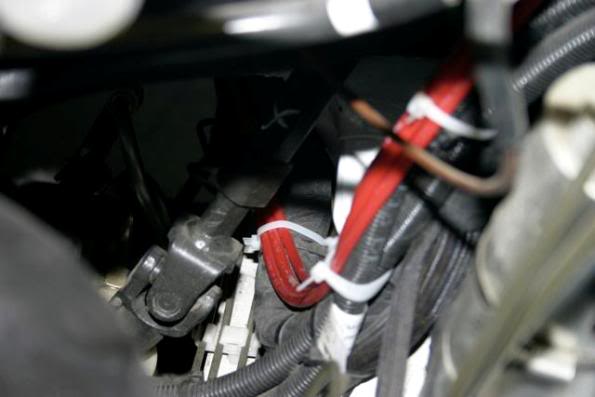
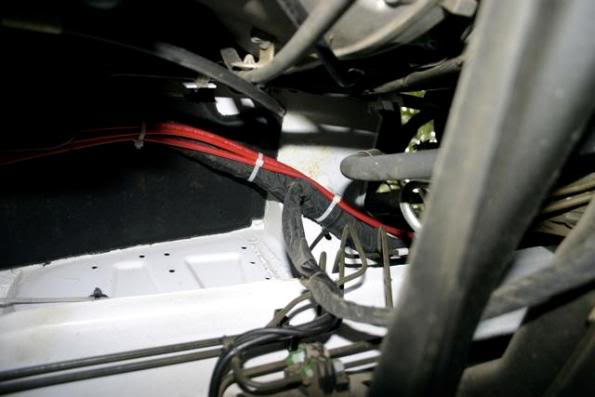
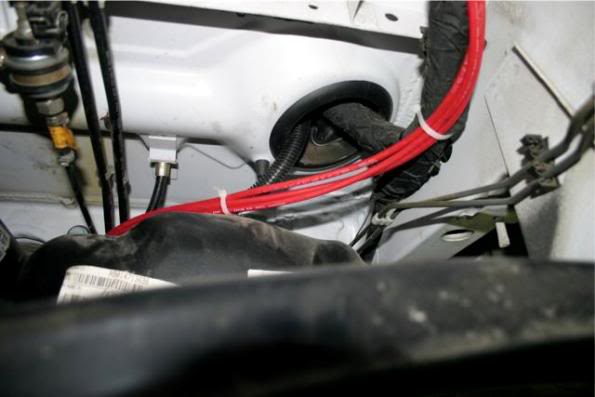
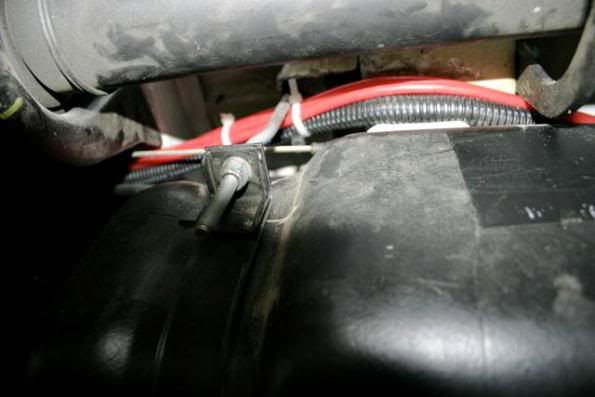
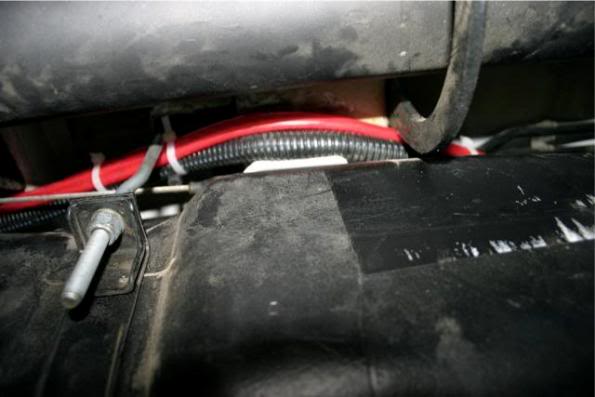
It's time to run the air tubes. They are fairly stiff and come coiled and don't want to straighten out easily so it's best to run one at a time since otherwise they get tangled up together. You have to run one from the left lifter all the way to the front and another from the right lifter all the way to the front. A third tube runs from the electrical compartment all the way to the front. Running the tubes is the hardest part of the job and took me several hours. There are a couple of critical areas to get through which you can see in the pictures below. You don't want to interfere in any way with the van's mechanical functions.
After running the tubes you can punch a hole through the firewall to pass them through to wherever you are going to mount the controller. I chose to mount the controller at the bottom of the dash on the far left side. It's convenient for the driver to access and I found it doesn't interfere with my leg movement at all. I installed the controller first and then cut and installed the tubes to the controller. A simple PVC pipe cutter worked well for making clean cuts on the air tubes.
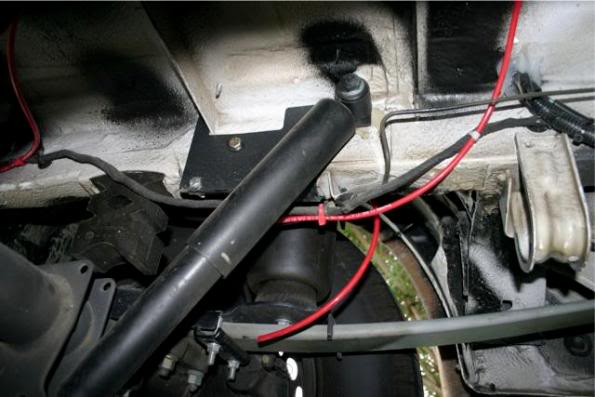
Now it's time to hook up the other end of the tubes to the air springs. First you have to disconnect the tubes that are already installed. Let out all the pressure first. Then from outside the wheel, reach in and push on the quick connector while pulling the tube out. This is much harder than it sounds since the workable area is tight. Also the old tubes can be stuck in pretty good. It took me a while to get mine out. After doing so, you can cut the new tubes to the proper length and shove them into the connector on each lifter. I then removed the original air tube on the right side going to the bumper but left the left side intact.
You now have to drill a hole through the floor to run the third tube from the controller up into the electircal compartment. I used a piece of the protective plastic wrapping from the right tube removed in the step above to protect the air tube where it went through the floor. Then get a caulk gun and liberally seal the hole from both sides (inside the wrapping too). Connect the tube to either end of the air tank. Cut a short tube to go from the other side of the air tank to the compressor.
Using a supplied "T" connect the left rear original air tube to the air tube that you just connected to the air tank (you do this under the van). This will give you an air station at the rear of the van under the bumper.
Connect the wiring to the electrical panel. My van had two unused locations on the fuse panel so it was easy to connect and insert the supplied fuse in the panel. Now you can turn the 12 volt power back on. The compressor should start running immediately and will shut off pretty quickly after filling the tank. Go and lift the paddles up on the controller and watch the rear of your van go up! If you made clean cuts on all the tubes and the ends were clean (free of grease etc.) the tubes should all be sealed and there shouldn't be any leaks. You'll be able to tell if the needles on the gauge go down for either the left or right side or the compressor runs when it shouldn't. In theory, the air in the tank should stay there "forever". There's so many connection points that small leakages may occur. I only worry about the big ones. So far, my installation has not sprung any leaks.
I measured the amount of lift you get with the installed springs. From 0 to 90 psi it raised the rear of my van 1.5 inches. This is not as much as I thought it would be. I had the same system on my old STW and I thought it raised the back end further. A friend bought my STW so I'll check it out when I can to see if my memory is correct.
(Update 9/16/04- I checked the lifting range of the ride-rites on the STW. From 0 to about 75 psi it was 3 inches. I suppose the difference is in the fact that the STW is equipped with Ride-Rites and the Plateau is equiped with Sport-Rites. Ride-Rites are not available for the Sprinter van as of this writing.)
This installation job took me about 6 hours.
|
Quote:
|
After scouting out the entire van I decided the electrical compartment was the place to install the compressor and air tank. Besides keeping the units clean it afforded the easy access to the electric panel for hooking up the compressor
|
Quote:
|
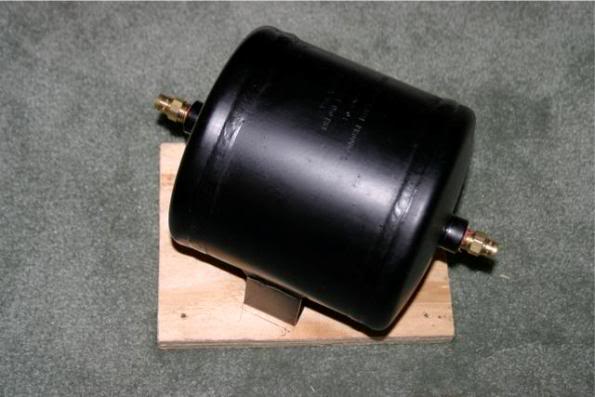
I found it easier to mount the air tank to plywood first
|
Quote:
|
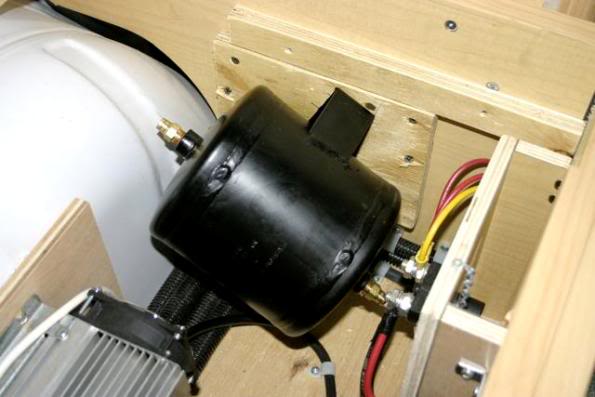
Then mount the plywood to the side of the compartment. It's angled to provide clearance for the air hoses to attach at each end. Make sure that the plywood top cover for the compartment will fit and the tank doesn't interfere with it
|
Quote:
|
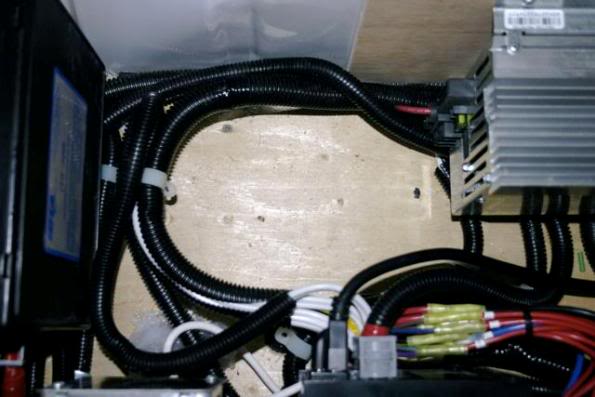
It was fairly easy to clear an area for the compressor
|
Quote:
|
The hardest job by far is the running of the air tubes. You need to run one each from the air springs to the front where you are going to mount the controller. Also a third line has to be run from the air tank to the controller. This shows where I ran the air tubes through the firewall
|
Quote:
|
Another view of the air tubes going through the firewall
|
Quote:
|
Looking at the air tubes disappearing down under the van from the engine compartment. I used several dozen cable ties to install the tubes. Several places are "critical". This is one of them. The reason? To avoid interfering with the steering mechanism
|
Quote:
|
Looking from under the van where the tubes appear from the engine compartment
|
Quote:
|
Here is where the tubes quit following the electrical wire and start to follow the coach wiring towards the rear
|
Quote:
|
Here is another critical area. You don't want to interfere with the parking brake cable. This space to work with here is very small. I would have preferred to go around the other side of the diesel tank but I couldn't find a way
|
Quote:
|
Again, being careful to avoid interfering with the brake cable
|
Quote:
|
This is the left side of the van where the cable arrives at the air lifter. It's not yet attached
|
Quote:
|
Here is the right side of the van where the cable arrives at the air lifer. It also is not yet attached
|
Quote:
|
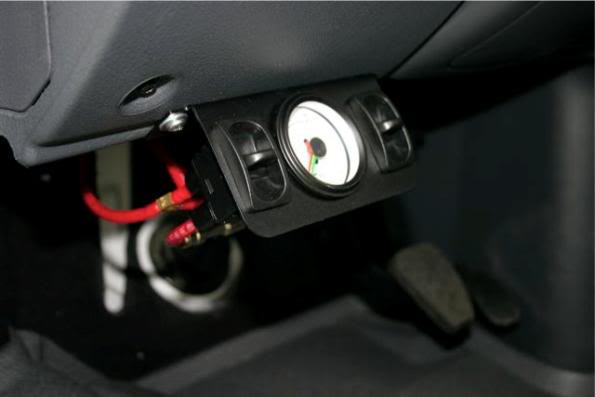
View of the controller mounted under the left side of the dash
|
Quote:
|
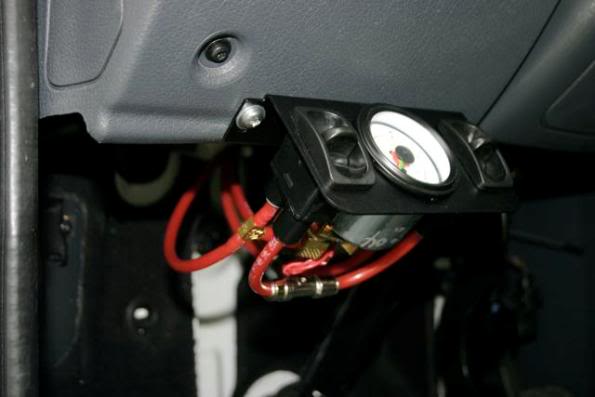
Another view of the controller. The line from the air tank hooks to the "T" which goes to each controller. One line comes out of each controller and one goes to left and and one to the right air springs
|
Quote:
|
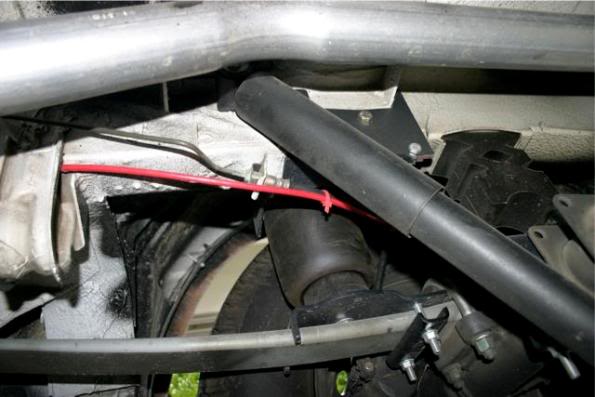
I left in place the old line running from the left lifter to the rear bumper. By utilizing a "T" on the air tube running from the air tank it makes the valve mounted on the bumper "live" with air. The kit comes with a coil air line for filling things like bicycle tubes. It would fill a tire if necessary since it generates enough pressure. (I removed the right side original air line.)
|
Quote:
|
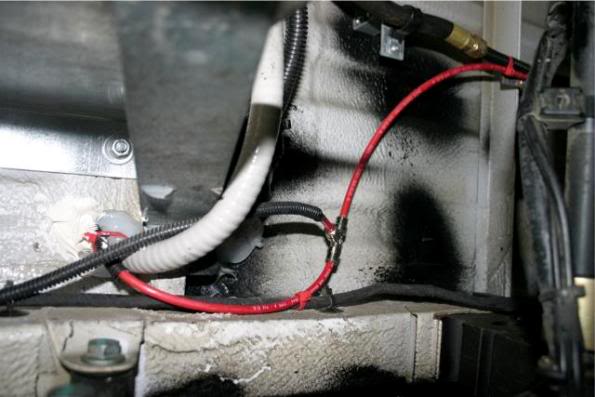
Here is the electrical compartment with the air compress and air tank installed and everything hooked up and functional
|
|

|

|
 10-26-2007, 03:40 AM
|
#9
|
|
Platinum Member
Join Date: Oct 2006
Location: New Brunswick, Canada
Posts: 8,828
|
Quote:
Awning Tools
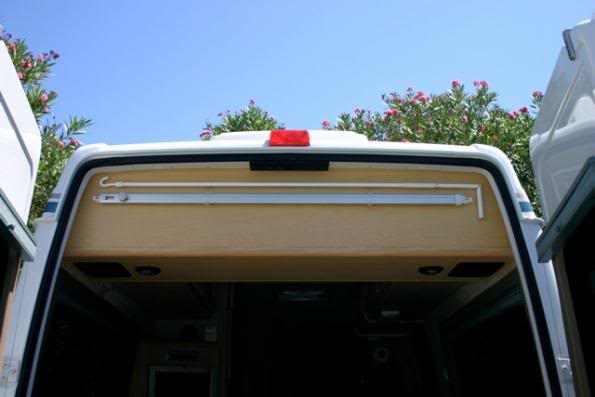
I didn't like the location that the awning crank and support bar were located (under the seats in the rear storage compartment.) I kept on knocking them out of their clips every time I put something in the back or took something out since they hung down slightly below the level of the rear trim piece. I re-located them to the back side of the upper rear cabinet. There's still room for the doors to close without hitting either piece. If you need to, you can stand on the step bumper to get to them.
|
|

|

|
 10-26-2007, 03:42 AM
|
#10
|
|
Platinum Member
Join Date: Oct 2006
Location: New Brunswick, Canada
Posts: 8,828
|
Quote:
Broom
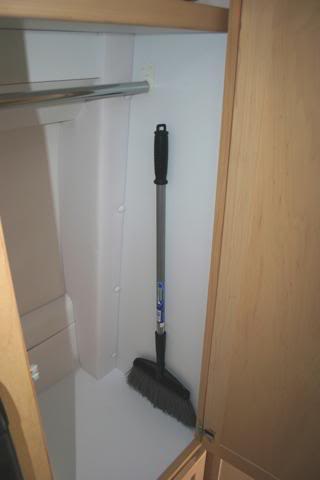
Why a whole page on a broom? Because I came across this clever telescoping broom at a camper supply place and thought it was perfect for the Plateau. My old STW couldn't be swept out because of the sunken area but the Plateau is flat throughout the entire van. Makes it easy to sweep out but who wants to carry a full size broom? This cool broom fit the bill perfectly. I mounted it on the wardrobe closet wall with a couple of spring clips where it wouldn't interfere with the hanging clothes. I think it'll be a good idea to wrap the business end of the broom in a simple plastic bag to keep dirt out of the closet.
|
|

|

|
 11-01-2007, 03:49 AM
|
#11
|
|
Platinum Member
Join Date: Oct 2006
Location: New Brunswick, Canada
Posts: 8,828
|
Quote:
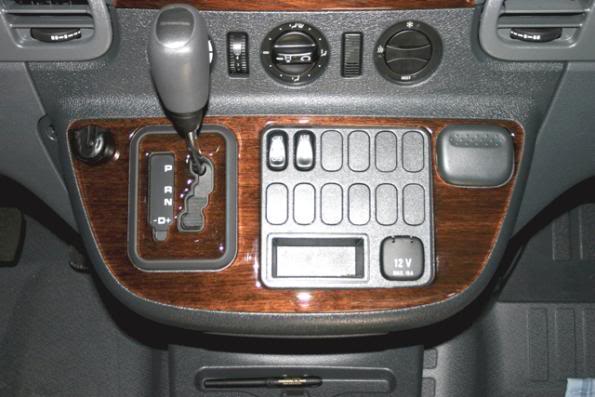
iPod
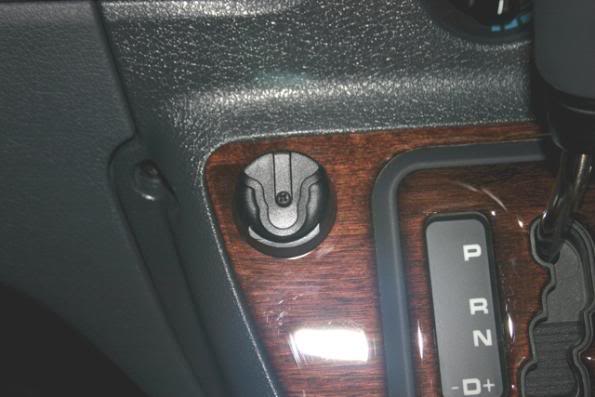
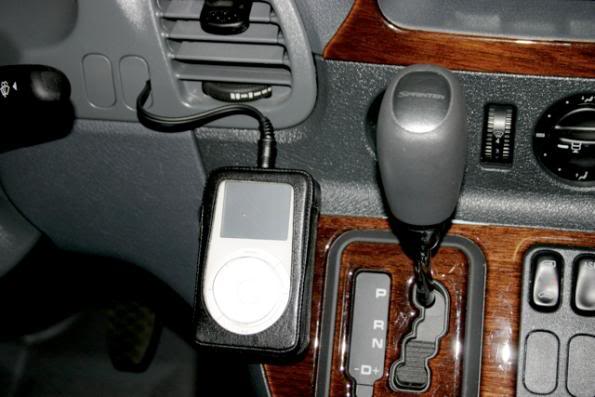
I like to take my iPod along on trips because it saves me from carrying dozens of CD's. I have the original iPod. If I charge it at night it has plenty of juice to last for a day of driving. I bought a case from Marware called the CEO Glove. This comes with a belt clip that fits nicely into a couple of different mounts. I put the included auto mount on the dash area next to the shifter. You simply peel off a backing and stick it on. (The screw you see in the picture below is not for mounting the auto mount to the dash but for holding the mount together.) The case's belt clip simply slides into the mount. The position for the driver is excellent to see the screen of the iPod.
|
Quote:
|
iPod in place. Note the wire leading into the dash that goes to the Aux in port on the stereo. I used a dremel moto-tool to carve out a little bit of the easily popped-out filler plug that's made out of plastic.
|
|

|

|
 11-01-2007, 03:53 AM
|
#12
|
|
Platinum Member
Join Date: Oct 2006
Location: New Brunswick, Canada
Posts: 8,828
|
Quote:
Mirror
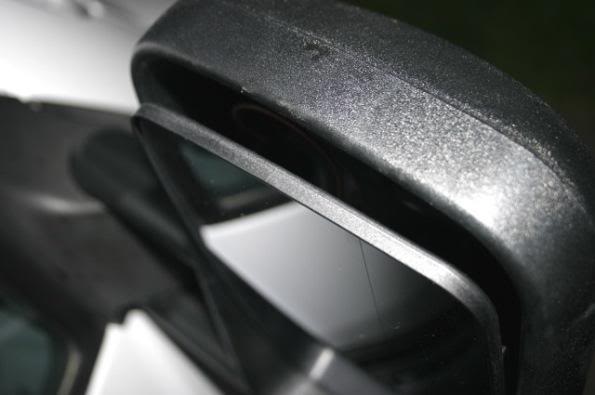
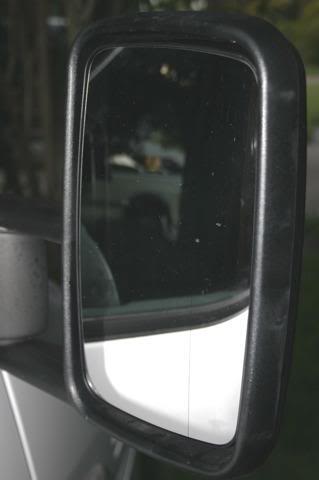
Everyone knows by now that the flat stock mirror on the right side is way too narrow to be useful to safely change lanes. I looked for stick on convex mirrors but decided I didn't like those. There are convex mirror add-ons for the Sprinter van but these have to be bolted onto the top of the existing mirror which means you have to carefully drill holes and besides, if you're tall like me, from the driver's seat you wouldn't be able to see most of the mirror. So when I came upon this replacement mirror for the original I decided to give it a try. The part number is 5103760AA and it's a Mercedes Benz part. I got mine from my local Sprinter Dodge dealer for $59.81 plus tax. It's a snap to install.
|
Quote:
|
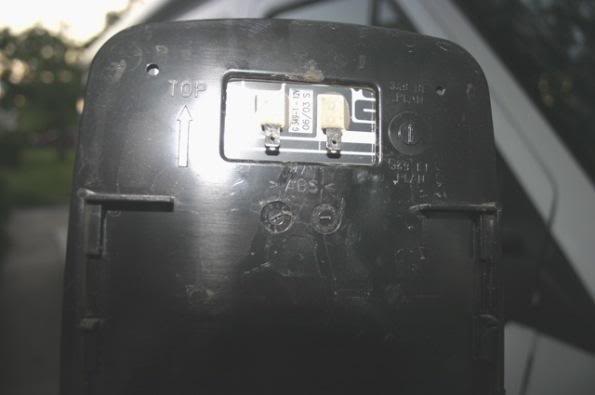
Adust the mirror to face down all the way to leave a gap at the top. Grab the mirror with your hands and pull slightly up then out. This releases the mirror. Disconnect the heater wires.
|
Quote:
|
These are the heater clip connections
|
|

|

|
 11-01-2007, 04:11 AM
|
#13
|
|
Platinum Member
Join Date: Oct 2006
Location: New Brunswick, Canada
Posts: 8,828
|

Quote:
Soap Pump
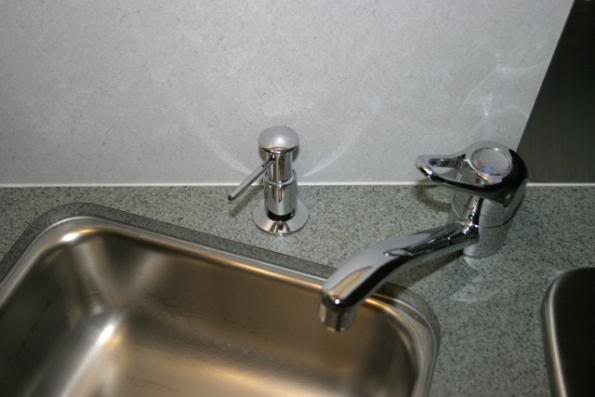
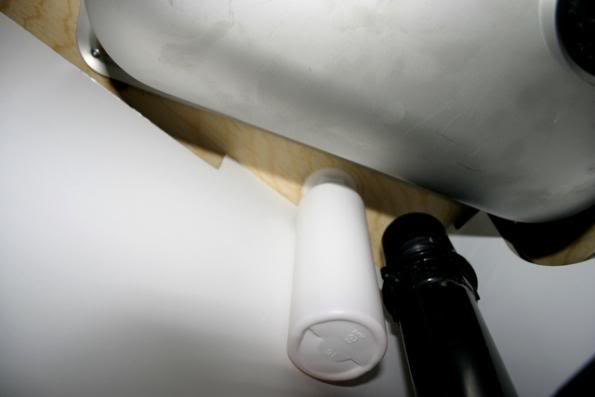
I installed one of these on my old STW and I just loved it. Saves you from having to dig through a cabinet for the soap. The spacing is tight to install it and you really have to be careful where you drill the hole (1") to mount it. I got lucky and got it just where I wanted it. The neat thing is the faucet spout will swing right over it so you can get the faucet out of the way of the sink if you need to. Also, to fill the reservoir, the top pump lifts right out and you fill it from above which means you don't have to unscrew the reservoir. Hint: Use the plastic reservoir base pushed up under the cabinet in the location where you want it to make sure it's going to fit. While holding it in place draw a line around it on the underside of the cabinet (easier said than done!). Locate the center of that circle and drill a small pilot hole up through the bottom of the counter. Drill the 1" hole from the top down through the pilot hole. I bought my metal pump from Kohler Plumbing Service Parts Store online. Part # 9619-CP. Total cost $41.45 including shipping. You can buy a cheaper all plastic version at Home Depot.
|
|

|

|
 11-01-2007, 04:14 AM
|
#14
|
|
Platinum Member
Join Date: Oct 2006
Location: New Brunswick, Canada
Posts: 8,828
|

Quote:
Towel Holder
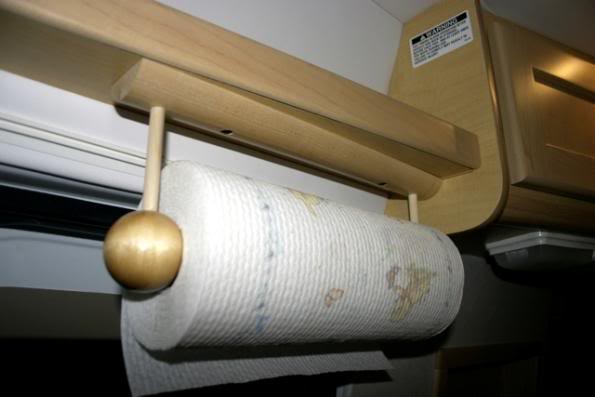
This is one of those items you just have to have. The problem is where to put it. I decided on mounting it under the open shelf above the counter. It barely fits. With a full roll of paper towels in it there is a small bit of trouble to close the curtain. But once it's in place it looks fine. If you want to exit the van during the night you'll open the curtain from the left side anyway. So to me it's no big deal. I got this holder from "Organize Everything" online. It's made of solid maple and matches the interior wood perfectly. Hint: Pre-drill the mounting holes carefully so you don't go through the top where they'd be visible.
|
Quote:
|
Very convenient place for the towels. Can easily be reached from outside.
|
Quote:
|
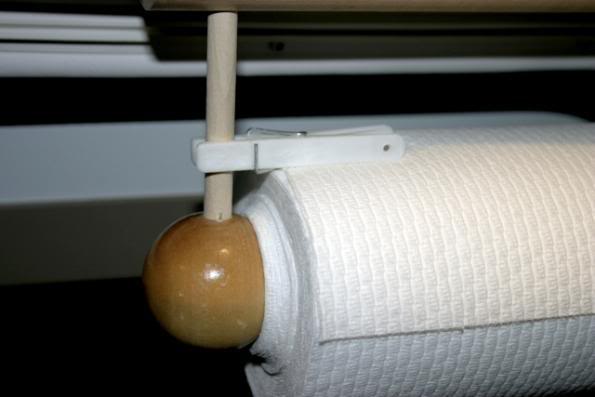
Extreme low-tech solution to a aggravating situation: The roll will always unroll when there's a breeze blowing through the van, driving or otherwise. This clothes pin solves the problem! Push it down on the roll and no more unrolling. Swivel it out of the way to pull the towels off when you want them.
|
|

|

|
 11-01-2007, 07:17 PM
|
#15
|
|
Platinum Member
Join Date: Nov 2006
Location: SE Minnesota
Posts: 242
|
Thank you MarcoPolo for saving Dennis' work here for all to see. I'm not sure how much longer his website will remain up and running. My guess is that once the domain name expires it will disappear.
__________________
A good traveler has no fixed plans, and is not intent on arriving. ~ Lao Tzu
|

|

|
 |
 Posting Rules
|
You may not post new threads
You may not post replies
You may not post attachments
You may not edit your posts
HTML code is Off
|
|
|
|
 » Recent Threads
 |
|
|
|
|
|
|
|
|
|
|
|
|
|
|
|
|
|
|
|
|
|
|
|
|
|
|
|
|
|
|
|
|
|