 |
|
 12-31-2013, 11:55 PM
|
#1
|
|
Platinum Member
Join Date: Aug 2010
Location: Minnesota
Posts: 12,457
|
 Charger and inverter upgrades in process
A few things came up (not bad things) that have made it so we won't be doing our 1 month dash to warm weather this year. The stuff also means I will have lots to do early in the spring, so I decided to get started on the electrical upgrades on the 07 C190P, even though the charger won't be here until the end of February. I should be able to get a lot of the rest done before then so I can finish in time to get onto the spring stuff.
The goal of it all is to get rid of the Tripp-lite model 750 inverter/charger that does not get the batteries all the way full, and replace it with a multibank, setable charger and a bigger, pure sign inverter big enough to run the microwave when coupled with upgraded engine to batteries wiring. We can then just run the van engine if we need a quick microwave use, instead of starting the noisy generator and perhaps breaking some rules.
First up was to get the microwave onto the inverter circuit, which it isn't from the factory in the Roadtrek. Luckily, the microwave is right above the inverter circuit outlet in the kitchen, so I looked like that would be the best place to tap in.
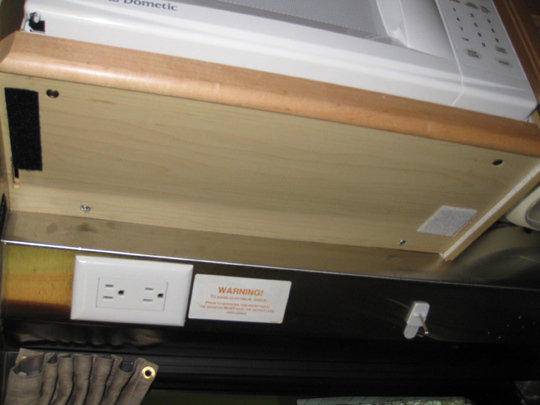
The microwave comes out pretty easy. Two screws in the front underside hold a wood tray that then slides out. The two rear screws in the pic have been added by us in the past to reduce noise and bouncing.
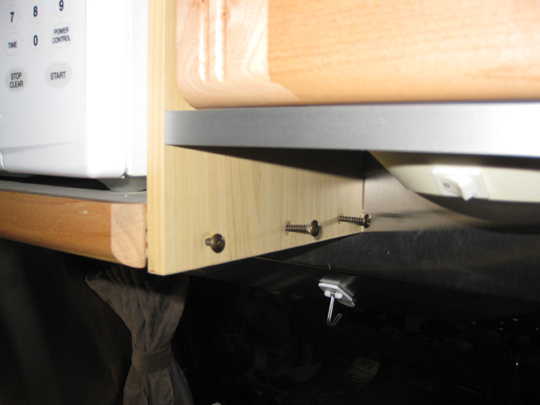
You don't need to remove the side screws, which look like you should. Those pieces are glued also, and don't have come apart.
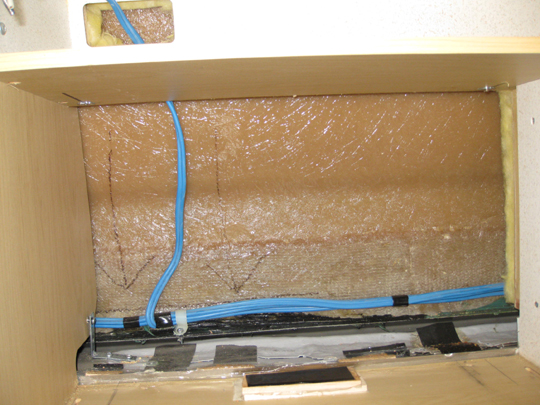
The original wiring is very accessible once the microwave is out. The upper wiring is for the micro and it comes directly from the breaker panel, on it's own breaker.
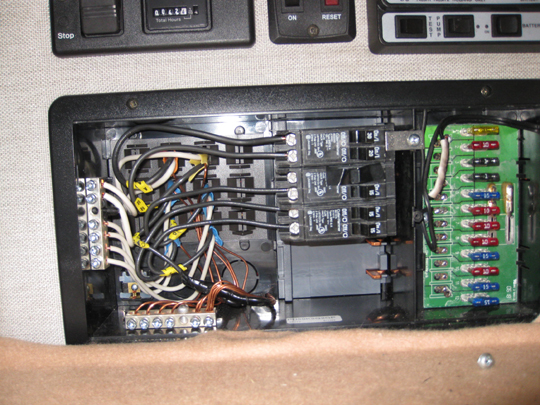
I just disconnected and taped up the breaker box end, as both ends of the wire will be disconnected and the wire not used for anything. The wire was on the third breaker, and is now folded, taped and tucked behind the grounds.
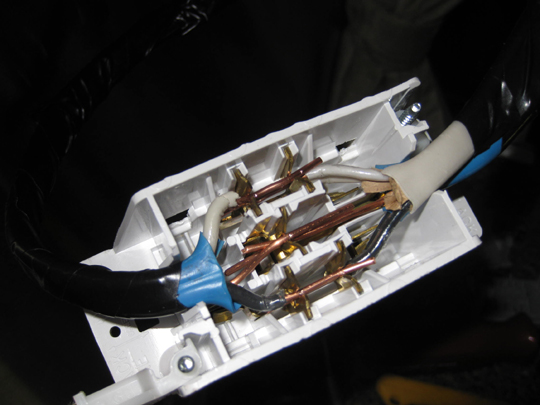
The inverter circuit outlet just below the micro had two wires in it. One came from the audio cabinet, and one out to the outlet behind the driver's seat. When I saw how it was wired, I was afraid I might not be able to add a third wire to it, but searching the web indicated that 3 wires are OK on those outlets. Unfortunately, there is no manufacturer information posted, just what others had gotten in emails and phone calls.
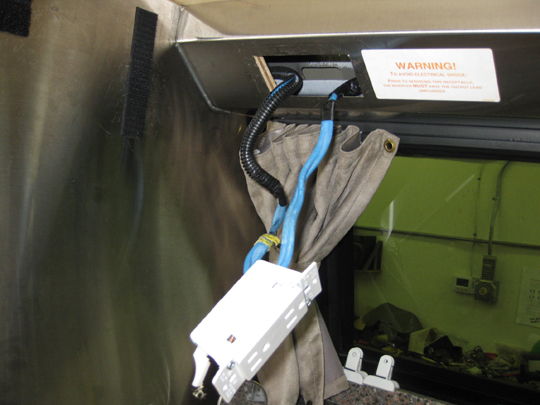
As it turned out, the three wires wouldn't fit in the push in contacts if the insulation was on them like Roadtrek had them. Once the insulation was stripped, there was plenty of room.
There was a gap in the cutoff roof material behind the cabinet that was big enough to get the wire into the stainless tray/runner that the kitchen outlet is in.
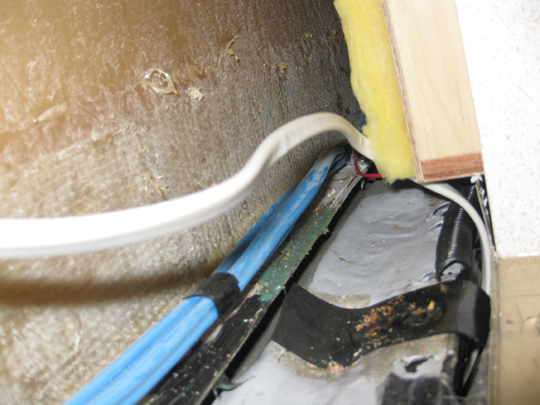
There were a lot of sharp edges where the wire went through, so I put a piece of split sleeving over the sharp edges, another sleeve around wire taped heavily, and when done set the whole thing in silicone to keep it from bouncing and wearing.
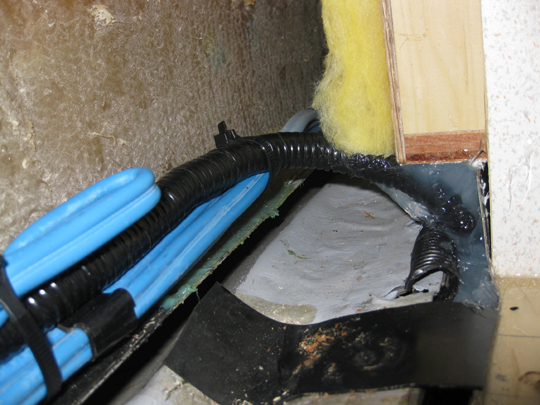
The original wire was taped up and folded against itself and tiewrapped to the other wires.
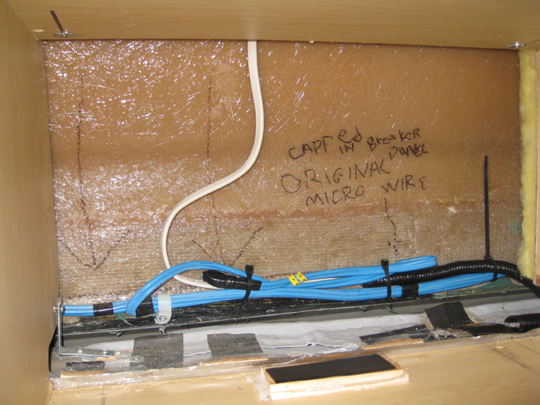
Looking into the microwave opening, it is obvious there is no insulation there, or on the roof behind the adjacent cabinet. Only some on the cabinet back that wouldn't do anything much. There is very little space behind the microwave, so they must have left it without insulation to let it vent, as the outlet of the microwave is in the back. One layer of Reflectix wasn't any thicker than the wiring, and seemed to leave enough room for air to flow. It is no wonder things would get very hot in those cabinets when in the sun.
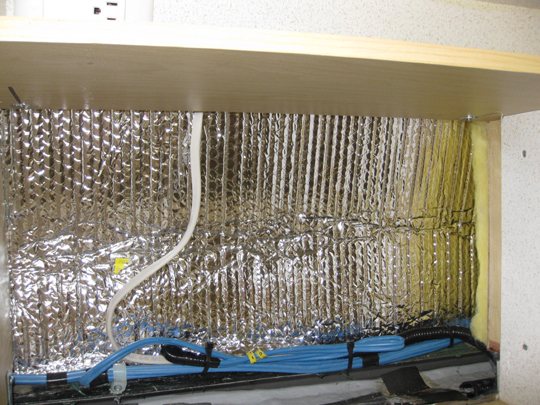
I put everything back together and turned on the Tripp-lite, too small, inverter to see if the clock on the microwave came on, which it did. It did flicker a lot, which I am told is because the Tripp-lite is a modified sine wave. Hopefully, the new inverter will work much better.
Now I need to get all the parts in place and enough power to the inverter to run the microwave properly.
One side note that I found while reading about microwaves and inverters, is that the microwave cooking power is directly related to AC voltage supplied to the unit, assuming a good sine wave. It was also stated that the output voltage of the inverter was directly related to the DC power voltage supplied, so having the engine running at 14.4 volts should make everything work better and faster. I hadn't heard that before, I hope it is all true.
|

|

|
 01-01-2014, 12:57 AM
|
#2
|
|
Platinum Member
Join Date: Aug 2010
Location: Minnesota
Posts: 12,457
|
 Re: Charger and inverter upgrades in process
Next up was to strip out the existing charger, controls, and such from the electrical area in the passenger side rear of the Roadtrek. The battery cable wiring all needed to also be pulled out and will be redone, and a new 4 gauge wire put in parallel with existing 4 gauge wire from the engine to the batteries
Current access is kind of tough, under the bed from the side only.
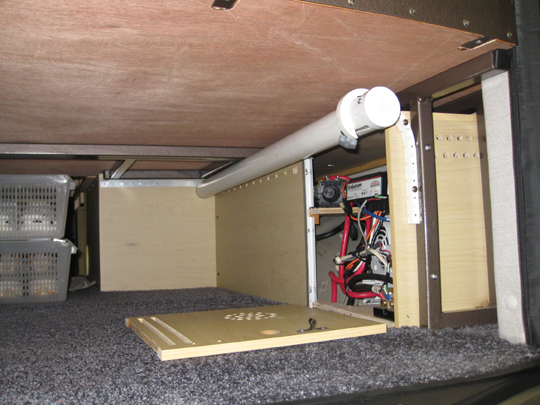
This is from closer. It is nearly impossible to flip the tiny, tiny dip switch to get the Tripp-lite into equalization mode.
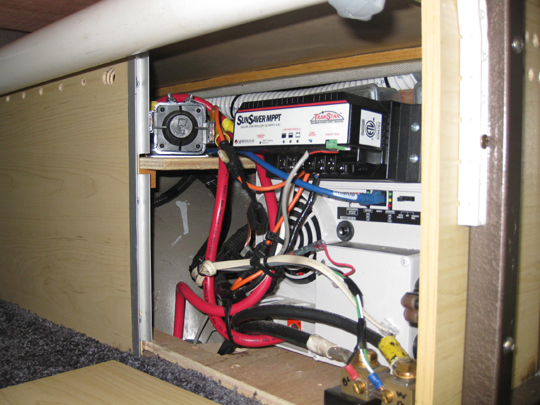
With the bed deck off, you can see the bed frame sits on the Roadtrek wooden wheelwell box.
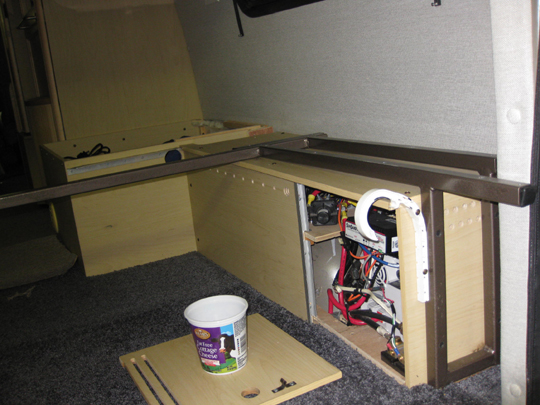
That will change so I can improve access to a support like I built for the other side when I removed the wood cover.
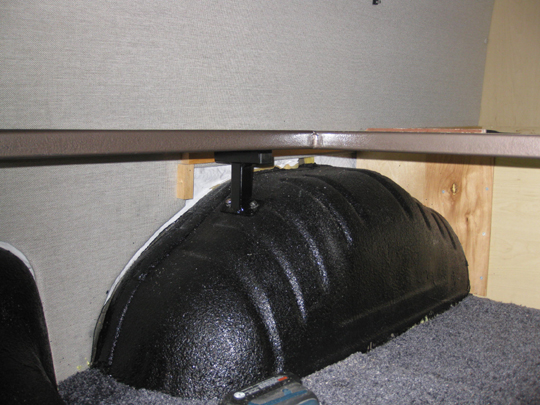
With the side and top covers off, it is still a mangled mess of stuff in the box.
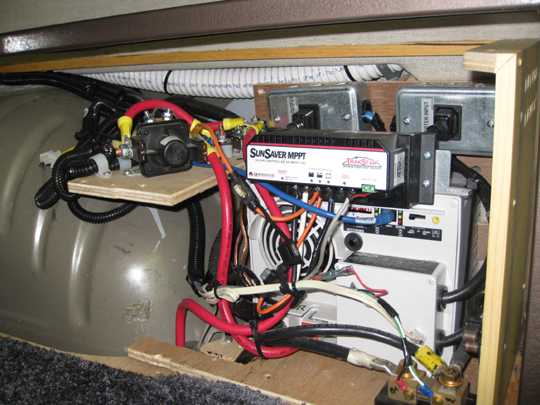
And from the top.
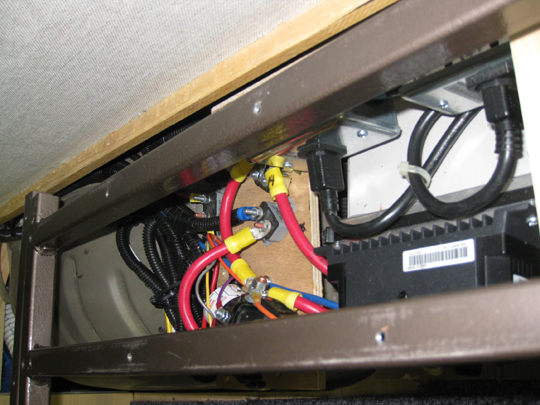
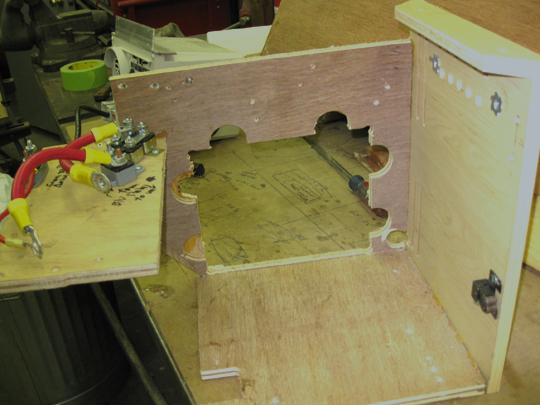
I removed everything from the cabinet, only leaving attached wiring. This is the wooden box Roadtrek used to hold it all. It is very flimsy, and I had already fixed and reinforced it twice in the past, while in doing other things.
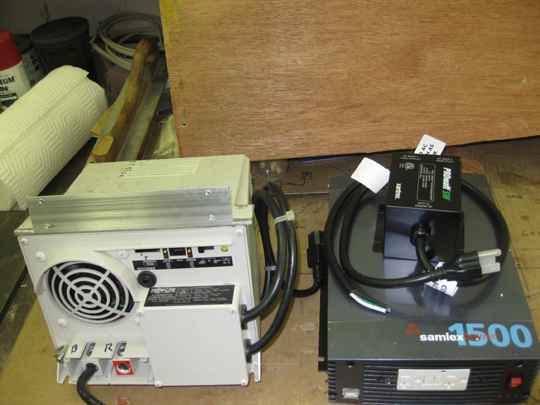
Here is the original Tripp-lite next to the new Samlex inverter and Xantrex transfer switch. Both these items are included in the Tripp-lite, but now will be separate. The Blue Sea charger hasn't arrived yet
Originally, there was no negative cable in the area, but I had added one when I put in the Trimetric monitor. It is large enough that it won't need to be replace (2 gauge). The red cable is the Roadtrek original and is a 4 gauge. It was connected to both batteries and the engine power feed to the rear. It will go away, and the 2 gauge battery cables from both banks will go directly into the area and the inverter.
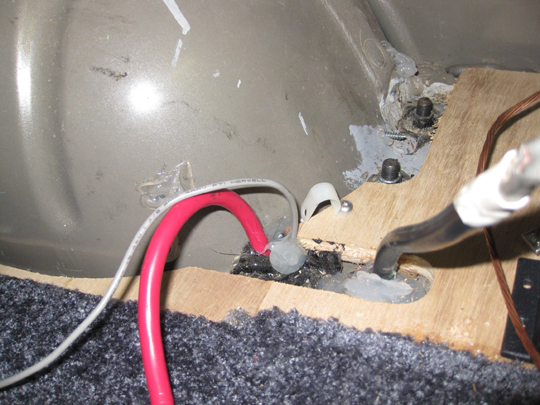
The 2 gauge battery cables are long enough to run into the cabinet individually for the multibank charging.
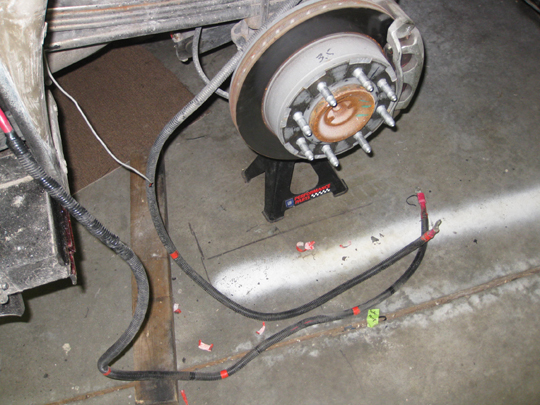
The negatives were previously tied together, by me, with a simple bolt connection, but since they are the right size, I will reuse them as is only put them onto a binding post.
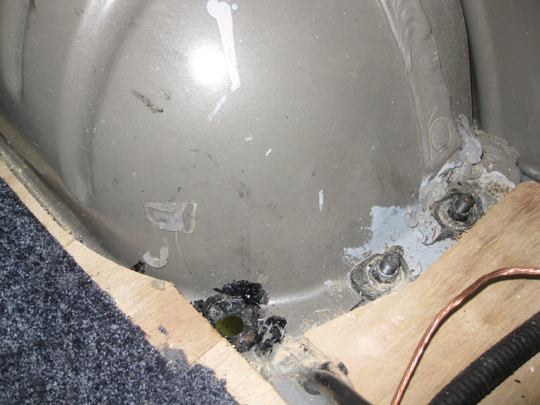
By cutting off a little of the floor plywood, there is enough room to bring in all the cables I will need. You can't go away from the wheelwell more unless you go past the negative cable because of a reinforcement under the floor, but you can go a ways along the edge of the wheelwell until you get to the battery box area. I will need the two 2 gauge battery cables, and the two 4 gauge cables from the engine to come into the cabinet, so there should be enough room. There will also be some smaller wires like an 8 gauge for the generator start, a 10 gauge for the air compressor, etc.
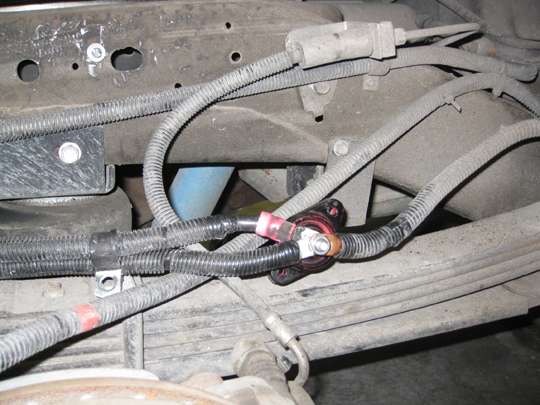
The underbody power wiring was pretty weird. Roadtrek had a binding post way over on the passenger side of the underbody, between the propane tank and the generator.
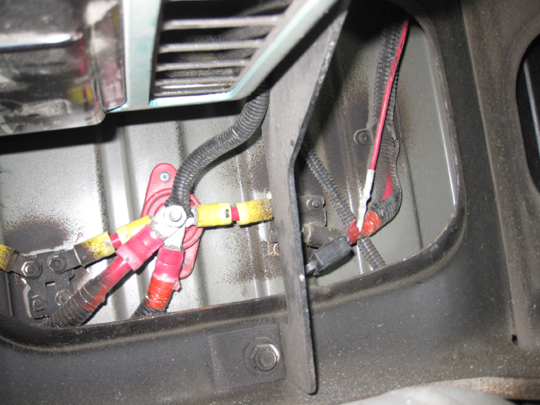
The wiring on the binding post and surrounding from Roadtrek was as follows. The 4 gauge wire from the engine came to the area and connected to an 80 amp breaker, then the breaker was connected to the binding post with another cable. The generator start line went directly to the post. Both battery cables (2 gauge) go all the way across the bottom of the van from the passenger side battery cases and connect to the post (no fusing). A 4 gauge wire goes from the post to an 80 amp breaker, and then another 4 gauge cable from the breaker all the way back to passenger side and up to the Tripp-lite. The binding post and breakers are right where they get lots of water, and salt if you drive in it, on them, and the big, unfused battery cables are tucked up between the floor and the reinforcing, but at least they have sleeving on them where they hit the sharp edges. There were at least a half dozen plastic cable clamps holding the cables the floor, and they must have been put in before the propane tank and generator, as they were not easily reachable. It took a 1/4" ratchet with a socket and square drive bit to reach them, and it was mostly by feel. Changing a battery cable on a stock Roadtrek would take hours of work, I think. I have lots of mounting holes to plug up with silicone to keep water out under there. All the wiring will be extended to move the connections into the electrical area with the charger and inverter, so the underside will be much cleaner and more reliable.
Still waiting for the new 4 gauge cable to finish the front to back wiring, and then can start making some mounting hardware for all the stuff that needs to be put in the electrical area.
|

|

|
 01-01-2014, 03:44 AM
|
#3
|
|
Platinum Member
Join Date: Oct 2006
Location: New Brunswick, Canada
Posts: 8,828
|
 Re: Charger and inverter upgrades in process
Wow!  That's a lot of work and it's going to be great when it is finished.
Actually, I'm impressed with the 4 gauge and 80 amp breakers put in by Roadtrek. You'll find 8 or even 10 gauge on some RV's. Everything looks to be in good shape too.
So you're upping it to 2 gauge and higher capacity breakers. Will you use something like 125 amp breakers?
|

|

|
 01-01-2014, 02:37 PM
|
#4
|
|
Platinum Member
Join Date: Aug 2010
Location: Minnesota
Posts: 12,457
|
 Re: Charger and inverter upgrades in process
Quote:
|
Originally Posted by markopolo
Wow!  That's a lot of work and it's going to be great when it is finished.
Actually, I'm impressed with the 4 gauge and 80 amp breakers put in by Roadtrek. You'll find 8 or even 10 gauge on some RV's. Everything looks to be in good shape too.
So you're upping it to 2 gauge and higher capacity breakers. Will you use something like 125 amp breakers? |
The only 2 gauge Roadtrek had in was the battery cables from the two coach batteries to the binding post. The wire from the front was 4 gauge, and the wire from the binding post was also 4 gauge, which really didn't make a lot of sense. Two number 2 and one number 4 feeding a single number 4?
I haven't finished the new wire to the rear from the alternator yet, but it will be second #4 with 80 amp breakers on each end, just like the Roadtrek one, so I will have, theoretically, 160 amps available. The wire from the alternator to the separator was also only #4 through an 80 amp breaker. I replaced that with a #2 wire and a 200 amp fuse.
There will be a 200 amp fuse to the new inverter, and three 60 amp fuses at the charger outputs.
It appears that the main coach battery cables are rarely fused. Our original wiring isn't, and since the fuse would need to be on the both ends of the wire to protect it adequately against shorts, you would need 4 big fuses to do it. I don't think I will fuse the battery lines, but will be very careful with running and protecting the cables.
|

|

|
 01-04-2014, 10:45 PM
|
#5
|
|
Platinum Member
Join Date: Aug 2010
Location: Minnesota
Posts: 12,457
|
 Re: Charger and inverter upgrades in process
The spool of 4 gauge showed up yesterday, so I could get back to finishing off the capacity increased wiring from the engine to the rear.
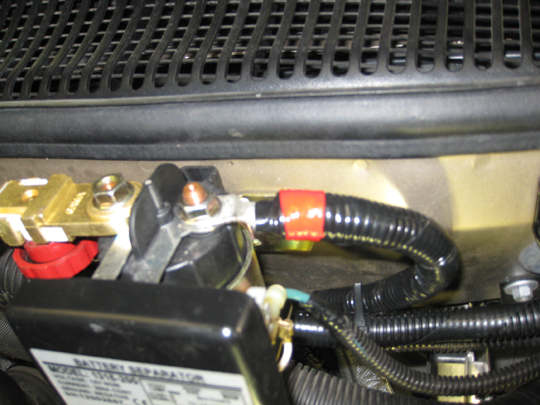
The original wiring from the alternator was a 4 gauge wire to an 80 amp breaker and then another 4 gauge wire from the breaker to the separator. The two 4 gauge wires were upsized to 2 gauge and the 80 amp breaker replaced with a 200 amp fuse.
#2 from the alternator to the 200 amp fuse
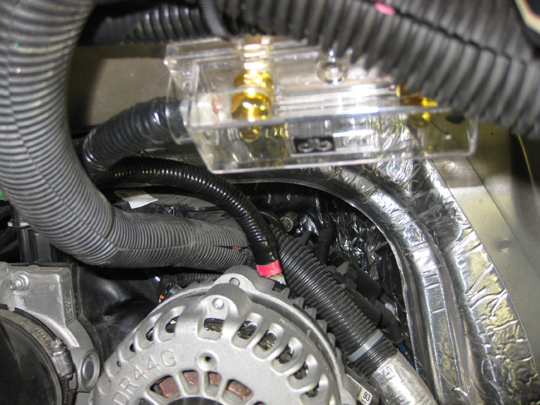
#2 from the fuse to the separator
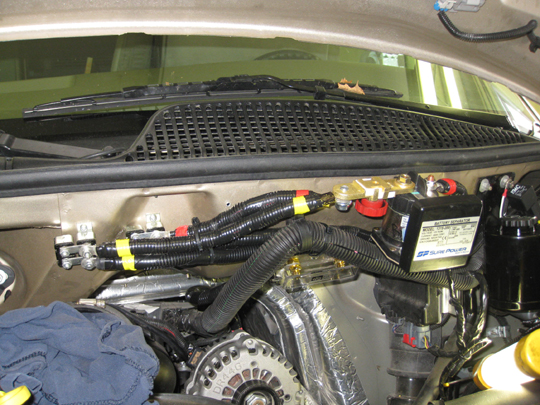
The increase in capacity to the rear is by adding a second 4 gauge parallel with the existing 4 gauge from Roadtrek. It will be done the same way as Roadtrek did, with an 80 amp breaker on each end of the new wire.
Added wire and breaker from separator to rear (left one)
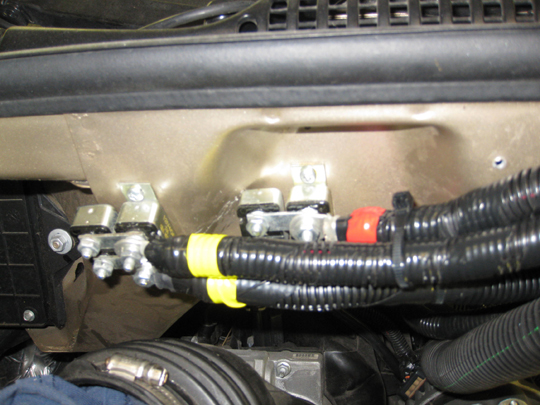
As long as wires were being run, I am also running two 12 gauge to the rear for future brake control, two 14 gauge for security install later, and one 10 gauge for the air compressor power. It all runs in two 1/2" sleevings, one with the #4 and the rest in the other.
In the wheelwell, only two of the mess of wire runs were added.
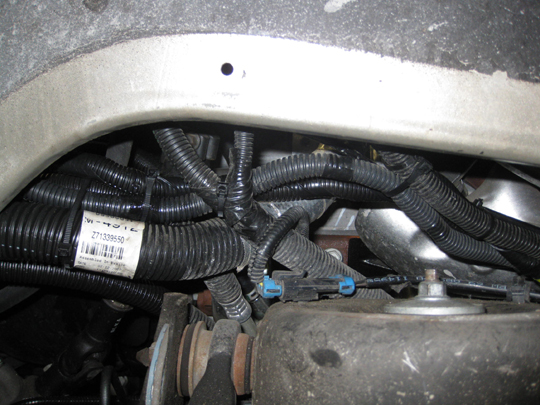
Harness breakout for security add on.
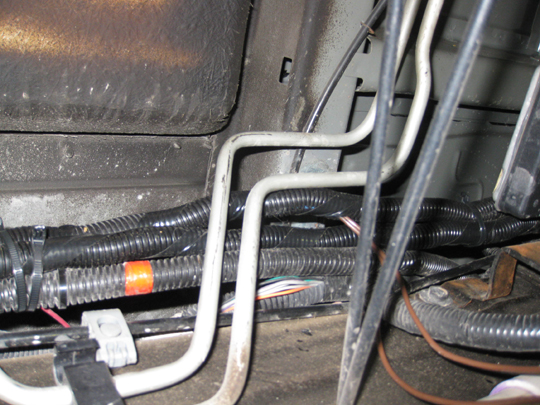
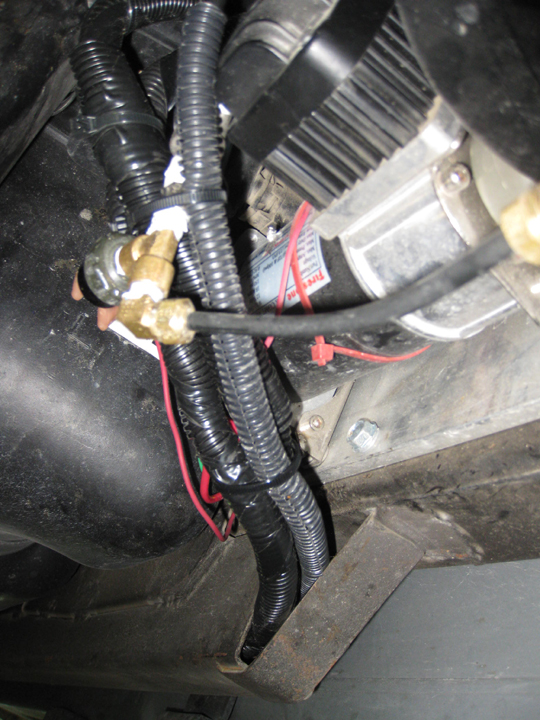
The original wiring goes between the gas tank and side storage, which didn't look to be accessible enough for the new wiring, so I took it lower at the air compressor and ran it through the new frame piece Roadtrek added to protect the gas tank.
Going into the frame at the compressor area.
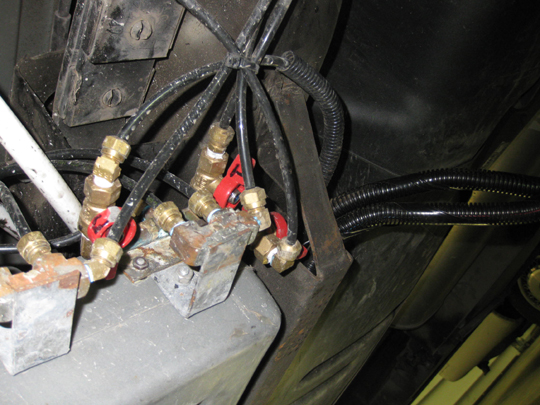
Coming out the other end of the frame just in front of the rear wheelwell.
All the wires are run to the rear wheel area, and now need to be run across to the passenger side and up into the electrical cabinet area. I won't be able to do much of that until the charger gets here and I can locate all the components.
|

|

|
 01-04-2014, 11:55 PM
|
#6
|
|
Platinum Member
Join Date: Oct 2006
Location: New Brunswick, Canada
Posts: 8,828
|
 Re: Charger and inverter upgrades in process
I never realized how large those SurePower battery separators are. Seeing it in your photo with the alternator gives a good idea of the size.
I'm curious about the breakers that look to be doubled up. Are they one unit that looks like two breakers or is it actually two breakers with the second one in there for redundancy?
|

|

|
 01-05-2014, 12:48 AM
|
#7
|
|
Platinum Member
Join Date: Aug 2010
Location: Minnesota
Posts: 12,457
|
 Re: Charger and inverter upgrades in process
Quote:
|
Originally Posted by markopolo
I never realized how large those SurePower battery separators are. Seeing it in your photo with the alternator gives a good idea of the size.
I'm curious about the breakers that look to be doubled up. Are they one unit that looks like two breakers or is it actually two breakers with the second one in there for redundancy?
|
The breakers are sold as an 80 amp breaker, but are really two 40 amp breakers in parallel with a permanent strap. Normally, this is a no-no, but apparently they must make sure they match very well. I had never seen these before, but Roadtrek uses them, and they are small and relatively inexpensive for a watertight, auto reset, breaker. The brand is Cole-Hersee.
|

|

|
 01-05-2014, 01:39 AM
|
#8
|
|
Platinum Member
Join Date: Oct 2006
Location: New Brunswick, Canada
Posts: 8,828
|
 Re: Charger and inverter upgrades in process
I hadn't seen them before either. Thanks for the info.
|

|

|
 02-27-2014, 07:16 PM
|
#9
|
|
Platinum Member
Join Date: Aug 2010
Location: Minnesota
Posts: 12,457
|
 Re: Charger and inverter upgrades in process
Still no charger, and at this point two weeks+ past the last promised ship date. My vendor is going to again check to see what is going on, but said that only one unit shipped to him in February of the about 15 or so he has on order. Oh well, it is still below zero here, and that is the high temp for the day.
Some discussions on other boards about chargers and batteries had me looking at specifications for chargers that had been mentioned by folks. In particular was a Parallax unit 4455TC. Interesting spec is that it says it goes into boost (absorption voltage it appears) for 4 hours whenever it is plugged in. It didn't seem to have any other parameters to take it out of boost, other than time. This would take care of some of the issues with the chargers that won't go into absorption mode if there is surface charge on the batteries, or solar, but it would always put in 4 hours of high voltage, even if the batteries were full. 4 hours would also not be enough time charge a fairly large bank of batteries if they were pulled down pretty far. I wonder if there are some other things going on that they don't mention, or if they just wanted to get multistep very simply? I think most of the multisteps use some sort of algorythm that takes into account voltage, current, and minimum time in absorption. Of course a lot of them do it pretty poorly.
That got me curious as to how the Blue Sea will do it. I knew that you set a max and min absorption time, and the manual says you also set a max amperage (by bank) that it can have before going into float. I assumed it would just charge until it went into absorption stage, run the minimum absorption time, and then go to float when the amps dropped enough, but then I ran across this in the manual I had downloaded.
It is kind of cryptic tech-speak, but I think it says that the charger monitors how long it is bulk charge (which is variable based on what SOC you started at and bank size) and calculates the absorption time based on that and max absorption time which you set based on how long it takes to bring up a near empty bank, within the other limitations of min and max time and max current. If it really does that, it is pretty cool, as you need to have different absorption time, from what I have read, depending on how low you start in % charge. It should really help in preventing overcharge water use (or damage in an AGM) and undercharging severely discharged banks. I wonder if it takes into account the charge amperage to the bank while in bulk by bank, as the output is split between them.
How do you read what it says?
|

|

|
 02-27-2014, 09:53 PM
|
#10
|
|
Platinum Member
Join Date: Oct 2006
Location: New Brunswick, Canada
Posts: 8,828
|
 Re: Charger and inverter upgrades in process
I think it monitors how long it is in bulk charge mode but I don't think that affects the time in absorption mode. It does effect the amount of time charging at a voltage greater than pre-float or float.
My understanding:
Bulk - it will stay in bulk mode until the batteries get to the absorption voltage you set.
Absorption - it will stay in absorption mode until it first reaches the minimum absorption time you set and then until the current flow into the batteries has reduced to the amperage you set and as long as the maximum absorption time you set has not been exceeded.
It will exit absorption mode when the current flow into the batteries has reduced to the amperage you set and the minimum absorption time you set has been met OR when the maximum absorption time you set has been exceeded regardless of the amount of current flowing to the batteries.
That is one smart charger 
|

|

|
 02-27-2014, 10:08 PM
|
#11
|
|
Platinum Member
Join Date: Aug 2010
Location: Minnesota
Posts: 12,457
|
 Re: Charger and inverter upgrades in process
Quote:
|
Originally Posted by markopolo
I think it monitors how long it is in bulk charge mode but I don't think that affects the time in absorption mode. It does effect the amount of time charging at a voltage greater than pre-float or float.
My understanding:
Bulk - it will stay in bulk mode until the batteries get to the absorption voltage you set.
Absorption - it will stay in absorption mode until it first reaches the minimum absorption time you set and then until the current flow into the batteries has reduced to the amperage you set and as long as the maximum absorption time you set has not been exceeded.
It will exit absorption mode when the current flow into the batteries has reduced to the amperage you set and the minimum absorption time you set has been met OR when the maximum absorption time you set has been exceeded regardless of the amount of current flowing to the batteries.
That is one smart charger  |
That is what I initially thought, but then I saw where it says "When in bulk mode the remaining time will increase" referring to the absorption timer. That is when I started thinking that it may set an absorption time, which is different from the min (but higher) and max (but lower), based on how long it is in bulk and increasing the absorption timer time. Most of the chargers just have a set absorption time, I think, so even having a min and max is somewhat different, and if it has continuously variable on top of the other parameters, that is getting pretty techie.
|

|

|
 02-27-2014, 10:35 PM
|
#12
|
|
Platinum Member
Join Date: Oct 2006
Location: New Brunswick, Canada
Posts: 8,828
|
 Re: Charger and inverter upgrades in process
I think the "When in bulk mode the remaining time will increase" re: the Absorption Timer Counter is because it is still in bulk mode and hasn't yet started absorption mode. The time left has to increase if still in bulk mode. It notes that the time remaining is "relative to the Maximum Absorb Time" (which is set by the user).
You'll know for sure the first time you see the increasing time indicator disappear and the time left is the Maximum Absorb Time you set. If it is not the time you set then you'll know it is continuously adjusting in addition to the presets.
|

|

|
 02-27-2014, 11:16 PM
|
#13
|
|
Platinum Member
Join Date: Aug 2010
Location: Minnesota
Posts: 12,457
|
 Re: Charger and inverter upgrades in process
Quote:
|
Originally Posted by markopolo
I think the "When in bulk mode the remaining time will increase" re: the Absorption Timer Counter is because it is still in bulk mode and hasn't yet started absorption mode. The time left has to increase if still in bulk mode. It notes that the time remaining is "relative to the Maximum Absorb Time" (which is set by the user).
You'll know for sure the first time you see the increasing time indicator disappear and the time left is the Maximum Absorb Time you set. If it is not the time you set then you'll know it is continuously adjusting in addition to the presets.
|
It will be interesting to see what it does, and it should be obvious. If the absorb timer keeps going higher until the start of absorption, and then counts down from there, not the maximum, we will know it is calculating an absorb time for each bank, on each charge cycle.
"The P12 battery charger uses a counter to determine the amount of time a battery bank should remain in Absorb relative to the Maximum Absorb Time." That could be taken to mean many things.
|

|

|
 02-28-2014, 03:56 PM
|
#14
|
|
Platinum Member
Join Date: Aug 2010
Location: Minnesota
Posts: 12,457
|
 Re: Charger and inverter upgrades in process
I have been googleing for a long time looking for information on absorption time setting. 99% of what I found was the normal fixed absorption time calcs based on battery bank size.
BUT--I finally found an explanation of what I think the Blue Sea manual is addressing. It is called adaptive charging and does vary the absorption time based on how long the bulk charge takes. It is apparently done because the battery needs more absorption time to totally get to a complete charge if it has been discharged deeper. Here is an explanation from Phoenix on how they do it, and it sure sounds the same as the Blue Sea statement of how theirs will work.
|

|

|
 02-28-2014, 06:19 PM
|
#15
|
|
Platinum Member
Join Date: Oct 2006
Location: New Brunswick, Canada
Posts: 8,828
|
 Re: Charger and inverter upgrades in process
There's no mention of current flow rate that I could see in the Phoenix doc. It is still timer based although more sophisticated than typical 3 stage chargers. The Blue Sea charger will exit absorption mode based on current flow not only time when configured correctly. That seems ideal to me as it is letting the battery "control" the charging. The battery "tells" the charger that it is near full (amps in at a relative trickle) and "instructs" the charger to switch to pre-float or float mode. 
I can't wait for you to get the Blue Sea unit and get it set up. That's going to be very interesting.
|

|

|
 02-28-2014, 06:53 PM
|
#16
|
|
Platinum Member
Join Date: Aug 2010
Location: Minnesota
Posts: 12,457
|
 Re: Charger and inverter upgrades in process
Quote:
|
Originally Posted by markopolo
There's no mention of current flow rate that I could see in the Phoenix doc. It is still timer based although more sophisticated than typical 3 stage chargers. The Blue Sea charger will exit absorption mode based on current flow not only time when configured correctly. That seems ideal to me as it is letting the battery "control" the charging. The battery "tells" the charger that it is near full (amps in at a relative trickle) and "instructs" the charger to switch to pre-float or float mode. 
I can't wait for you to get the Blue Sea unit and get it set up. That's going to be very interesting. |
I noticed the no minimum current thing, too, but I would bet that the Pheonix also has that, as they seem to be pretty sophisticated, and the minimum current seems to be more common than the variable absorption time.
One question I will need to answer is which takes priority in coming out of absorption, the extended time or the low current? My guess is that the extended absorption time will, but it doesn't say that anywhere.
With a single charger on a single battery bank, it all looks pretty obvious how it would work, but I wonder how it will handle the split output to 3 banks and van usage of 12 volts, which could extend the bulk time on any given bank, and thus the absorption time. However it does it, I would think it will still be better than a fixed timer, even with a low current setting.
The extended absorption time must be some kind of automatic "mini" equalize time they put onto batteries that have been taken down quite a ways. It is an easy way to get it when it is needed and not get it when you don't need it. I know all the wet cell manufacturers recommend much more frequent equalizing on batteries that are more deeply discharged, so hopefully this will reduce that need and do it by itself. The extra time combined with the 14.8 volts Trojan recommends should be a very good thing as long as it keeps the times correct.
I think this kind of setup might be even more of a benefit to AGMs than to wet cells. Wet cells mostly will just use some water, and maybe corrode the plates a little, for overly long times at absorption, but AGMs will dry out the electrolyte irrecoverably.
Seeing how it works in reality will be fun. Hopefully, it will also consistently and safely get the batteries totally full. I already picked up a second little hydrometer and a small plastic box to carry it in, so we can easily check actual SOC while on the road, and under various conditions.
|

|

|
 03-02-2014, 02:11 AM
|
#17
|
|
Platinum Member
Join Date: Aug 2010
Location: Minnesota
Posts: 12,457
|
 Re: Charger and inverter upgrades in process
Still been digging around on how folks are designing things in the charger world these days.
This is on the Battery Tender site and refers a lot of the actual tech work back to Deltran:
http://batterytender.com/images/largebasics3.gif
It is the first time I have seen a charger profile that actually matches the curves that Trojan says it wants for their wet cells, fairly well, although Battery Tender is talking about it being for AGMs. It also gives some time calculations for the absorption and equalize portions of the curve.
Here is the complete article:
http://batterytender.com/resources/battery-basics.htm/
|

|

|
 03-18-2014, 05:10 PM
|
#18
|
|
Platinum Member
Join Date: Aug 2010
Location: Minnesota
Posts: 12,457
|
 Re: Charger and inverter upgrades in process
Well, the Blue Sea adventure continues. I called the vendor about 10 days ago to see if he had an updated ship date, which he didn't. Said he would check and get back to me, but I hadn't heard from him since. I called him today, and he told me it was supposed to ship this week, but he just got an e-mail that moved the tentative ship date to May 19--Yikes. We need to be running way before that.
I had done a search right after I called him 10 days ago, and West Marine showed them in stock, which I called and confirmed then, so I called them back this morning. Out of stock, and more due in May--Crap. After a bunch of back and forth, the customer service person checked the retail stores and found one in Rhode Island and another in St Petersburg. I called Rhode Island, and they couldn't find it. I called St. Petersburg and they said they had one, so I ordered it. West says they do free shipping for all orders now, and that would include from the store, but of course you pay full retail with them. Should get it next week. While I was talking with the customer service person, I had them check on the remote, which had disappeared from their website, but as of 10 days ago was not in stock. It now showed in stock, so I ordered that from the online store via phone before anything else could happen. That just left the ACRs, which are common items, very expensive at West ($100), so I ordered them from Amazon.
Sooo, if everything works out, I should have everything early next week, but the way this adventure has gone I don't have a lot of confidence in any of it.
|

|

|
 03-19-2014, 08:48 PM
|
#19
|
|
Platinum Member
Join Date: Oct 2006
Location: New Brunswick, Canada
Posts: 8,828
|
 Re: Charger and inverter upgrades in process
Frustrating. Looks like limited production / high demand / high quality unit. It is made in the US isn't it?
|

|

|
 03-19-2014, 09:06 PM
|
#20
|
|
Platinum Member
Join Date: Aug 2010
Location: Minnesota
Posts: 12,457
|
 Re: Charger and inverter upgrades in process
Quote:
|
Originally Posted by markopolo
Frustrating. Looks like limited production / high demand / high quality unit. It is made in the US isn't it?
|
It is built at the Blue Sea plant in Washington or Oregon, I think. Story is that they are building and run in testing every unit to confirm reliability. I don't know if this is because they want to make sure of their reputation in a new market for them, or because they have issues. I did get info from a few of the vendors that have sold a few, and they said they have had no field failures, though.
I had an interesting discussion with my original vendor when I cancelled my order with him yesterday. Actually, I think he was glad to be done with Blue Sea for a while. He does electrical system designs and installs for a lot of high end boats, with sophisticated systems in them, as his primary work. When I originally ordered the charger and parts from him, in the far distant past, he tried to talk me out of it, saying that he would recommend Victron, and that a similar control system could easily be designed using their parts. I had so much time in at that point, I declined to start over and ordered the Blue Sea. Last week when he found out the Blue Sea was moving out to at least May, he looked closely at the specs to find me some a substitute that could do the same thing, and that he could actually get. To my surprise (and his too, I think) he came up empty. In the last conversation he told me I really had no other options for what I wanted to do and the programing I needed to charge correctly. He did say, if the Blue Sea turns out to be a good seller and addresses the issues it is intended to, that he thought the other manufacturers would be offering similar chargers pretty quickly. We will see.
|

|

|
 |
|
 Posting Rules
|
You may not post new threads
You may not post replies
You may not post attachments
You may not edit your posts
HTML code is Off
|
|
|
|
 » Recent Threads
 |
|
|
|
|
|
|
|
|
|
|
|
|
|
|
|
|
|
|
|
|
|
|
|
|
|
|
|
|
|
|
|
|
|