Journey with Confidence RV GPS App RV Trip Planner RV LIFE Campground Reviews RV Maintenance Take a Speed Test Free 7 Day Trial ×


Reply
 
Thread Tools Display Modes
 
Old 11-15-2020, 10:28 PM   #1
Platinum Member
 
Join Date: Aug 2020
Location: TX
Posts: 179
Default Roadtrek 210P AC Changeout

Hi friends, I'm not typically on this forum but I thought I'd share my replacement of the failed Dometic AC/Heat pump unit in our 2010 RT 210P (Chevy Express 3500 chassis).....

I'm aware that you can do a direct swap with another new Dometic unit, but I didn't want to do that. It wasn't a matter of cost, even though a new one is about $900-1000, not including labor to install. I could afford that, but my perspective was to install a regular window unit in place of the Dometic to facilitate any later replacement needed if we were on the road. Nothing can cut a trip short in warm/hot weather than a failed ac unit, especially if you decide to find and get a direct replacement installed. By using a regular ac unit, it's much easier to find at Walmart, Home Depot, etc etc and swap it out in about half a day with regular tools you would typically carry with you. And of course, the cost of a window ac unit is much less than a replacement Dometic.

I did check out the non-cooling Dometic unit in terms of circuitry, controls, and start/run capacitors, etc. Conclusion was that there was an issue with the compressor itself and cost to repair was not feasible.

I've also seen comments centering around the ability of a regular window unit to withstand vehicle vibrations. We have not had any problems with that, and our family has used standard window ac units for years, added to a Class C motorhome.

So, here's what I did. As mentioned, now that the initial installation is done, it's a straightforward swap if I ever need to replace the ac unit out in the wilds somewhere. I'll also add the usual disclaimer - this has worked great for us, but do this at your risk, not my fault if you mess things up

There's a lot of trial fit and removal needed as well to ensure that the new unit fits properly. But now that's it all done any future replacement is not difficult at all, the hardest part will be hoisting the old unit out and new unit up onto the rear shelf.

Your needs may be different, but we didn't really care about the heat pump nor the wall mounted thermostat. We have the propane furnace if needed and it's just as easy to control the new unit from its face panel or the remote control supplied with it. That remote also has a thermostat, so you can program the ac unit to work with the remote thermostat, which can be placed anywhere in the van.

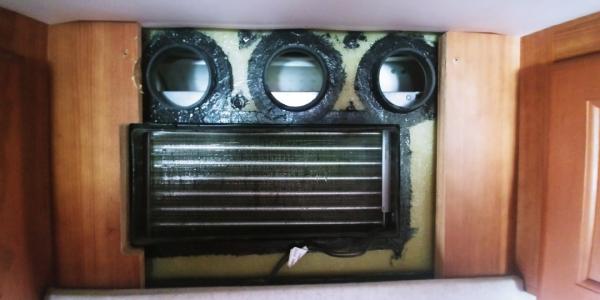
Here's the Dometic unit with the face grill removed. The entire unit sits in a fiberglass pan whose face runs up the front side, with openings for the return and supply airflow.

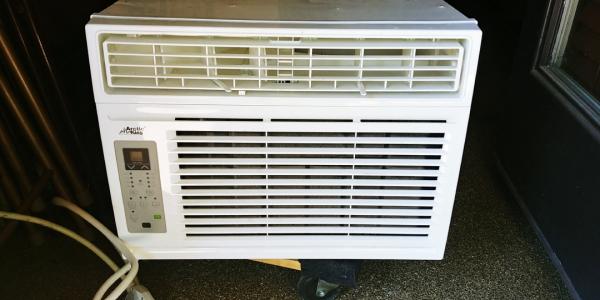
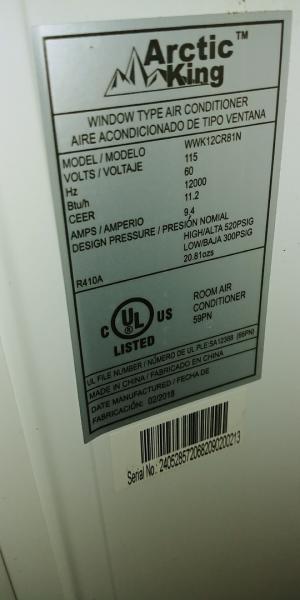
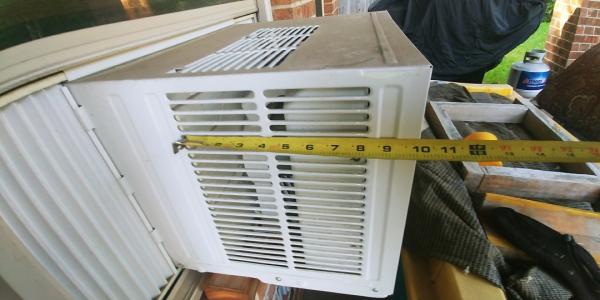
Here's the window unit ac that replaced the Dometic, dimensions are very close to the Dometic, but the bottom front brackets need to be trimmed down to 1/4" (I think they are about 1/2" deep). It's a snug top-to-bottom fit into the opening but it does fit fine.

Although I guess it all worked, I never really liked the plastic corrugated cover that RT installed on the Dometic.
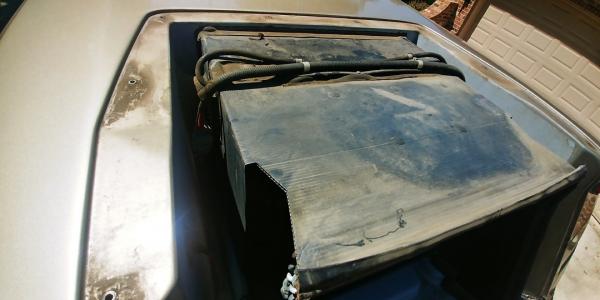

The top isolation panel was also sagging after all these years, it should have been metal like the side isolation panels.
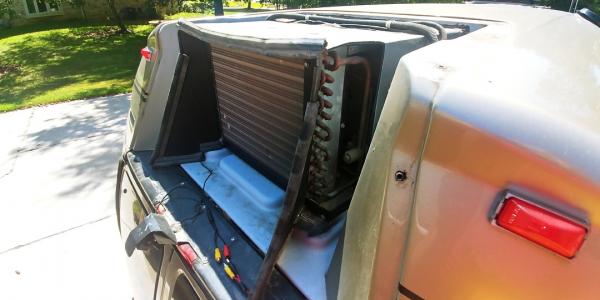
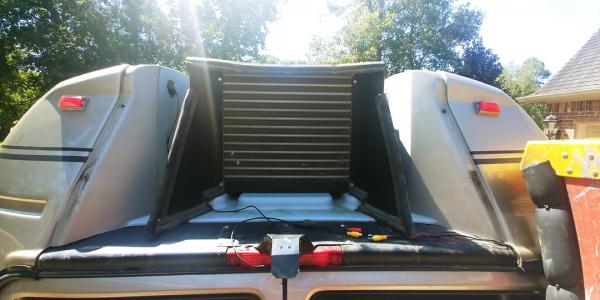

Those panels are very important to isolate inlet air going into the sides and top of the ac unit from the exhaust blowing out the rear of the unit. If not installed correctly, the unit will short-cycle warm exhaust air right back into the inlet side.

After the fiberglass rain cover was removed, the Dometic was unplugged from the multi connector plug. The power cord routed to the passenger side inner cabinet so that was carefully unplugged and pulled out. There were also 2 brackets at the rear of the Dometic unit that were removed - these are what essentially holds the unit in place.
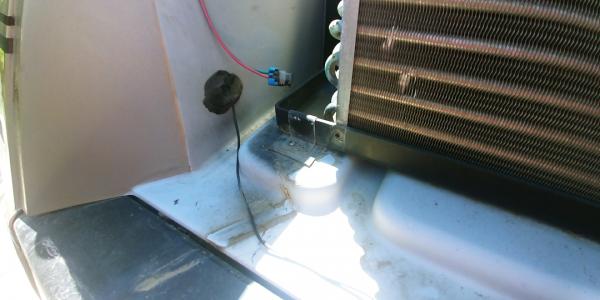
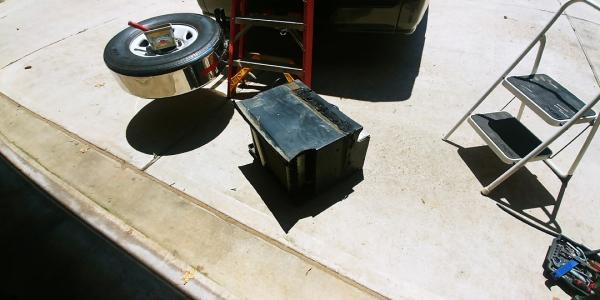

This left the fiberglass pan open, and it got a good cleaning. Wire/plug on the left was for clearance lights on the fiberglass rain cover, lower left was for rear camera. Wire loom on the right was for the original controls and was not re-used, I just left it in place to the side. You can also see the hole for the power cord. This needed to be enlarged slightly for the new unit plug.
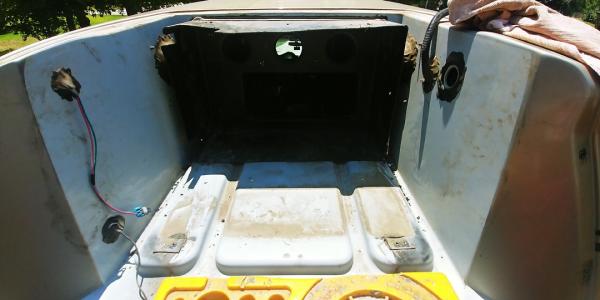


WARNING! - I used a multi-tool to enlarge the opening for the new unit plug as well as at the interior panels to widen the opening. The panels can get very hot with the blade, possibly hot enough to burn! I kept a spray water bottle handy and went slow with cutting. VERY IMPORTANT!

There's a black plastic sleeve that the Dometic unit slid into, this stays in place but it got cut back to accommodate the inlet air grills on the new unit.
Here's the cleaned pan and the black plastic sleeve cut back for the new unit, with the front face opening also opened up for the new unit :
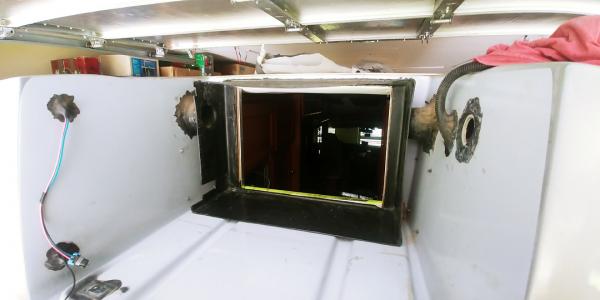

This is what I mean about the black plastic sleeve needing to be cut back to accommodate the side grills of the new unit. You don't want to cover those grills or airflow will suffer. The sleeve was cut back to the solid cover part of the unit and allowed for flex flashing to attach the sleeve to the unit.

The interior panel was opened up by cutting out the fiberglass face and was also widened by cutting the side panels so the new unit would of course slide into place. I also added some aluminum trim at the sides for a clean edge finish. Green tape protected the fabric at the bottom.
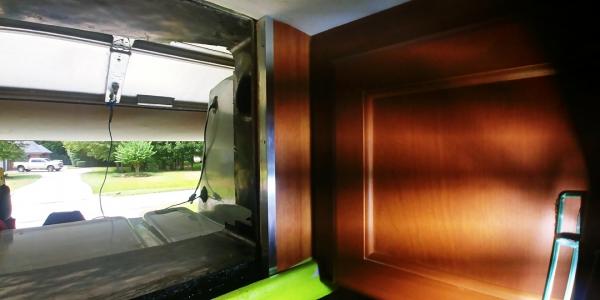

Top-to-bottom fit is very snug with the new ac unit. If you looked underneath the unit, there's a couple of stamped steel ledge brackets. These needed to be cut down to 1/4" height in my installation. When the final opening work was completed, there was a 1/4" front lip left on the fiberglass plan that the original and new ac units sat into. I needed to cut a slot into that small lip so the power cord could be routed back alongside the ac unit and into the rear cabinet. I then siliconed that slot and cord just to be sure no condensate or rainwater ever crept into that area. That 1/4" lip left on the pan also keeps any moisture away from the interior.

I then paid attention to the rear air isolation panels. The original side panels are metal and only needed a slight mod to fit really nicely into place. I also used the original weatherstripping on their outer edge. You can see the left panel fairly well here. I also made a couple of new rear base retention brackets for the new ac unit. You will want to be sure that the front-to-back location of the new unit enables the rear air isolation panels to rest against the fiberglass rain cover when it's installed.
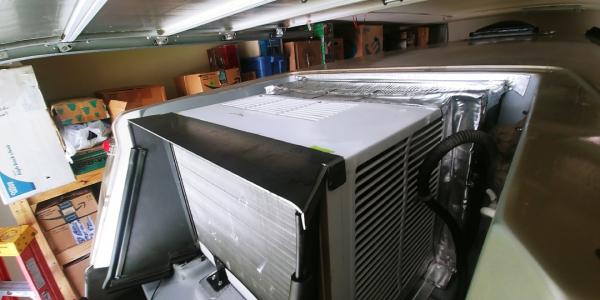

The upper corrugated plastic panel had pretty much sagged and failed, so I made a new upper panel out of 20ga steel and was able to use the original weatherstrip on it as well.
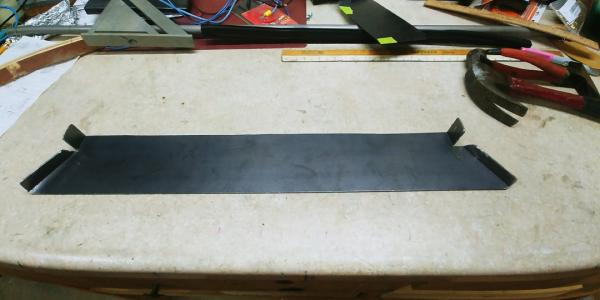
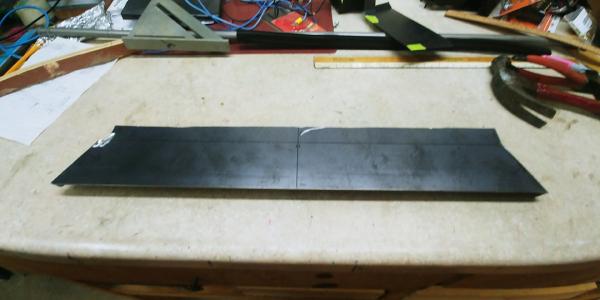

The results were very good, the panels were now held securely in place.
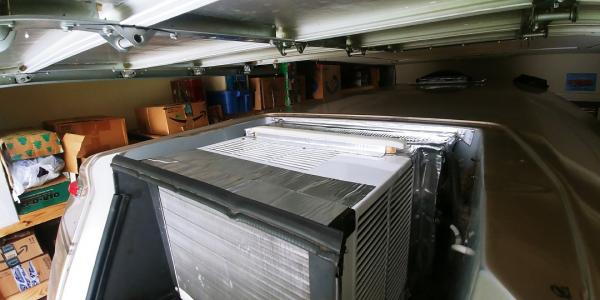

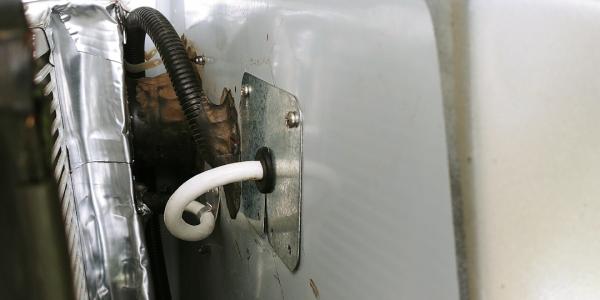
The new powercord got metal flashing at the entry point. It was later also covered with flex weatherproof flashing.

I used QuikRoof (or Peel n Seal) flex weatherproof flashing to seal the black plastic sleeve to the metal shell of the new ac unit. That attachment alone can keep the unit in place, but along with the 2 rear base brackets and the side isolation panels also screwed down that ac unit isn't going anywhere.
Here's that picture again of the unit fully installed.


I also added three 2" diameter black aluminum vents into the fiberglass rain cover just to ensure that the top inlet area of the new ac unit got airflow. I think the side inlets have plenty of exposure but these top vents don't hurt anything. Any rain inflow is minimal through the grill vents and just simply drains out the rear of the pan. They are located to coordinate with the inlet grill of the ac unit.
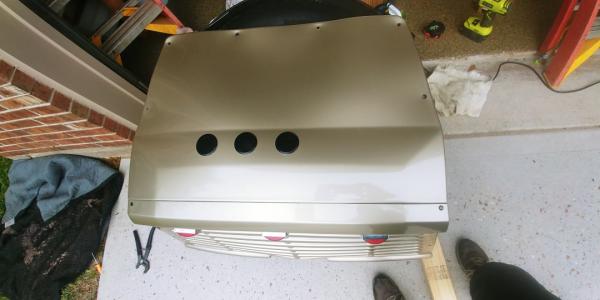

This is final installed look of the new unit. No drips or drabs and it works great.
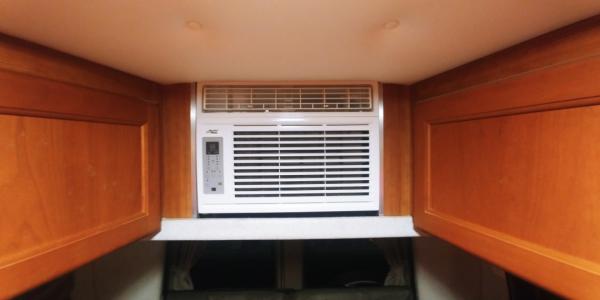

The new ac unit has no trouble keeping the interior cold. On a 95d day, after approx. 20 min of runtime, the temp indicator at the unit was 68d and the temp at the front of the van was 72. I also really like the fan throw from the unit. On medium speed you can feel cold air at the front seats.

One item you may have noticed is that the new unit no longer feeds the 2 small vents that are located directly above the sleeping area. We don't notice any problem as the interior gets cooled well enough that this change is not a factor. We also typically have a small 110v fan plugged in at the galley area that circulates air everywhere.

I also noticed that the new ac unit startup is also easier on the genset. Much less of that hiccup when a load is placed on the genset and no problems with hot outlet or circuit popping etc. Be aware that the plug typically does get warm as part of normal operation.

All in all, I'm really pleased with this installation.
TX-Trek is offline   Reply With Quote
Old 11-15-2020, 11:19 PM   #2
Platinum Member
 
Join Date: Aug 2020
Location: Little Valley NY
Posts: 268
Default

Good write up. One night of that Dometic AC/Heat pump unit running is enough to convince anyone to do this, even if the Dometic hasn't failed. I could not believe how noisy they are!!
wny-pat is offline   Reply With Quote
Old 11-16-2020, 03:32 AM   #3
Platinum Member
 
Join Date: Oct 2010
Location: VA
Posts: 1,024
Default

Thanks for the detailed writeup. I will do this on my 2006 210 when the KoolKat dies. Probably soon as other items have failed: fridge, generator, microwave...
peteco is offline   Reply With Quote
Old 11-16-2020, 05:38 AM   #4
Gold Member
 
Join Date: Jan 2018
Location: Texas
Posts: 90
Default

Thanks for the great write-up. I've thought about replacing mine just to lower the noise, but I'll probably wait until it fails. Your info and pics will be a big help! Thanks again!
bwatters60 is offline   Reply With Quote
Old 11-16-2020, 12:52 PM   #5
Platinum Member
 
Jon in AZ's Avatar
 
Join Date: Jan 2019
Location: Arizona
Posts: 609
Default

Ditto here! I have bookmarked this thread. My factory unit is currently not working. I think it’s just the start capacitor, but if it turns out to be more, I will follow your lead. Thanks for the very detailed write-up.
__________________
2014 Roadtrek 190 Popular
2008 Scamp 13
Jon in AZ is offline   Reply With Quote
Old 05-04-2021, 01:26 PM   #6
New Member
 
Join Date: Nov 2019
Location: Ontario
Posts: 15
Default

Thnx for this. My coolcat runs well but the squirrel cage fan is not balanced and vibration in my RT 190P is so violent that we cannot run it while relaxing inside. Has anyone had similar experience and managed to rectify the noise/vibration without swapping out the unit. Any ideas would be welcome before I do a refit.
MsBhaven is offline   Reply With Quote
Old 11-23-2021, 08:20 PM   #7
Bronze Member
 
Join Date: Jul 2015
Location: Texas
Posts: 34
Default Powering the thermostat when replacing a/c

I replaced my a/c on my 2012 RT much as you did and it was very successful. However, I have discovered that the thermostat was powered through a transformer on the old CoolCat. Now that I have (and you) discarded that power connection to the old a/c, how do you now power the thermostat? Thanks in advance. DaveW
DWorrell3 is offline   Reply With Quote
Old 11-23-2021, 09:25 PM   #8
Platinum Member
 
Join Date: Apr 2019
Location: Daytona Beach, Florida. Hawkins Island Alaska
Posts: 124
Default

I found several Mud Dauber Wasp nests inside the AC Fan area. I broke them free from the fan area and several other areas in the AC and used my shop vac to remove all of the nest debris. I then lubricated the fan bearing. Put the AC cover back on with a silicon based sealant to keep water out, I installed a screen cover on the inside of the AC cover so no creeping, crawling, flying critters could get back into the AC area. Turned on the AC fan and it was noticeably quieter. The screen has not effected the cooling or heating capabilities of the Cool Cat.
This is on a 2007 RT210V
__________________
RAA357
RAA357 is offline   Reply With Quote
Old 11-24-2021, 12:43 PM   #9
New Member
 
Join Date: Nov 2019
Location: Ontario
Posts: 15
Default

Sorry I don’t Have that information as I have not swapped the units out as of yet. But, thanks for the heads up on the powering of the thermostat.
MsBhaven is offline   Reply With Quote
Old 02-16-2022, 09:13 PM   #10
Platinum Member
 
Join Date: Aug 2020
Location: TX
Posts: 179
Default

Quote:
Originally Posted by DWorrell3 View Post
I replaced my a/c on my 2012 RT much as you did and it was very successful. However, I have discovered that the thermostat was powered through a transformer on the old CoolCat. Now that I have (and you) discarded that power connection to the old a/c, how do you now power the thermostat? Thanks in advance. DaveW
I'm sorry for a very late reply, I missed this.

Time to close the loop in this thread on the furnace stuff.

Yes, if you replace the Dometic a/c you won't have use of the furnace without some additional mods, but it's not too bad.

In my case, the Dometic thermostat is dead without the rear a/c unit, as that unit provides supply voltage (I think it was 7.5v) to the thermostat. But in that case, the thermostat sends control back to the Dometic ac unit, through it's transformer, then back to the furnace as 12v.

The first thing I did was to decide to abandon the Dometic thermostat in place and install a very basic Suburban heat-only thermostat. I never really like the location of the Dometic so I tweaked the thermostat location slightly with the new thermostat. Simply personal preference. The furnace needs 12v for operation, the original 7.5v supply was for the Dometic thermostat, so I just stuck to 12v on the control wire circuit.

Here's a pic of the original and new thermostats.


As mentioned in other posts, the 2 control wires to the furnace route out of the rear ac unit. They are contained within the original plug/wiring that is left when the rear ac is removed, which is in the black loom in the picture. The white cord is the power to the new ac unit.


The suburban furnace wiring is pretty straightforward. There's a 12v feed (always hot) from the chassis fuse panel, a ground wire and 2 control wires. One of the control wires is connected at the same furnace control panel terminal as the 12v feed so it is also hot at all times. The other control wire is only hot when the thermostat is on - the thermostat is essentially a switch to connect the control wires and energize the panel.

In my case there were 2 green wires in the dometic plug that were the furnace control wires. I verified this by using a voltmeter to test continuity from these wires back to the furnace wires. I could also touch them together to start the furnace, but an issue showed up with the operation - more on that later.

Now I just needed to get these wires to the new thermostat. I added a length of same gauge wire to each of the plug wires and routed it inside the cabinet to the new thermostat location. Just some loom and clips.


Now that the new thermostat was functional I needed to address the operational issue with the furnace, which was a bad control board. I did check the sail switch, high limit switch circuits for continuity and it was definitely the control panel.

After some research, rather than get the same control panel, for about the same cost I bought a Dinosaur Electronics 50Plus board (plug and play). It has the added bonus of incorporating a 5a fuse to protect the board itself. But the downside is that to get to the fuse you'd need to pull out the furnace - not terrible but inconvenient. But better than a fried board. The board itself is well made and I think an improvement over the stock replacement.

Anyway, with that fix, the furnace works fine. The thermostat location works well for us and is easy to reach without crawling onto the bed (we have a mattress set up across the entire back area).

Edit - I also wanted to mention that since initial installation in late 2020, after going through a complete 2021 summer season (which seemed to last most of the year), the ac unit has worked great. No issues.
TX-Trek is offline   Reply With Quote
Old 02-20-2022, 11:52 PM   #11
Platinum Member
 
Join Date: Mar 2014
Location: Herndon, Virginia
Posts: 507
Default

Thank you for our excellent description and photos. My CoolCat is still going strong on my 08C210P...but you never can tell!

Thanks!
JohnnyFry is offline   Reply With Quote
Old 08-29-2022, 06:52 PM   #12
New Member
 
Join Date: Aug 2022
Location: Ca
Posts: 1
Default

Quote:
Originally Posted by DWorrell3 View Post
I replaced my a/c on my 2012 RT much as you did and it was very successful. However, I have discovered that the thermostat was powered through a transformer on the old CoolCat. Now that I have (and you) discarded that power connection to the old a/c, how do you now power the thermostat? Thanks in advance. DaveW
Did you ever get the Furnace to work??? I cant figure out how to activate it?
Jetlimaximize is offline   Reply With Quote
Old 08-29-2022, 08:39 PM   #13
Bronze Member
 
Join Date: Jul 2015
Location: Texas
Posts: 34
Default

I got it to work great, but it was so simple, I am ashamed. When I cut all the wires from the CoolCat to the old Dometic , I tried every possible to identify them, including with a Multi Meter. No go. I also undid them from the existing thermostat. It then occurred to me that there are only two wires to the furnace, a hot and a ground. That meant only two wires were now attached to the furnace. So, one by one, I gave each of the remaining existing wires a little tug. Lo!! All of them came loose, except the ones attached to the furnace. Bingo.. problem solved. Then I wired in a simple furnace thermostat to the remaining two wires. The new a/c unit had a handheld wireless controller, which included a thermostat. So now everything runs great. Dave W
DWorrell3 is offline   Reply With Quote
Old 01-10-2023, 04:11 AM   #14
New Member
 
Join Date: Jan 2023
Location: NJ
Posts: 2
Default Winterize and waterproof A/C compartment?

Hi all,
I recently purchased a modified 1996 Roadtrek 210 and love it so far. However, we just had some significant water damage in the rear passenger side corner. We had some heavy rain recently, and think the leak came from the AC compartment. After removing the AC (wish we had read this thread first!) we realized how wide open that rear compartment is to the elements. Since we use the vehicle all winter and suspect the compartment allowed the leak, we hope to seal off that compartment for winter (with AC removed). We'll then re-install and only use the AC in warmer months. Does anyone have ideas or experience covering those exterior A/C vent grills in manner that is waterproof but easy to remove when it's time re-install the AC? Bonus points if there's a way to seal them with a transparent or semi-transparent material (plexiglass??) to maintain the new light source. Any ideas are much appreciated.

Additional details - original furnace, generator, and all propane components have been removed and replaced with a solar and lithium battery system that supports the newer A/C's low power pull and Webasto heater.
Thanks!
Gianna
Attached Images
File Type: jpg IMG_9207.jpg (190.9 KB, 11 views)
OpenRoadServices is offline   Reply With Quote
Old 01-10-2023, 03:10 PM   #15
Platinum Member
 
Join Date: Nov 2017
Location: ON
Posts: 260
Default

I found this 2011 discussion that may provide some assistance:
https://www.classbforum.com/forums/f...unit-1859.html
Sensfan is offline   Reply With Quote
Old 01-10-2023, 05:14 PM   #16
Bronze Member
 
Join Date: Jul 2015
Location: Texas
Posts: 34
Default Leaky A/C compartment, RoadTrek 210, 190

Quote:
Originally Posted by OpenRoadServices View Post
Hi all,
I recently purchased a modified 1996 Roadtrek 210 and love it so far. However, we just had some significant water damage in the rear passenger side corner. We had some heavy rain recently, and think the leak came from the AC compartment. After removing the AC (wish we had read this thread first!) we realized how wide open that rear compartment is to the elements. Since we use the vehicle all winter and suspect the compartment allowed the leak, we hope to seal off that compartment for winter (with AC removed). We'll then re-install and only use the AC in warmer months. Does anyone have ideas or experience covering those exterior A/C vent grills in manner that is waterproof but easy to remove when it's time re-install the AC? Bonus points if there's a way to seal them with a transparent or semi-transparent material (plexiglass??) to maintain the new light source. Any ideas are much appreciated.

Additional details - original furnace, generator, and all propane components have been removed and replaced with a solar and lithium battery system that supports the newer A/C's low power pull and Webasto heater.
Thanks!
Gianna
My 190 is a little different, but the concept may be the same. I don't think the a/c pan is parallel to the ground, I think it tilts forward a bit. I had to cut the front pan lip down quite a bit to install the new a/c and the condensate and both overflowed the cutdown lip. My answer was, if it threatened rain, merely park the van slightly nose up or chock it up. Not an elegant solution, but highly effective. If you truly have a/c compartment leaks, 1/8" sheet plastic cut to size and FlexSeal works wonders. Dave W
DWorrell3 is offline   Reply With Quote
Old 01-13-2023, 10:50 PM   #17
New Member
 
Join Date: Jan 2023
Location: NJ
Posts: 2
Default Thanks

Thank you for the responses!
OpenRoadServices is offline   Reply With Quote
Old 05-14-2023, 11:28 PM   #18
Platinum Member
 
Join Date: Oct 2022
Location: Red-Neck Riveria - (Fort Walton Beach, FL)
Posts: 283
Default Thanks For the Actionable Intel!

My CoolCat is doing the "click." Havent pulled the LID off yet to check capacitor, but suspect it. I was considering buying a SoftStartRV to "mooch-Dock," but the price of an LG9500 and these tips makes me wonder if I just found another project!

Thanks anyway.

Cheers - Jim
phantomjock is offline   Reply With Quote
Old 06-05-2023, 11:58 PM   #19
Gold Member
 
Join Date: Apr 2023
Location: nevada
Posts: 98
Default

Did you leave the back panel off the new ac as to expose the fins? Also, did you use a different plug than what came with the unit?
__________________
2005 Roadtrek 05C210v
2020 Can Am Spyder RT Limited
Bangorbob is offline   Reply With Quote
Old 06-06-2023, 02:24 AM   #20
Platinum Member
 
Join Date: Aug 2020
Location: TX
Posts: 179
Default

If you're asking about the original post/install - nope, unit was installed with the factory cover which exposed the fins.

No special plug was needed, it plugged into the same 110v outlet that the Dometic plugged into - located inside the back of the passenger side upper storage cabinet.
TX-Trek is offline   Reply With Quote
Reply


Posting Rules
You may not post new threads
You may not post replies
You may not post attachments
You may not edit your posts

BB code is On
Smilies are On
[IMG] code is On
HTML code is Off
Trackbacks are Off
Pingbacks are Off
Refbacks are Off


» Featured Campgrounds

Reviews provided by

Powered by vBadvanced CMPS v3.2.3

All times are GMT. The time now is 04:12 PM.


Powered by vBulletin® Version 3.8.8 Beta 4
Copyright ©2000 - 2024, vBulletin Solutions, Inc.