Journey with Confidence RV GPS App RV Trip Planner RV LIFE Campground Reviews RV Maintenance Take a Speed Test Free 7 Day Trial ×


Reply
 
Thread Tools Display Modes
 
Old 09-01-2022, 03:44 AM   #1
Bronze Member
 
Black95's Avatar
 
Join Date: Aug 2022
Location: South Dakota
Posts: 24
Default My Chevrolet Express van Class B- camper

I have been camping in my 1990 Chevrolet Silverado Blazer 2-door for the last 20 years. When I removed the back seat there was just enough room for a 3/4 sized (Hollywood, as some people called them) mattress to fit between the wheel wells and from the back of the console to the tailgate.
Blazer1.jpg

Blazer2.jpg

After all those years with my wife and I getting older, she decided we needed a little more room so she found me a 2001 Chevrolet Express van with low mileage on the internet. After checking it out and taking it for a test drive we bought it on the spot. It was a nice passenger conversion LT model with all the bells and whistles available in 2001. I will chronicle the changes I made to transform it into my Class B- motorhome in the next few postings. I call it my Class B- (B minus) motorhome because it is just a regular van without the raised roof.
van1.jpg

After using that van for many years we decided it was time to upgrade to a newer van. We decided to stick with the Chevrolet Express because the body has not changed in all these years. We found a 2018 Chevrolet Express 2500 passenger van with only 15,000 miles that we would have OnStar and a WiFi hotspot. This fit our needs perfectly, so you will see the evolutionary changes to each of these as I post more in the future.
van2.jpg

I have to give a lot of credit to another vanner, LenS and his Green Tardis van that I got a lot of ideas and inspiration from. I think his latest posting can be found on Youtube.
Black95 is offline   Reply With Quote
Old 09-01-2022, 02:53 PM   #2
Platinum Member
 
Join Date: Nov 2014
Location: PHX, AZ
Posts: 2,660
Default

Nice, I had both 73 4wd and 74 2wd Blazers.

The Blazer Chalet camper conversion was one of the first products from the company which became Chinook ( RIP)


You'll love the new van. Mechanically just smoother and better power and fuel economy and brakes too.


have fun with your build out !
__________________
Mike
2006 Pleasure Way Lexor TD on a Chev 3500
Previous: tent strapped to Electra-Glide
mkguitar is offline   Reply With Quote
Old 09-01-2022, 03:58 PM   #3
Bronze Member
 
Black95's Avatar
 
Join Date: Aug 2022
Location: South Dakota
Posts: 24
Default

Quote:
Originally Posted by mkguitar View Post
.......You'll love the new van. Mechanically just smoother and better power and fuel economy and brakes too.

have fun with your build out !
Yes, the new van is great for several reasons. Because Chevrolet kept with the same body style for so long, I was able to transfer my camper conversion modifications to the new van with only minor modifications. The newer 6 speed automatic transmission is much smoother and the 6.0 LS2 engine has more power than the old van's 350.

For those of you following this post, my van camper conversion will not have all the fancy cabinet work of the pre-built models. I wanted something that I could modify easily and a bed that was always ready to nap or sleep on. So if you are looking for fancy, you will not find it. Functional, yes! I have been camping for over 50 years starting with tent camping, then moving up to a 16 foot trailer camper with no refrigerator or bathroom facilities, then up to a 23 foot trailer camper slide-out with all the modern amenities. As we got older we wanted to downsize to something simpler, hence the move to the Blazer and van camping. We love van camping because we can go anywhere a car can go, have an instant bed ready for rest area and afternoon naps, and finally my wife feels comfortable driving and backing it into camping slots. Many of the ideas originated in the Blazer mini-motor home as I liked to call it and transitioned into the vans. Some of the ideas originating in the old van transitioned into the new van and some ideas originated with the new van only. I hope you enjoy following along with my future posts.
Black95 is offline   Reply With Quote
Old 09-01-2022, 04:16 PM   #4
Platinum Member
 
Join Date: Nov 2014
Location: PHX, AZ
Posts: 2,660
Default

Quote:
Originally Posted by Black95 View Post
We love van camping because we can go anywhere a car can go, have an instant bed ready for rest area and afternoon naps, and finally my wife feels comfortable driving and backing it into camping slots.

add MPG and you hit on the advantages of a class B over other rv types


cheers
__________________
Mike
2006 Pleasure Way Lexor TD on a Chev 3500
Previous: tent strapped to Electra-Glide
mkguitar is offline   Reply With Quote
Old 09-01-2022, 04:19 PM   #5
Bronze Member
 
Black95's Avatar
 
Join Date: Aug 2022
Location: South Dakota
Posts: 24
Default

My first modification to my van after removing the rear seats was to build a bed frame/storage area. I divided it in half front to back. The front area consists of two shelves. Each, the top and the bottom, has space for four Shopko canvas boxes 6" x 6" x 12" and eight 6" x 12" x 12" canvas boxes. That gave my wife 24 locations for storage.
bed1.jpg
bed6.jpg

Here is an early build picture of the bed frame before I added the top to hold the mattress. You can see that the front half is for my wife's canvas storage boxes and the back half is for my tent storage shelf, tarp storage shelf, area for hooks for walking sticks, and underneath is my large "basement" area accessible from the rear van doors.
bed2.jpg

bed4.jpg

bed3.jpg

The right edge of the bed storage has special hooks for storage of my blue rain tarp poles and our two custom made hiking sticks.
bed5.jpg
Black95 is offline   Reply With Quote
Old 09-01-2022, 04:23 PM   #6
Bronze Member
 
Black95's Avatar
 
Join Date: Aug 2022
Location: South Dakota
Posts: 24
Default

All of the windows, from the front windshield to the back door windows are covered with Reflectix insulation. I cut it a little larger than the windows so that I can just press it into place and it will stay there. When not used it is stored on the left side of the bed frame, out of sight. The picture shows the Reflectix used in my old Blazer as I haven't taken van pictures of it yet. It insulates and makes it totally dark inside at night for peaceful sleep.
window1.jpg
Black95 is offline   Reply With Quote
Old 09-08-2022, 01:33 AM   #7
Bronze Member
 
Black95's Avatar
 
Join Date: Aug 2022
Location: South Dakota
Posts: 24
Default

For lights I am using 5 or 6 magnetic LED flashlights. They are handy because they can be re-positioned in many locations in the van or removed and taken with us to the showers and restrooms.
LED1-640.jpg

Here are two of my LED lights (one showing the back with the round magnet). These have a high, low and off position switches. They use AAA batteries which are easy to replace. They last quite a long time because we don't use them as our main lighting. That is in my next post.
LED5-640.jpg

I did not want to drill holes in my van so I used flat metal pieces with their ends wrapped in sticky-backed felt squeezed in between the roof liner and the trim pieces on the van. Once the sticky-back felt in pushed in far enough it does not wiggle back out while driving. The LED light's magnet is strong enough that they have never fallen down with bumpy roads.
LED4-640.jpg
Black95 is offline   Reply With Quote
Old 09-08-2022, 01:50 AM   #8
Bronze Member
 
Black95's Avatar
 
Join Date: Aug 2022
Location: South Dakota
Posts: 24
Default

In the main living area of the van I installed a camper light above the kitchen unit with sticky felt covered metal brackets that simply slide between the trim and the roof liner. Again, no holes were drilled in my van. I squeezed the wiring behind the trim down to the 12 volt fuse block mounted in the back of the kitchen unit. (More on the kitchen unit in a later post.)
light-sink.jpg

I mounted another of these camper lights on the opposite side of the van by the side entrance doors. I used the same mounting system of metal brackets covered with sticky-back felt to hold them in place. All wiring was squeezed behind the plastic trim and across the top of the headliner. I was able to squeeze the wire between the location where the front headliner meets the back headliner so it could be connected to the same 12 volt fuse block as the over the sink light. I converted each of these lights to LED bulbs for lower current draw. They originally had incandescent bulbs in them.
big lights.jpg
Black95 is offline   Reply With Quote
Old 09-08-2022, 03:19 PM   #9
Bronze Member
 
Black95's Avatar
 
Join Date: Aug 2022
Location: South Dakota
Posts: 24
Default

I installed a Scosche fm transmitter to my 2001 van's radio antenna so that I could connect my mp3 player directly by cord. It was much easier to play my music collection, Car Talk downloads, and Science Friday downloads than trying to use CD's. When I upgraded to my 2018 van, it already had an auxiliary input for my mp3 player so the Scosche transmitter was no longer needed.
ScoscheFM.jpg

I also wanted more 12 volt outlets, so I connected a multiple unit under the passenger side of the dash and ran the wires to the extra 12 volt fuse block I installed under the day. (more on the fuse box in a later postl) It gave me more plugs for charging cell phones and running GPS and other units while driving.
power outlets.jpg
Black95 is offline   Reply With Quote
Old 09-08-2022, 03:32 PM   #10
Platinum Member
 
Join Date: Feb 2015
Location: Oklahoma
Posts: 962
Default

I'm really liking this build. When every half inch counts, creativity becomes paramount.
__________________
2014 Promaster 136" Self-Build has passed 250,000 miles

Build Site: msnomersvan.wordpress.com
Travel Site: woodworkingtraveler.wordpress.com
MsNomer is offline   Reply With Quote
Old 09-09-2022, 03:03 PM   #11
Bronze Member
 
Black95's Avatar
 
Join Date: Aug 2022
Location: South Dakota
Posts: 24
Default USB Ports Added

After upgrading to my 2018 van I added a couple of 12 volt plugs that had USB ports with them for some of my newer equipment like phone chargers, dashcam and RV style GPS. The wires will by hidden up under the dash using the red Velcro strap.
acc plug-1.jpg

Along with the added plugs I used a quick disconnect plug so when I or the service technicians had to remove the van's doghouse they could quickly disconnect my added plugs. The disconnect is out for your easy visibility, but it is tucked under the dash to be hidden from sight.
acc plug-2.jpg
Black95 is offline   Reply With Quote
Old 09-14-2022, 02:40 AM   #12
Bronze Member
 
Black95's Avatar
 
Join Date: Aug 2022
Location: South Dakota
Posts: 24
Default

One thing I should mention about my DIY camper conversion build. Both the 2001 Express and the newer 2018 Express van were passenger vans when I started. One of my goals was to not destroy anything in the passenger van nor gut it and start from scratch. When I removed the seats and did the conversion, it was with the idea that I could remove everything and convert the van back into a passenger van before I sold it. That is exactly what I did with the 2001 Express van. I had only drilled one hole in the floor on each van to allow the electric wires (both 110 volt and 12 volt) and TV wires to enter the cabin. I was able to plug the hole under the carpet and the old 2001 van sold within a week of putting it on the market. That is the same plan and outcome I hope for the 2018 Express when I get old enough to not be able to camp anymore. Even the roof rack and the ladder are attached to the body and back door with clamp type attachments and no holes were drilled in the van for either of them. This will be addressed in later posts when I get to that section.
Black95 is offline   Reply With Quote
Old 09-14-2022, 02:50 AM   #13
Bronze Member
 
Join Date: Nov 2020
Location: LOUISIANA
Posts: 46
Default

I get your thoughts on resale & such, but please secure everything as well as you can. In the event of an accident, particularly a front end collision, everything that is not REALLY secured well could become flying objects headed to the front. Just saying......
Philip53 is offline   Reply With Quote
Old 09-14-2022, 03:04 AM   #14
Bronze Member
 
Black95's Avatar
 
Join Date: Aug 2022
Location: South Dakota
Posts: 24
Default Altimeter

I live in the eastern part of South Dakota at an elevation of about 1300 feet. We often travel to the Black Hills of South Dakota for vacations as well as to visit my relatives in Rapid City. I love knowing the elevation and the changes that occur while driving so I added an analog altimeter to the left side of my van's dash for easy viewing. I attached it to the dash with Velcro so that I can transfer it easily to my other vehicles that I use for traveling. My van did not come equipped with an outside thermometer, so I added one beside the altimeter that will show both outside and inside temperatures while traveling.
altimeter.jpg
Black95 is offline   Reply With Quote
Old 09-14-2022, 03:33 AM   #15
Bronze Member
 
Black95's Avatar
 
Join Date: Aug 2022
Location: South Dakota
Posts: 24
Default

Quote:
Originally Posted by Philip53 View Post
I get your thoughts on resale & such, but please secure everything as well as you can. In the event of an accident, particularly a front end collision, everything that is not REALLY secured well could become flying objects headed to the front. Just saying......
Thanks for the concern. My bedframe and kitchen unit are both secured to the floor brackets that were used in the passenger van to secure the three rows of passenger seats. i will address that in a future posting of how I did that. Everything else like cameras, cooler, are secured below seat level with straps. Excellent point that you made!
Black95 is offline   Reply With Quote
Old 09-20-2022, 05:47 PM   #16
Bronze Member
 
Black95's Avatar
 
Join Date: Aug 2022
Location: South Dakota
Posts: 24
Default Kitchen Unit

The big project after the bed frame was a custom made kitchen unit for my camper van to fit the wall and floor contours. I wanted something that would give us the basics for when the weather was bad and we couldn't be outside and not take up much room. I built an L-shaped unit with a sink in the corner. I searched the internet for the smallest sink I could find. I plumbed in two Reliance 2 1/2 gallon water tanks for fresh water and grey water. I built a cedar wood frame and covered it with then paneling to keep the weight down.
kitchen-1.jpg

kitchen-2.jpg

Next I wired it for 120 volt outlets, 1 four outlet unit and 1 two outlet unit for charging our cell phones, iPads, cameras, etc. I also wired in a 120 volt thermostat below the four outlet unit that I connected to the bottom two outlet unit and easily reachable from sleeping position in the bed. This is so I could plug in a 120 volt space heater in the van for cold weather and the thermostat would turn it on and off during the night as needed. Also installed a 12 volt outlet on one side. I should have located this 12 volt outlet a couple inches lower because when I open the top door it hits anything plugged into the outlet. Just one of the mistakes I made in its build. I won't mention the others.
kitchen-3.jpg

The finished installed kitchen unit looks like this and is bolted to the seat brackets on the floor:
kitchen-4.jpg

The side towards the driver's seat has the switch for the 12 volt water pump and red indicator light along with a connection for TV when we camp at campgrounds that have cable connections. I use the far hook to hand a cloth bag of magazines for reading on trips and the closer hook to hang a plastic bag to collect garbage.
kitchen-5.jpg

With the doors open you can see the water tanks, the shelf above them for storage of the 120 volt hotplate, the storage spot on the bottom right for storage of our 4-cup coffee maker, and the two other storage spaces for whatever my wife wants to put in it. During fair weather we do all our cooking outside on the camp stove and campfire. I love to make coffee over the campfire with my old dripolator coffee pot.
kitchen-6.jpg

I also wired small 12 volt lights into each door so that when you opened the door you can see what is inside.
kitchen-7.jpg

The kitchen unit has a 12 volt fuse block mounted in the rear which I use to attach most of my 12 volt lights and plugs for extras. The 120 volt cable is connected with a twist-lock plug for ease of disconnecting the kitchen unit during removal.
kitchen-8.jpg
Black95 is offline   Reply With Quote
Old 09-20-2022, 05:53 PM   #17
Bronze Member
 
Black95's Avatar
 
Join Date: Aug 2022
Location: South Dakota
Posts: 24
Default Floor Attachment

I did not remove any of the floor nor the passenger seat brackets in the back of the van. I used them to mount my bed frame and my kitchen unit.
kitchen-9.jpg

I made some steel brackets very similar to the picture below and mounted the top three holes to my bed frame and kitchen unit so they were positioned over the top of the seat brackets.
kitchen-10.jpg

I pulled the locking pins out of the seat brackets in the floor, then slid my fabricated brackets down into them so the locking pin would engage the single hole in my brackets and locked the pins in place.
kitchen-11.jpg

Using this method of attachment, it is easy to remove for upgrades or modifications later.
Black95 is offline   Reply With Quote
Old 09-27-2022, 07:30 PM   #18
Bronze Member
 
Black95's Avatar
 
Join Date: Aug 2022
Location: South Dakota
Posts: 24
Default Water Faucet Control

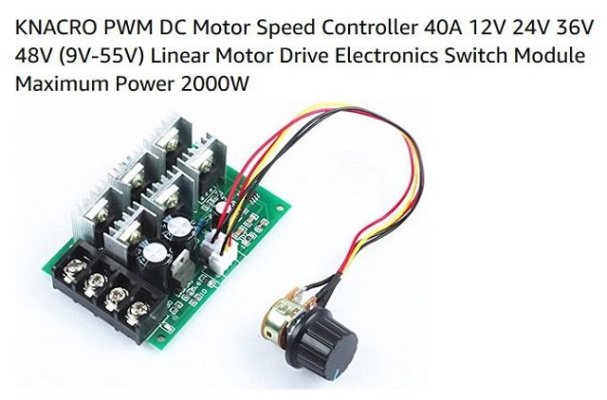
Ever since I added an 12 volt water pump to my DIY van camper conversion sink, it has pumped too fast when I switched it on. I requested some help in another forum link and found the answer I needed. So recently I purchased a 12 volt motor speed voltage regulator, installed it and it solved my problem. I can now turn down the speed of the pump for small water jobs and turn it up full blast for filling my coffee pot to make campground coffee. I like the model with the volume knob on wires so I could mount it close to the faucet handle and have the circuit board hidden away under neath the cabinet.
[ATTACH]13167[ATTACH]
Attached Images
File Type: jpeg C0B2BBE7-303F-4484-866C-F98D15D6E997.jpeg (52.2 KB, 4 views)
Black95 is offline   Reply With Quote
Old 09-27-2022, 07:45 PM   #19
Bronze Member
 
Black95's Avatar
 
Join Date: Aug 2022
Location: South Dakota
Posts: 24
Default Another Sink Modification

I added little grey silverware organizer trays to the top of my sink edging.
84DB3461-E35C-4D13-B838-017770606D05.jpeg

I used a piece of paneling edge trim to hold it in place on the edge of my van sink. I mounted the paneling edge trim with some 3M body molding tape from my local auto supply store. It turned out to be very handy and easily removable. My wife thinks it is the cat's meow! It makes a great place to store the TV remote, pens, and other needed items.
2C3710F6-341D-4E49-A8D0-C95DCAFBAFA1.jpeg
Black95 is offline   Reply With Quote
Old 10-15-2022, 07:56 PM   #20
Bronze Member
 
Black95's Avatar
 
Join Date: Aug 2022
Location: South Dakota
Posts: 24
Default Side Step

On my first express van I made myself a side step out of wood.
Sidestep-Boxa.JPG

I painted it blue as my first express van was blue and we had named it the Cookie Monster. I stored it on the step just inside the door for travel.
Sidestep-Boxb.JPG

I found this rather inconvenient to always have to get it out and put it away after use, so for my 2018 express I searched online and found a single step.
sidestep1.jpg

I like this a lot better because it can be slid out when needed and slid back under the van when not in use. It does not stick down any lower than the frame under the van.
sidestep4.jpg
Black95 is offline   Reply With Quote
Reply


Posting Rules
You may not post new threads
You may not post replies
You may not post attachments
You may not edit your posts

BB code is On
Smilies are On
[IMG] code is On
HTML code is Off
Trackbacks are Off
Pingbacks are Off
Refbacks are Off


» Featured Campgrounds

Reviews provided by

Powered by vBadvanced CMPS v3.2.3

All times are GMT. The time now is 11:51 PM.


Powered by vBulletin® Version 3.8.8 Beta 4
Copyright ©2000 - 2024, vBulletin Solutions, Inc.