Journey with Confidence RV GPS App RV Trip Planner RV LIFE Campground Reviews RV Maintenance Take a Speed Test Free 7 Day Trial ×


Reply
 
Thread Tools Display Modes
 
Old 10-17-2022, 02:59 PM   #21
Bronze Member
 
Black95's Avatar
 
Join Date: Aug 2022
Location: South Dakota
Posts: 24
Default Electric Box

My next modification in my camper van was to route the electrical connections to the outside. I used some heavy 12 gauge extension cord wire to connect my kitchen unit to the outside. Then ran it to the back and built a box with a camper type flip-lid cover. It came in white only so I spray painted it with special spray paint for plastic and mounted it in a wood box that I built to fit the contour of the back bumper. I also ran a coaxial TV cable from the kitchen unit to the black box on the bumper also. Some private campgrounds do provide cable TV connections. I spray painted the wood box flat black to match the black of the bumper and mounted it with automotive body molding tape so no holes were drilled into the van. I added a piece of rubber stair tread to the top of the box as my finishing touch.
electric Box2.jpg

I added an outside electric box outlet to each side of the frame near the front of the vehicle for use with my rope lights, battery float charger, and window air conditioner that we occasionally use during summer camping.
electric-b.jpg
Black95 is offline   Reply With Quote
Old 11-03-2022, 07:43 PM   #22
Bronze Member
 
Black95's Avatar
 
Join Date: Aug 2022
Location: South Dakota
Posts: 24
Default Porta Potty

I needed a location for the porta-potty and one that was out of sight and useful also. I built a cabinet so that ours would just fit inside. A hinged lid made it out of sight and more useful. The pillow makes it useful as an extra seat while we are camping.
console2.jpg

I made the top with an edge on it so we could use it for a storage console between our seats while driving and items would not roll off.
console3.jpg

I added a wood pocket on the front for maps and other traveling paperwork. In the front right corner I mounted a folding cup holder to hold my camera's zoom lens. on the left side I mounted an old grey felt pocket that I used for holding cassette tapes and CD's. Now I use it for other things as all my music is on a flash drive as mp3 files.
console4.jpg

On each side I mounted a green canvas multi-pocket for storage of various items. I have found that you can never have too much storage space.
console5.jpg

I did have to mount some slanted bottom pieces so it would fit the floor contour between our seats better. Apparently our old 2001 van had a flatter floor and I couldn't just move it to the new van space.
Black95 is offline   Reply With Quote
Old 11-03-2022, 08:15 PM   #23
Platinum Member
 
Join Date: Nov 2014
Location: PHX, AZ
Posts: 2,660
Default

your front seats don't swivel ?


many manufactured B's have swiveling seats
__________________
Mike
2006 Pleasure Way Lexor TD on a Chev 3500
Previous: tent strapped to Electra-Glide
mkguitar is offline   Reply With Quote
Old 11-28-2022, 02:16 AM   #24
Bronze Member
 
Black95's Avatar
 
Join Date: Aug 2022
Location: South Dakota
Posts: 24
Default Tables

My first attempt at making a table for my van was a simple slide out model that was hidden under the bed's mattress. I wanted a small table for us to eat on when we were trapped inside by bad weather and to play cards on. I decided to follow the same theme of using the pressed wood that I used for the top of the center console and the kitchen unit countertop. I attached a flexible handle on the front to pull it out with.
table-1.jpg

I had a couple of guides that came from an old desk that I dismantled and screwed them to the top of the bed frame.
table-2.jpg

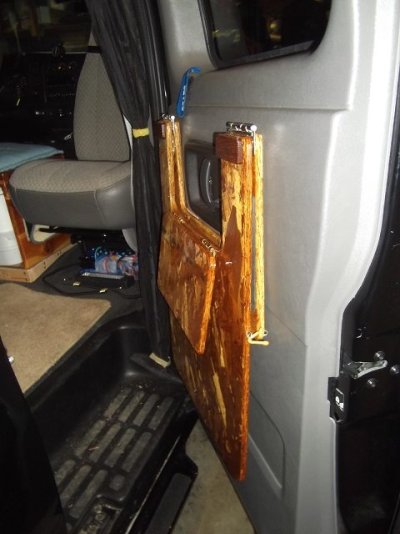
This table served us for a while but it was too low for playing games and as an eating table. It worked great for a meal buffet but not so great as a table. I decided to make another one and mount it to the side door via the arm rest bolts. Again I used the same pressed wood for interior continuity. I made this table so it would fold up against the door and fold out for use when we were locked inside due to inclement weather. During good weather we always eat outside or under our van awning which I will cover in a later posting. This first image shows the table in use with the passenger seat swiveled around.
table-3.jpg

This image shows the table folded up for travel. It has a folding cut out so that we can easily access the door handle and locks.
table-4.jpg

This image shows how the PVC tubing table leg is attached to the bottom of the table with a PVC end cap screwed into the bottom of the table. The tubing leg can be removed and stored elsewhere in the van.
table-5.jpg

This image show the wood mounting frame underneath the table that it is mounted to with hinges and the two screws that bolt it onto the door via the door handle/arm rest. The two vertical pieces of insulating foam prevent rattles while traveling and the yellow twisty attached to the small eye-bolt hold it in place while traveling.
table-6.jpg

Another view of the table in traveling position before it is tied down with the yellow twisty. I also use a small bungee cord to hold the flip down part of the table tight while traveling.
Attached Images
File Type: jpg table-7.jpg (49.4 KB, 5 views)
Black95 is offline   Reply With Quote
Old 11-28-2022, 02:35 AM   #25
Bronze Member
 
Black95's Avatar
 
Join Date: Aug 2022
Location: South Dakota
Posts: 24
Default Swivel Seat

I have always wanted a swivel seat in the van, but my old 2001 van was an LT with dual electric seats and I could not find a swivel to fit those. The new 2018 van does not have electric seats so I bit the bullet and ordered a swivel seat adapter for it. There are a number of companies that carry them specifically for the Chevrolet Express van if you search the internet. I am pleasantly surprised at the extra room it gives us in the van. I am now thinking maybe I should get one for the drivers seat in the future. I would not be able to swivel it 180 because of my kitchen unit, but I could still swivel it enough to make it usable. I will have to find a new location for my porta-potty case if I go that route. A swivel passenger seat is one modification that I highly recommend if you don't have it.
swivel-2.jpg
Black95 is offline   Reply With Quote
Old 11-29-2022, 03:18 AM   #26
Bronze Member
 
Black95's Avatar
 
Join Date: Aug 2022
Location: South Dakota
Posts: 24
Default Auxiliary Battery

To isolate the camper 12 volt functions from the van's main starting battery, I mounted a small battery box on the frame.
battery box1.jpg

I connected it to the van's charging system via a relay activated by the ignition key. When the key is on and the van is running this auxiliary battery is connected and will be charged while driving. When the key is switched off the relay disconnects the auxiliary battery from the van's electrical system. It will be discharged and not the van's main starting battery.
relay2.jpg

I have added several fuse blocks to this auxiliary battery for all of the 12volt camping lights and accessories.
fuse1.jpg

My future plans are to someday upgrade to a Lithium metal hydride 12 volt battery instead of the lead acid battery that I am using now. That will mean upgrading the charging system for that battery as well.
Black95 is offline   Reply With Quote
Old 11-30-2022, 01:28 AM   #27
Bronze Member
 
Black95's Avatar
 
Join Date: Aug 2022
Location: South Dakota
Posts: 24
Default Air Compressor

I like to re-use things as much as possible so I added a 12 volt air compressor from one of our older trailer campers. It was salvaged from the camper when we converted from a pressurized system to an on-demand system with a new plastic tank. I mounted it on the frame beside the auxiliary battery.
air comp1.jpg

I connected RapidAir blue air hose and a quick connector at the rear bumper along with the switch to turn the compressor on and off.
air comp2.jpg

I then added RapidAir blue tubing to the under hood area with another switch at this location so I could turn the air compressor on from this location or from the rear of the van where the other air quick connector was located. As you can see I like to label almost everything.
air comp3.jpg

I carry a coil air hose with quick disconnects in my tool box so I can reach tires or other devices from the front or rear of the van.
air comp4.jpg
Black95 is offline   Reply With Quote
Old 01-29-2023, 03:30 AM   #28
Bronze Member
 
Black95's Avatar
 
Join Date: Aug 2022
Location: South Dakota
Posts: 24
Default Campground Coffee

Today's topic is my wife's favorite campground coffee. I love to sit around the campfire and brew coffee for the morning. I start with an old fashioned drip-o-lator that I remember my aunt using as I was growing up. My parents just boiled coffee grounds in a pan on the stove and poured it into cups. My aunt was more of a coffee aficionado with her drip-o-lator coffee maker. I picked one up at a nearly new store just for making campground coffee because it brews coffee similar to the modern counter top coffee makers.
coffee dripolator.jpg

It has three parts to it. The top part is where you pour in the hot water from which it drips through holes into the basket attached to its bottom. Into this basket I add a paper filter with the appropriate amount of coffee grounds to your taste. From there the brewed coffee drips into the bottom or serving part of the pot.
coffee3.jpg coffee5.jpg

I keep my coffee grounds in an old plastic gellato container with the filters rubber-banded to the outside of it. For traveling, I store it inside the drip-o-lator. The drip-o-lator and water boiling pot get stored in a canvas box inside special bags.
coffee6.jpg coffee7.jpg
coffee4.jpg

I heat the water for pouring into the top of the drip-o-lator with an old Al perculator pot. It gets very black heating cold water directly in the fire, so I store it inside its own bag which itself gets quite sooty black.
coffee2.jpg

On days when I do not have the time to give to this coffee making method, we carry a small 4-cup coffee maker to brew coffee much quicker. I use a tire step as my "coffee corner" for this process. This is usually done on days that we have to get up and get going quicker or for going on local tours so we have coffee to take with us. It also works great on rainy days because my "coffee corner" is under our awning and dry.
coffee-2.jpg
Black95 is offline   Reply With Quote
Old 01-30-2023, 05:16 PM   #29
Platinum Member
 
Join Date: Apr 2022
Location: Florida
Posts: 191
Default

Thanks for the information and the ideas.
__________________
2002 Chevy Roadtrek 190V
https://www.roadtrek190.com
KurtFranz is offline   Reply With Quote
Reply


Posting Rules
You may not post new threads
You may not post replies
You may not post attachments
You may not edit your posts

BB code is On
Smilies are On
[IMG] code is On
HTML code is Off
Trackbacks are Off
Pingbacks are Off
Refbacks are Off


» Featured Campgrounds

Reviews provided by

Powered by vBadvanced CMPS v3.2.3

All times are GMT. The time now is 09:14 AM.


Powered by vBulletin® Version 3.8.8 Beta 4
Copyright ©2000 - 2024, vBulletin Solutions, Inc.