|
03-30-2022, 06:28 AM
|
#1
|
Bronze Member
Join Date: Jan 2021
Location: California
Posts: 44
|
City water shutoff replacement?
The fun continues,
2006 Roadtrek Versatile Chevy chassis
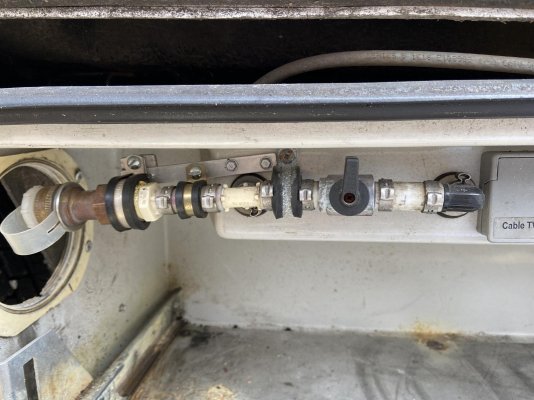
Our city water shutoff valve broke, another project, *sigh*
I'll post the picture below but how are you supposed to replace an inline threaded water shutoff when both sides are immobile? Loosening one side will tighten the other side ... and there's no space and all the connections disappear behind a plastic cover that's solid. And also both fixtures that it connects to are right angled through the cover, so those can't be rotated either ...
I did this on my old Roadtrek but everything was much more accessible, and it was still a 3-day nightmare.
Any advice is appreciated,
Thanks
|
|
|
03-30-2022, 06:29 AM
|
#2
|
Bronze Member
Join Date: Jan 2021
Location: California
Posts: 44
|
|
|
|
03-30-2022, 04:28 PM
|
#3
|
Gold Member
Join Date: Jul 2015
Location: MD
Posts: 85
|
I can think os 2 approaches.
1. Remove the compartment to access the backside to aid disassembly.
2. Use a cut off wheel to remove the valve, then unscrew the remainder and replace with clamped plastic fittings.
|
|
|
03-31-2022, 12:35 AM
|
#4
|
Bronze Member
Join Date: Jan 2021
Location: California
Posts: 44
|
Quote:
Originally Posted by GroupB
I can think os 2 approaches.
1. Remove the compartment to access the backside to aid disassembly.
2. Use a cut off wheel to remove the valve, then unscrew the remainder and replace with clamped plastic fittings.
|
Thanks for the reply, I would like to cut it, but it will be somewhat hard to get the new fixtures that I would want to use in there.
If you've done yours, how do you remove the compartment? If it's too complex to describe, no worries.
Thanks again,
Dave
|
|
|
03-31-2022, 12:50 AM
|
#5
|
Gold Member
Join Date: Jul 2015
Location: MD
Posts: 85
|
I've had the battery compartment off; I believe it is the same.
There are 4 bolts that go through the slide assembly and compartment bottom, attaching the works to two support arms. Remove these and hope there is enough slack in the water lines and electric to get the access needed.
|
|
|
03-31-2022, 01:00 AM
|
#6
|
Bronze Member
Join Date: Jan 2021
Location: California
Posts: 44
|
Quote:
Originally Posted by GroupB
I've had the battery compartment off; I believe it is the same.
There are 4 bolts that go through the slide assembly and compartment bottom, attaching the works to two support arms. Remove these and hope there is enough slack in the water lines and electric to get the access needed.
|
Okay thanks!
Your compartment looks exactly the same, but the plumbing is different of course. Did it come like that or did you cut / unscrew the old stuff and reinstall with PEX? Etc.
Thanks
|
|
|
04-01-2022, 12:00 AM
|
#7
|
Gold Member
Join Date: Jul 2015
Location: MD
Posts: 85
|
I bought used - low mileage. I assume it is as-built.
A slow drip started recently; simple repair with a piece of PEX and new clamps. I was thinking that the leak wouldn't have occurred if the piping was metal.
The grass is always greener.
|
|
|
04-03-2022, 09:16 PM
|
#8
|
Platinum Member
Join Date: Mar 2017
Location: Oklahoma
Posts: 456
|
rhythmtone, my set up on the 2007 210 Popular is exactly the same. Mine leaks in the "on" position and the red handle is just pot metal. I took the handle off and I use a small wrench to operate it and that's ok with me. It appears yours is beyond that solution. I have often wondered if there was some easy way to replace it that wasn't obvious to me and so I appreciate knowing I am not the only one who has had problems with that valve.
I noted that the valve was "Made in Italy" which I though was rather interesting and unusual. I don't ever recall seeing any other small pipe valves made in Italy. Clearly, no thought was given in the design to replacement. It is amazing how much grief something so small that should be simple can cause. If you figure out some magic solution, please post it.
|
|
|
04-04-2022, 12:53 AM
|
#9
|
Platinum Member
Join Date: Nov 2014
Location: PHX, AZ
Posts: 2,660
|
as an outsider ( Pleasure-Way), I'd follow the earlier suggestion and remove that whole mess and replace the valve using a flexible hose, fittings and a couple of clamps
mike
|
|
|
04-04-2022, 01:20 AM
|
#10
|
Platinum Member
Join Date: Dec 2021
Location: Louisiana and Colorado
Posts: 131
|
Would it be possible to cut the pipe on both ends then use shark bite type fittings to rebuild it?
__________________
Enjoying life at our Colorado cabin
2011 Roadtrek C210P
RZR 570, Ranger 1000
Previously: 1999 36' Foretravel, 1998 Newell, 1993 Newell
|
|
|
04-04-2022, 02:09 AM
|
#11
|
Platinum Member
Join Date: Mar 2018
Location: Tinley Park IL
Posts: 370
|
Another reason to NOT use the useless city water hookup...go ahead and blast away
|
|
|
04-06-2022, 12:48 AM
|
#12
|
Platinum Member
Join Date: Mar 2014
Location: Herndon, Virginia
Posts: 507
|
Frankly, I see no other way than to access the back of the panel from the inside. If it is at all like my 08C210P you start by taking up the floor panel near where the water pump is located. I found all the plumbing connections under there. They were CPVC which can be cut and reattached with fittings and a crimp tool available from Home Depot or Lowes. My guess is that what is connected to that bronze Tee to the interior is CPVC and not more threaded pipe. Even with that it is not going to be an easy job. You may have to remove the entire drawer assembly after cutting the CPVC pipes going inside. I know this is small solace, but it is a really crappy design job with no thought to future problems. Good luck.
|
|
|
04-06-2022, 02:41 PM
|
#13
|
Platinum Member
Join Date: Mar 2017
Location: Oklahoma
Posts: 456
|
I have come to the same conclusion as JohnnnyFry. Personally, my problem is just the handle and not the valve itself so I simply removed the handle and use a tool to turn the valve. That being said, I haven't hooked up to a water supply in years since I prefer to just fill the tank from the doors. This is, of course, a Roadtrek specific problem and applies to many years and models.
Most places we spend the night don't have threaded hook ups.
|
|
|
07-09-2022, 07:35 AM
|
#14
|
Bronze Member
Join Date: Jan 2021
Location: California
Posts: 44
|
Thanks for the replies, I am just getting back to this as we moved houses in late April. I did end up removing the entire drawer assembly, basically all bolts were rusted out, and even the drawer rails fell apart during disassembly - rust was probably due to years of slow leakage. I wish that I could've saved the rails, and maybe I could have, but when frustration sets in, of course you're unbolting and ripping, just trying to get access. *Sigh* and I think that the rails were toast anyway.
The electrical and generator connections and exhaust mounts made this even more difficult, but the water lines are fixed, finally. I'm waiting on some new rails and a handful of other small parts to put everything back together, I'll post some pictures tomorrow. FYI, it was difficult, but at least I was able to do everything from the outside, by removing the entire drawer and its surrounding compartment.
Thank you everyone for all the help, it IS much nicer without a leaky valve and the water pump cycling every 30 seconds - the hardest and most expensive parts will be the drawer rails, and the difficult task of riveting that all back together, but oh well. Thanks again!
|
|
|
07-09-2022, 07:49 AM
|
#15
|
Bronze Member
Join Date: Jan 2021
Location: California
Posts: 44
|
To add, the old connectors at the rear, to the brass fittings in my original picture, were plastic pex crimp style with "hand screw hose connectors".
I wanted to reuse them at the rear, but because they were crimped so tight and covered in a black glue-caulk, I basically had to destroy them / cut the pipe to get the water lines off at the rear. There was no way that they were going to unscrew willingly, even with the pex connector removed at the rear, where it connects to the brass fittings. Even after cutting the pipe at the rear, it was impossible to get a good grip on both sides of the drawer wall to unscrew the rear connectors, due to the drawer compartment shape and the tight access, so replacement was the only answer. You could maybe widen both holes with a Dremel and pull the whole assembly through but I really didn't want to damage the brass fittings.
Once I had access, I replaced the rear connectors with "aqua lock" connectors from Amazon which are push-to-connect - shark bite does not make a 1/2" PVC push-to-connect to 1/2" "hand screw" - shark bite style would have had a wrench connector on the brass side, and that may have been fine, but I was worried about getting the wrench in there with such limited access. I'll post photos soon, if anyone is interested, should make more sense with a picture.
Thanks!
|
|
|
07-09-2022, 07:57 AM
|
#16
|
Bronze Member
Join Date: Jan 2021
Location: California
Posts: 44
|
Here are the connectors I used at the rear, after carefully cleaning the old brass fittings, and cutting and deburring the water lines:
Watts 959085 Aqualock (P-615) CTS Quick Connect Female Adapter, 1/2" https://a.co/d/besVPD8
As stated, shark bite surprisingly does not make this connector in 1/2" unless you're willing to use a wrench connection on the brass/valve side
And finally here is the valve that I used, worked great: (lead free)
https://www.ebay.com/itm/12407220730...mis&media=COPY
|
|
|
|
Posting Rules
|
You may not post new threads
You may not post replies
You may not post attachments
You may not edit your posts
HTML code is Off
|
|
|
|
» Recent Threads |
|
|
|
|
|
|
|
|
|
|
|
|
|
|
|
|
|